Switch Pros mount locations?

Warebear

New member
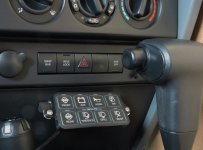
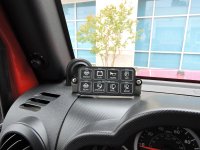
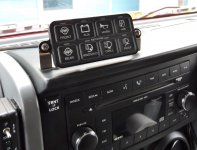
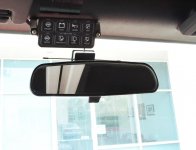
Finished the install today. Such an awesome product! I put the switch panel on the RockHard Cage overhead center bar. I ran the wire for the panel through the firewall on passenger side and then up the b-pilar. I also had to cut the plug to get the wires through the firewall. Since i had to extended the wire about 5' to reach cutting the plug was going to happen anyways. I then drilled and tapped 2 10-24 5/8 bolts for the panel and used a step bit to drill a hold big enough for the plug coming from the panel to go up and through. Ran the cable back and then along the speaker bar. I want to add some foam backing behind the panel to fill in the gaps. Once complete I add some silicon to seal up the top hole.

View attachment 140845
View attachment 140846

Damn that's nice.
 

Switch-Pros

New member
Thanks so much for sharing your installation experience. We learn of a new potential mounting location with each post. Looking forward to hearing what accessories you decide to power with your SP8100!
 

BigPrince

New member
This seems to be a better thread to have put this in so adding to this thread:

I mounted mine to my cage dash bar with zip ties to see if liked it up there before doing anything more permanent.
sp8100-01.jpg
 

Switch-Pros

New member
This seems to be a better thread to have put this in so adding to this thread:

I mounted mine to my cage dash bar with zip ties to see if liked it up there before doing anything more permanent.
sp8100-01.jpg

This is an awesome mounting location. Clean and convenient! Thanks for sharing!!
 

Switch-Pros

New member
Did you need to lengthen the harness in order to accommodate that location? If so, perhaps we need to start building with longer leads?
 

Switch-Pros

New member
'07 JK Mounting Options for SP8100 Switch Panel System

Pics of some mounting options for JK (this rig is an '07)
 

Attachments

  • bottom console center best.jpg
    bottom console center best.jpg
    68.5 KB · Views: 425
  • left dash cu best 1.jpg
    left dash cu best 1.jpg
    111.7 KB · Views: 422
  • mid dash best.jpg
    mid dash best.jpg
    84.8 KB · Views: 424
  • mid visor good.jpg
    mid visor good.jpg
    63.4 KB · Views: 423

BigPrince

New member
Let us know what you end up adding, so that we can make changes to our build specs.

Speaking of wiring, not sure if anyone else has the same issue but I had to cut the connectors off the wiring to get it passed into the cab from the engine bay. I have the tool to remove the wire leads from the connectors but couldn't get them out. It was just a hair too big.
 

Switch-Pros

New member
Any chance you checked both pass-throughs? We have found one side is larger, and should not require you to remove the connector.
 

Switch-Pros

New member
The connector will fit through the drivers side feed through. You will still have about 1 foot left plus the 5 feet long switch panel harness.

Robert
 

H8ROADS

Caught the Bug
Could someone highlight how this wires up under the hood. I'm familiar with sPOD and other solutions, but I'm curious what the wiring looks like under the hood. All the shots I see are just for the connection to the switches itself. I want to see the rest of the wiring.
 

boardsurfer

Active Member
Could someone highlight how this wires up under the hood. I'm familiar with sPOD and other solutions, but I'm curious what the wiring looks like under the hood. All the shots I see are just for the connection to the switches itself. I want to see the rest of the wiring.

Did you see my short write-up? It's here I think you were out of town when I posted that.

Besides the switch connections, there are only 4 wires. Batt+, Batt-, Accessory power in the fuse box, and a wire that connects to the side marker wire.
 
Top Bottom