The very best part of owning a Jeep Wrangler is being able to go topless and of course, remove the doors! This short write-up is available in the JL User Guide and the photos are from it but I've made it available here for those of you who might appreciate having something online to use as a quick reference.
What you will Need
• Torx T-50 Bit
• Torx T-40 Bit
• Ratchet
• Inch Pound Torque Wrench
JL Wrangler Front Door Removal
Before starting, it's always helpful to be parked on level ground and in an area with lots of room around your Jeep. The doors are heavy and once they're off, you're it'll help if you have an easy and straight path to wherever it is you'll be storing your doors.
1. To prevent any damage and to help make it easier to carry your doors, be sure to roll down the glass windows before you start removing your doors.
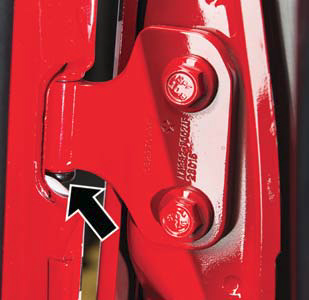
2. Starting on the driver side, open up your door and then use a Torx T-50 bit to remove the 2 screws securing it to the upper and lower outside hinges.
NOTE: The cargo tray under your rear deck is molded with holes that'll allow you to store your hinge pin screws.
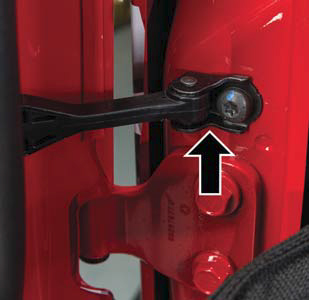
3. Unlike previous Wranglers, the JL comes with metal check straps and you will need to use a Torx T-40 bit to remove the screw securing your door to the door frame.
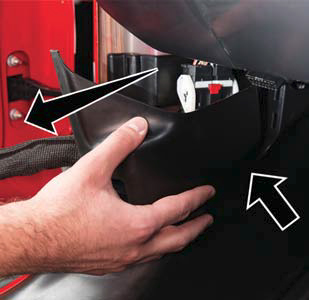
4. Underneath the dash, you will find a plastic access panel covering the plug for your door's wiring harness. To remove it, simply slide the panel back along the door frame until the tabs are free. DO NOT pry back the panel as that will cause it to break.
5. In order to unplug the wiring harness, you will need to first unlock it by pulling the red locking tab UP. #1 in the image below shows the locking tab.
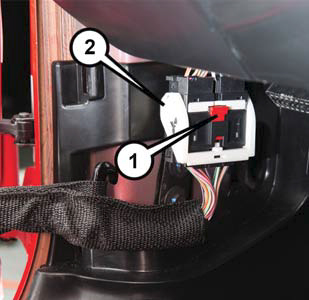
6. Now, you will need to push and hold down the black security tab under the connector and then lift the white lever to release it. #2 in the image above shows the lever.
7. With the connector released, hold it firmly and then pull downward on it until it separates from the plug. The wiring harness can now be stored in the basket of the door.
8. Again, make sure you have clear path to wherever it is you'll be storing your doors as well as something to set them on to prevent any damage. Place one hand underneath your door and the other on the side for balance and then, carefully lift it up until the hinge pins clear the hinges.
9. Repeat steps 1-8 on the passenger side of your Jeep.
JL Wrangler Rear Door Removal (4-Door Models)
1. Begin the removal of your rear doors by rolling down the glass windows.
2. Next, slide the front seats to the forward most position to make it easier to access the B-Pillar access panel.
3. Again, starting on the driver side of your Jeep, open up your rear door and then use a Torx T-50 bit to remove the 2 screws securing it to the upper and lower outside hinges.

4. Use a Torx T-40 bit to remove the screw securing the check strap to the door frame.

5. On the bottom of your B-Pillar, carefully pry open and remove the plastic access door cover the wiring harness.
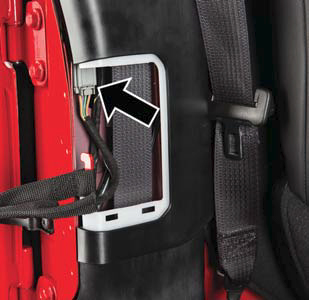
6. Firmly grab the wiring harness connector, depress the tab on the bottom of it (black arrow on photo above shows this tab) and then pull it downward until it is free of its plug. The wiring harness can now be stored in the basket of the door.
7. Place one hand underneath your door and the other on the side for balance and then carefully lift it up until the hinge pins clear the hinges.
8. Repeat steps 1-7 on the passenger side of your Jeep.
Reinstalling your doors is as simple as following this write-up in the reverse order. To make things easier, you'll see that the upper hinge pins are slightly longer and they are designed this way help you guide the doors in place. It is important that you NOT over tighten the hinge screws as you can break them and they will only need to be tightened to 90 INCH lbs. of torque.

