PRESS RELEASE : Meet The New Jeep JK BIG BORE XDII-R

View attachment 274226View attachment 274227

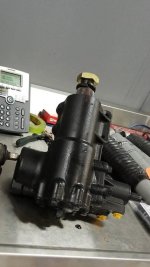
My XDll-R arrived this weekend! It is massive. You can see how much larger it is than the OEM unit that I pulled when I installed the big bore XD. When I pull the old XD next weekend, I will layout all three gears to show the difference.


Sent from my iPhone using WAYALIFE mobile app

Good shit man. Mine is arriving tomorrow.... I am very excited.
Did you do any research on the flush?
If you don't mind, how long did it take you to switch out the box the first time? I
Did it come with any kind of instructions?
 
I found this on WOL from 2013 for the flush. This is what he did and I'll start there.

"Tools and materials that I used:

Small adjustable wrench or 10 mm socket.
Small locking pliers.
~5' long 3/8" ID, 1/2" OD Clear Plastic Tubing.
3/8" Male-Male Pipe Barb.
1/4" to 5/8" Pipe Clamp
Flathead Screwdriver
Small ~6mm (small end) to ~9 mm Rubber Stopper
Pump from an old soap bottle (Turkey Baster is no doubt better).
Silicon spray lube
Latex or rubber gloves
2 Quarts ATF 4+

Procedure:

1. Remove the air filter housing. Start by undoing the four clips on the cover, and disconnecting the crankcase ventilation hose. Remove the cover and bend the snorkel, pushing it off to the side (I put it over the radiator. If you're inclined, disconnect the snorkel and remove completely from the engine compartment. If you have very small hands that can squeeze between the air filter box and the PS reservoir you might be able to skip this step entirely). Remove the air filter and set it gently aside if you intend to reuse it, or else it's obviously a good time to replace if needed. Next remove the bottom of the air filter housing by wiggling it upward with a moderate amount of force. It is held in place only by three pins in rubber grommets. There are no fasteners as the Chilton Manual led me to believe. (You could also disconnect the snorkel and remove the air filter and housing as one piece, but if the housing is particularly dirty you might risk fouling the filter.)

2. Prepare reservoir for flush. Place enough rags underneath the Power Steering reservoir to catch any spills. (I noticed too late that I had dripped ATF on a wiring harness.) Open the cap on the reservoir and use a turkey baster or small hand pump to remove as much fluid as possible (for me it was about half a pint), taking care not to damage the screen. Place the cap back on the reservoir. Remove the one 10 mm bolt holding the power steering reservoir. (Not strictly necessary but helpful). Get your clear plastic hose, pipe barb, pipe clamp and rubber stopper, and pliers, and screwdriver ready.

3. Connect PS return line to tubing. Grab the PS reservoir and tip it perhaps 30-40 degrees with the return line facing up so that it's less likely to spill. Use pliers (or your fingers if you are brave) to pinch the clamp holding the PS return line. I slid it down 4-5 inches and released it there temporarily, it didn't seem to do any harm to the tubing. Others might not want to risk damaging the tubing especially if it's in poor condition. In any case, wiggle and pull the return line off the reservoir, trying to keep it upright. Place the rubber stopper in the PS return line entrance to the reservoir and return the reservoir approximately to its normal position. Slide the hose clamp onto the return line. Place one end of the barb in the clear plastic tubing and the other in the PS return line. Slide the hose clamp over the barb and tighten it down with the screwdriver. Place the other end of the clear plastic tubing into a bottle or tub to recieve the old fluid.

4. The Flush. Open the reservoir cap and fill up the reservoir with fresh ATF 4+ almost to the top. Rock the steering wheel back and forth moderately 10-15 times. (I did it "dry", some might want to lift up the front end.) Check to see if the old fluid is being pumped out. Check the level in the reservoir and as needed. You'll need to get a feel for how much you can move the wheel before it's time to fill the reservoir again, don't let it get too low. Repeat until you see clear fresh fluid coming out the return line.

5. Finishing up. Pump the fluid in the reservoir back down by rocking the steering wheel until the level is about where it was when first sucking/ pumping the old fluid out of the reservoir in step 2. Replace the cap on the PS reservoir. Loosen the hose clamp on hose barb on the return line. Remove barb and hold up return line and plastic tubing to minimize spilling and let the fluid drain out of the clear plastic tubing. Hold PS reservoir as in the start of step 3, remove rubber stopper and reconnect return line. Use pliers to depress the factory clamp and slide it up over the entrance to the PS reservoir. Return PS reservoir to original location and reattach bolt. Remove cap again, fill reservoir to about the max line, replace cap again. (I used a little over one quart if ATF 4+ total for the whole procedure. It might be possible to use less than 1 quart if you catch the exact moment that the fluid turns clear.) Replace bottom of air filter housing (It helped to give a shot of silicon spray lube on the rubber grommets to get the pins to go in again). Replace air filter and cover. Re-clip 4 clips on the cover. Reattach CCV hose. Reattach snorkel if you removed it.

6. Workout air, test drive. I rocked the steering wheel dry a few more times. Then went on a short test drive around the neighborhood, with lots of turns to workout any potential air from the system. If you are careful not the let the level get too low in the reservoir you shouldn't have any problem with air, but if you do it's not that hard to work out. The level in my reservoir actually went up after my test drive due to the fluid warming up. The steering felt a little smoother and easier for me but it might have been all in my head. At any rate this is a fairly easy, often neglected bit of maintenance that should make life easier for the PS pump, prevent corrosion, and maybe even make it a little easier on your arms. When I do it again in 5 years I'll provide pictures! This time I was feeling my way around in the dark to a certain extent. I welcome comments and corrections."


Sent from my iPhone using WAYALIFE mobile app
 
I followed Eddies JK Steering Box Removal & PSC O-Ring Replacement instructions and modified it for the swap. It was a huge resource!! The only change is instead of strapping the steering wheel to the break pedal, strap it to the mount behind pedal. If you strap it to the pedal it can damage the brake light pedal sensor. If you do damage it, it is a easy fix but try to avoid putting pressure on the pedal.

https://wayalife.com/showthread.php?t=24849

It took me about 3 hours to swap them and then about an hour to purge the air and test it. The other thing to to remember is the set screw that attaches the steering shaft to the gear is only threaded on one side. Make sure you put it back it the same way it came out.

Hope this makes sense!!


Sent from my iPhone using WAYALIFE mobile app
 
Last edited:
I followed Eddies JK Steering Box Removal & PSC O-Ring Replacement instructions and modified it for the swap. It was a huge resource!! The only change is when you strap the steering wheel to the break pedal, strap it to the mount behind pedal. If you strap it to the pedal it can damage the brake light pedal sensor. It you do damage it, it is a easy fix but try to avoid putting pressure on the pedal.

https://wayalife.com/showthread.php?t=24849

It took me about 3 hours to swap them and then about an hour to purge the air and test it. The other thing to to remember is the set screw that attaches the steering shaft to the gear is only threaded on one side. Make sure you put it back it the same way it came out.

Hope this makes sense!!


Sent from my iPhone using WAYALIFE mobile app
Thank you, It will make sense to me when I do it. Thanks for your time to respond, I very much appreciate. [emoji108][emoji869]
 
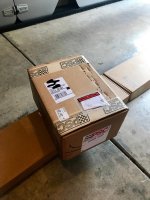
My steering box showed up today
IMG_5525.jpg
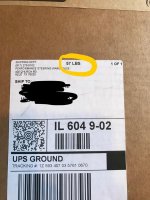
The packaged weight 57lbs
IMG_5526.jpg
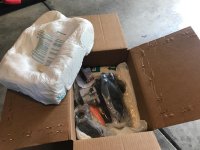
Well packaged as expected form PSC
IMG_5527.jpg
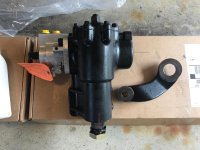
It is massive and weighs like 50lbs, pitman arm another 7lbs I would say.
IMG_5528.jpg
 
Might just be paint. It yours looks a little different than a local guy that just got his. Wonder why they painted his and left yours unpainted.
 

Attachments

  • IMG_3879.jpg
    IMG_3879.jpg
    56.8 KB · Views: 152
So PSC releases these as a pre-order, sells a handful of them and now it's another 5-6 week preorder? :thinking:
 
You had the big bore XD before right?
What made you switch to this over the other one?
Still on the fence as to which route to go.

My big bore XD has an internal defect. PSC is swapping it out and offered to upgrade me to this one. The added strength is the #1 reason for going in this route. I hope to not need to install a ram assist in the future, that is the other reason.


Sent from my iPhone using WAYALIFE mobile app
 
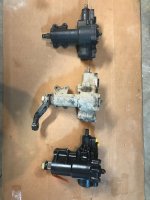
If there's any question how much larger the XDll is to the XD and stock this answers the question!Image1504371974.719002.jpg
From left to right, OEM, Big Bore XD (just back from Drummond) and the new XDll.


Sent from my iPhone using WAYALIFE mobile app
 
The trick on the flush is to disconnect the return line, cap the port on the reservoir and extend the line to a jug. IMG_8101.jpg I ran the whole jug of the cleaning fluid thru it by turning the wheels back and forth with the engine off and adding fluid to the reservoir as needed until it was gone. Because I am doing the swap, I continued turning the wheel until the cleaning fluid stopped coming out of the return line. The best thing was, No mess disconnecting the old pump!!


Sent from my iPhone using WAYALIFE mobile app
 
The trick on the flush is to disconnect the return line, cap the port on the reservoir and extend the line to a jug. View attachment 275024 I ran the whole jug of the cleaning fluid thru it by turning the wheels back and forth with the engine off and adding fluid to the reservoir as needed until it was gone. Because I am doing the swap, I continued turning the wheel until the cleaning fluid stopped coming out of the return line. The best thing was, No mess disconnecting the old pump!!


Sent from my iPhone using WAYALIFE mobile app
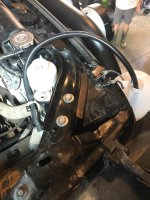
That's was I was thinking of doing, this made most sense to me.


Sent from my iPhone using WAYALIFE mobile app
 
I have the XDll up and in! It is a beast to lift up and install from the bottom. I had a strap lowered down from the with my dad at to top taking up the slack as it went in. If you go in from the bottom, you will need to disconnect the front left ABS wire and pull that harness out of the way to get it in. Secure that lower front bolt thru the frame and it is easy from there. Good luck!


Sent from my iPhone using WAYALIFE mobile app

Thanks for the info, great idea with the strap.


Sent from my iPhone using WAYALIFE mobile app
 
Top Bottom