My own JK 'Big Brake' research:

Teaser pic!!! The test caliper arrived a day early. It is HUGE. And gorgeous :) I just got home from a 16 hour shift, so don't be disappointed, but no, I'm not going to the Jeep to take a mounted pic until tomorrow! ;)

Here she is!!

View attachment 31538

:crazyeyes: ohhh that's !!!! I'll sleep for you so you can test fit hahahahaaa...rest up and......... wow!!! those look nice :thumb:
 
OK, ok...so someone is gonna shoot me for not getting to mock up that caliper today. ;) Will do tomorrow... kids came first today :) But we did thoroughly clean the undercarriage of the Jeep today to make for better pics tomorrow!
 
OK, ok...so someone is gonna shoot me for not getting to mock up that caliper today. ;) Will do tomorrow... kids came first today :) But we did thoroughly clean the undercarriage of the Jeep today to make for better pics tomorrow!

:eek: kids came first??? well that's just fantastic! they should come first. I'm off to hangout with my daughter and let her drive some. I couldn't get her to drive last year (dirt roads only ofc) but now she's seeing a DL in her too near future is showing more interest, I may need a new Jeep as she reminded me I told here she could have mine --I told her this when she was 5!!! she's not supposed to remember this :doh:

looking forward to the mock up and seeing that clean undercarriage :thumb:
 
Caliper Mock Up

So here is some fun stuff! Got to pull the wheel and take a few measurements, mount the big rotor and caliper, check clearances, etc! I took alot of pictures, hi-res, but for ease of viewing I am posting them on here at 1024x768 size so they aren't like 10MB each :) Pay attention to the captions under each pic for explanation of the significance of that particular picture.


caliper nub height.jpg
In this pic I am measuring the height from the outer edge of the mounted rotor to this odd little 'nub', which is by far the highest point of the caliper. I don't think it will end up being an issue, but I wish I knew what it was for and if I could safely just cut it off. I just don't want to cut into a fluid passage inside the casting...

Caliper test fit (2).jpg
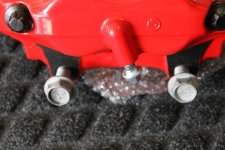
This one shows the maximum width of the caliper outside the outer surface of the rotor. I measured from the outer brake pad surface here. It's just shy of 2.5" This is significant and I will explain at the end of the pics.

Caliper test fit (3).jpg
Calipers side by side for comparison of size increase. Makes me drool... :yup:

Caliper test fit (4).jpg
Calipers side by side for comparison of size increase.

Caliper test fit (5).jpg
Calipers side by side for comparison of size increase.

Caliper test fit (7).jpg
This one shows clearance of all steering components at full lock.

Caliper test fit (8).jpg
This one shows a comparison of the rough mounted size difference. I have the stock caliper at the bottom. I could not slide it completely on due to the dust shield being in the way. But it give you an idea of the gain :)

Caliper test fit (11).jpg
Another straight on 'mounted' caliper comparison.

Caliper test fit (13).jpg
Another 'nub' height check.

Caliper test fit (16).jpg
Maximum radius check for wheel fitment. This pic shows right at 8" from hub center. It's actually a touch LESS than this because the caliper in this mock up is actually not sitting down over the rotor as far as it will in its final position.

Caliper test fit (17).jpg
Another max radius check, at the lower end. It is less that the pic above because this end is slid down over the rotor closer to its true mounted position. (I was just using 1 mouning bolt to hold the caliper on, which lets the low end of the caliper swing inward more.)

Caliper test fit (20).jpg
A pic of the whole thing mocked up - so you knew I was truly mounting it on a Jeep and not just messing with you guys! :D

Caliper test fit (25).jpg
One more pic of the whole thing... what a gorgeous, HUGE caliper, huh?? :rock:

Caliper test fit (36).jpg
This pic shows the stock caliper highest point outside the rotor edge. Just checking wheel clearance here.

Caliper test fit (38).jpg
This pic shows a very important measurement: this is the depth of the stock caliper outside the outer rotor face. It is roughly 1 3/8" = 1.375" More discussion below!

---------------------------

So here are the key points:

- This rotor and caliper is adaptable and will clear all stock steering components.

- The maximum diameter, using the 14.2" rotor and including that stupid little nub on the inboard side of the rotor is approx 16.375". This will clear most 17" rims!! Alot of rims, especially the stock ones, taper from about 17" inner diameter at the innermost edge of the wheel, to about 16.25" at the flange that bolts to the vehicle hub. The stock Rubi wheels actually have a huge step that narrows to < 16" just before the mounting face. More discussion below.

- A machined caliper adapter plate will be required to mount the caliper in its final location. I kinda expected this. There are too many variables to expect to have a massive brake upgrade like this just bolt right on. The OEM uses too many different wheel offsets, rotor offsets, knuckle shapes, etc to find one that matched the same caliper bolt spacing as the stock JK one.

- Due to the increased width of the caliper compared to stock, either a wheel spacer or a wheel with less backspacing will be required. The factory wheel, as we all know, has a HUGE backspacing. This places the inside of the wheel 'spokes' really close to the outer surface of the factory caliper. Just look at any stock JK front wheel and this is easily seen. So, using just the ROUGH measurements I showed above:

Factory outer caliper depth outside of rotor = 1.375"
Max new caliper depth outside of rotor = 2.5"

So with simple math, to safely fit this brake setup you need one of two things:
1. Factory wheels, but running at least a 1 1/8" wheel spacer (1.25" preferred)
2. An aftermarket wheel with 1 1/8" LESS backspacing. Factory backspace, if I recall correctly, is 6.25". So roughly a wheel with 5" of backspacing or less.

My thought, and please correct me if you all feel differently, is that this shouldn't be a significant issue. A large proportion of us, that I've seen on this forum, aren't running factory wheels with that ridiculous backspacing anyways. Many of those that ARE keeping factory wheels are running spacers already. As part of our whole focus on increasing the safety of our rigs, the less backspace (or spacer equivalent) only helps the stability of our rigs in turns and on sideslopes, so I hope that there won't be too many people that 'poo-poo' this brake mod simply because they can't keep their factory wheel setup. Open for discussion...

I will post more thoughts later tonight... things like details of the caliper mounting adapter, etc.

Hope you guys enjoy the new pics!!
 

Attachments

  • Caliper test fit (28).jpg
    Caliper test fit (28).jpg
    68.1 KB · Views: 540
Oh, and BTW, when my new Hutchinson RockMonster wheels arrive next week, I will test mount with wheels. The backspace on the RMs is around 4.6", which should meet the requirements I noted above. I may also be running a small spacer in addition to make my own setup hub-centric AND wheel-centric, so I'd have even more clearance. But the key point I'm making is that I will recheck the fitment next week when my wheels arrive and prove my idea about needing less backspacing.
 
and it's red!! looking forward to see it on the 14" rotor!
With what and how did you get the underside of your Jeep so clean??? mine wasn't that clean new
 
and it's red!! looking forward to see it on the 14" rotor!
With what and how did you get the underside of your Jeep so clean??? mine wasn't that clean new

Haha. I live in West Texas. It's not hard to clean when there's nothing but dust around you! It's been so ridiculously dry here the last year since I got the Jeep, I bet it's only gotten wet 5 times!
 
Wow. Those are gonna provide some serious stopping power. Love it!

Thanks! I hope they do, too! The next step is the measurements for the caliper adapter bracket. I think I may fab a test bracket out of some extra lexan scraps I have laying around, then adjust as needed and finalize the shape, then bring the drawing to the machine shop for one to be cut out of steel. Keep your fingers crossed!!
 
View attachment 31719
In this pic I am measuring the height from the outer edge of the mounted rotor to this odd little 'nub', which is by far the highest point of the caliper. I don't think it will end up being an issue, but I wish I knew what it was for and if I could safely just cut it off. I just don't want to cut into a fluid passage inside the casting...

I think that's a "clearance reduction nub" HAHA.

All I can say is that looks amazing. Refresh my memory but did you end up deciding that a new master cylinder was required to run the new beefed up calipers, or was the stock master going to have enough umph? Cant wait to see it once you get your new rims and tires installed, and get some actual on road test data.

I am picturing you cruising down the road with those 37's at 60 and lighting up the brakes to see what they can do! :D Thanks for all the hard work and research man!
 
That's too funny! I almost called it the same thing! As far as the master cylinder, yes...you will probably WANT to change it, even if the old one was 'acceptable' at driving these new calipers. Without the proper ratio of MC bore diam to the caliper piston volumes, I think we are wasting our time. Too small a MC bore will produce a really soft, easy to press pedal, but you will hit the floor before you can properly squeeze the calipers. It's a balance with this part. Too big a MC bore and you have to have an iron leg to press the pedal, but it will move alot of fluid and lock the wheels. Too small and it will have a great hydraulic advantage (soft and easy on your leg), but you will need 3 feet of pedal travel to realize the potential of those calipers. I also may have a small amount of variability to explore regarding the pedal ratio (involves moving the push rod that travels through the firewall higher or lower on the brake pedal to change its ratio). Lots of fun stuff to try and work out and make our rigs stop like they were supposed to!!

Can't wait to pull the ABS fuse out, go about 50 mph and lock all four 37s on dry pavement!! :yup: You can bet there will be a video on here the first time that happens!!
 
So just curious... is there any major heartburn out there about the backspacing/wheel spacer requirement for this brake upgrade? Just curious...

(See discussion in long post with pics above)
 
So just curious... is there any major heartburn out there about the backspacing/wheel spacer requirement for this brake upgrade? Just curious...

(See discussion in long post with pics above)

No concern here. I have Hutchinson's like you, but with 1.5" Spydertrax because I have coil-overs to clear. However, I would like to run a smaller spacer like you are planning. Much less than 1.5" and you will either have to trim the factory studs, or countersink the back of the wheels. I wasn't up to either of of those options, so I'm curious what you plan to do there...?

Dave

I'm personally ordering a custom set of spacers from this site: http://www.motorsport-tech.com/

I want to be able to keep a hub-centric and wheel-centric wheel mount, and these guys will machine them exactly that way. With my spyntec conversion up front it was hard to find someone that could machine the approx 107mm wheel centric lip when the hub is already the same size (107mm). These guys will match the taper down the hub (the hub narrows from the wheel mount to where the locking hub dial is, as I'm sure you know) from the wheel mount flange on the hubs, which then allows them to machine a wheel-centric lip at the same 107mm. For my rears, I have a set of RCV 300M shafts which have the stock JK 71.5mm hub. The bolt pattern is dual 5 on 5" or 5 on 5.5" which was the easy part. These guys will machine the spacers to have a 71.5mm ID on the inner side to make them hub-centric, and them a 107mm outer lip, to make them wheel-centric with the Hutchinson's I ordered. My only decision is how thick to make them. So my issues are a little different. If my stock studs are too long at the depth of spacer I decide on, I'll just grind them down. Or, seeing my hubs are new anyways, I will just choose shorter studs before I install them.
 
No concern here. I have Hutchinson's like you, but with 1.5" Spydertrax because I have coil-overs to clear. However, I would like to run a smaller spacer like you are planning. Much less than 1.5" and you will either have to trim the factory studs, or countersink the back of the wheels. I wasn't up to either of of those options, so I'm curious what you plan to do there...?

Dave

BTW, do you have a pic of your rig with the 1.5" spacers and the Hutchinson's? I was curious what the stance looked like! Thanks in advance!
 
The other reason moght be that alumium serves as a much better heat sink. That said, the large rotor is what will be dissipating the vast majority of the heat here.

I'm still reading this great thread for the first time, but wanted to say that Aluminum is going to be 'stiffer' than a steel plate and should minimize deflection under heavy load. I certainly don't know the specs or metallurgy of the steel used, so can't say this is for sure, but...
 
Top Bottom