Radious arm rescue kit

Got some time to get some work done this weekend.
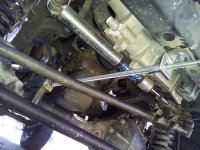
Removed lower fronts and crossmember. Cut and ground down excess metal from stock brackets. Fitted new upper brackets and made relief cuts in crossmember to allow for added 1/4" bracket on each side.ImageUploadedByWAYALIFE1393331130.803061.jpgImageUploadedByWAYALIFE1393331147.728065.jpgImageUploadedByWAYALIFE1393331165.266624.jpgImageUploadedByWAYALIFE1393331179.335864.jpg.
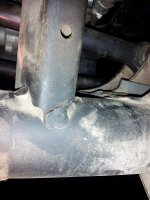
Welded up the relief cuts as well as a couple of small spots needing some love on the crossmember.
 
Last edited:
I think Eddie called it on this side effect on the radious arm setup. Cracked/broken factory weld on passenger upper control arm bracket.
 

Attachments

  • 20140226_180001 - Copy.jpg
    20140226_180001 - Copy.jpg
    328.7 KB · Views: 147
Got the lower arms on Thursday. With a little help from a floor jack and cheapo ratchet strap I was in business. ImageUploadedByWAYALIFE1393685991.105489.jpg
 
Made a little more progress today between the rain showers. Got the new upper adjustable arms set to ballpark length.ImageUploadedByWAYALIFE1393726693.076793.jpg
Needed a boost again with the strap and after using some anti seize on the bolts, had the driver side bolted up.ImageUploadedByWAYALIFE1393726820.452385.jpgImageUploadedByWAYALIFE1393726837.279211.jpg
 
For anyone interested, here is the old front radious arm setup that was on my jeep when I bought it.ImageUploadedByWAYALIFE1393727936.439066.jpg

The rescue kit will return the front 4 link design while keeping the long arm lower ca's and crossmember.
 
Finished bolting up and round 1 on the torque run through. Couldn't resist taking it around the block and everything seemed fine, but as I kind of expected was squirrelly as hell. Got back and after the damn rain stopped again I referred to Eddies alignment/ caster check.

First I confirmed the driveway was a couple of degrees out of level.ImageUploadedByWAYALIFE1393805420.620293.jpg

Next, using a 2' framing square I set and held it on the upper ball joint to make it easier to see the protractor in front of the tire, was able to verify I had zero positive caster and now need to get to 4*. Was able to get closer than I thought I would on presetting the new arms. ImageUploadedByWAYALIFE1393805920.705439.jpg
 
Rebel JK did you ever get those rubber bushings that you needed. I sent that link to your phone when I was over there Saturday during the BBQ to see if you could get those Currie bushings?
 
Havent got anything yet. Had my hands full getting everything back together to get back on the road and ready for the next run. Will be getting back to those soon.
 
Didn't really know how many turns per degree to get what I needed so spent a few minutes putting together a jig to rotate axle with upper arms disconnected. Was able to adjust axle to desired degree caster and then rotate adjustable arms accordingly to match bracket holes. Figured out I needed 2-1/2 turns to gain 1 degree of change. Probably didn't save any time overall but always up for trying a new idea.
 

Attachments

  • image.jpg
    image.jpg
    127.9 KB · Views: 48
Top Bottom