As we started to build up our 1997 Jeep XJ Cherokee, one of the things we wanted to do was run as big of a tire as we could and with as little of lift as possible. And, after doing some research, we decided to try running a set of 285/70R17 Nitto Trail Grapplers which have a true measurement that's just shy of an advertised 35x12.50R17 and run them with just a 2.5" Rancho lift kit. Of course, this wouldn't be remotely possible without doing some kind of trimming of the body and, that's why we picked up a set of Bushwacker Flat Fenders.
Having installed a set of Bushwacker Flat Fenders on our old 2009 Jeep JK Wrangler in the past, I knew they would look factory when finished, would be light weight, would offer a lot more clearance under the wheel well and would also be durable. Once I realized just how much I would need to trim to get them installed, I knew these would be perfect for our needs. The below is an installation write-up on how to install these flat fenders on a 1997-01 XJ and I point that out because there are a few things you will have to do differently on an earlier model XJ. Also, I should point out that this write-up should be used as a compliment to the instructions provided by Bushwacker.
What you will need
• Utility Knife
• #2 Phillips Drive Bit
• Electric Drill
• 1/4” & 7/64” Drill Bits
• #2 Phillips Screwdriver
• Socket Wrench
• 1/4” Socket
• 7mm, 8mm & 10mm Sockets
• Scratch Awl
• Angle Grinder
• Soft Wiping Cloth/Shop Towels
• Pry bar/Claw Hammer
• Safety Glasses
• Grease Pencil/Marker
• Partner/Helper
• Putty Knife/Molding Remover
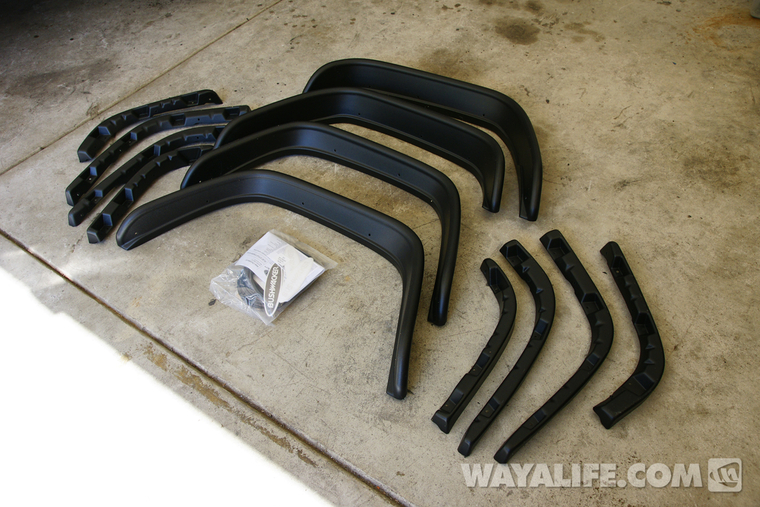
Here's a shot of everything you will get with your new Bushwacker Jeep XJ Flat Fenders.
Instructions
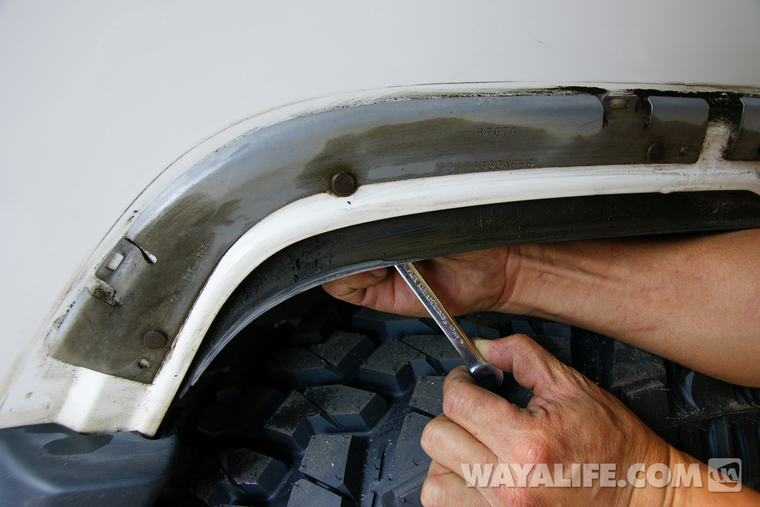
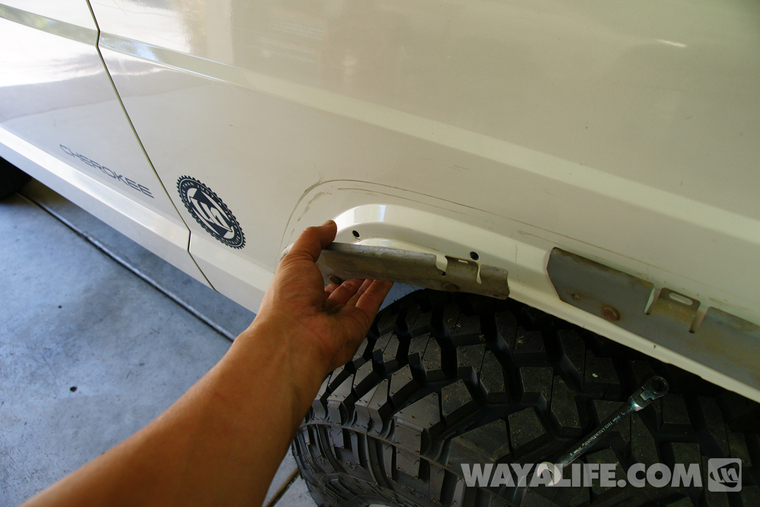
1. The plastic factory fender flares are attached to metal brackets that are bolted to the body (photo only shown with the bracket). Using a 10mm wrench, remove the 7 nuts securing the bracket and pull the entire fender off the body of your Jeep.
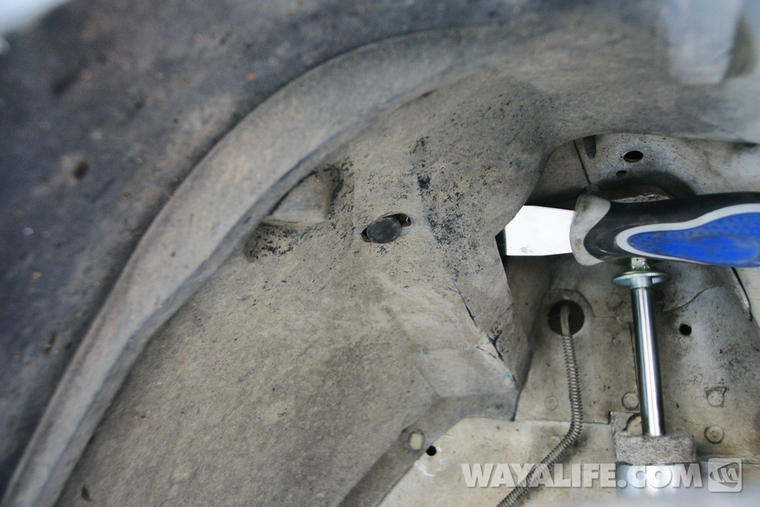
2. Remove the fender liners from wheel wells using a pry tool or flat head screw driver. There are a total of 7 tabs that will need to be pulled in order to remove the liner.
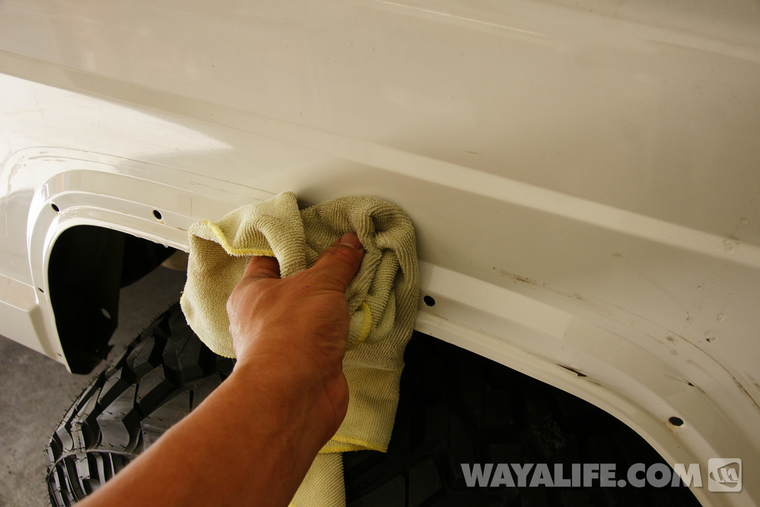
3. Clean the body panels around the wheel well with rubbing alcohol and a clean rag.
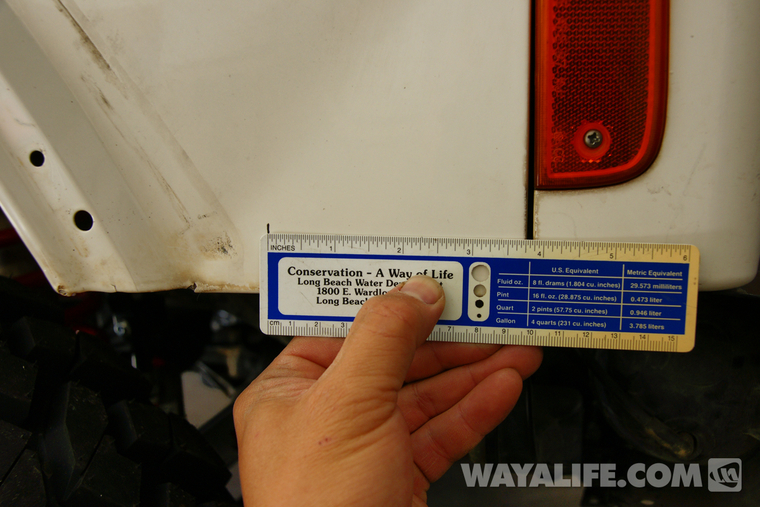
4. Measure 3-3/4” from the forward edge of the body panel back toward the fender well and then draw a small vertical line with a grease pencil.
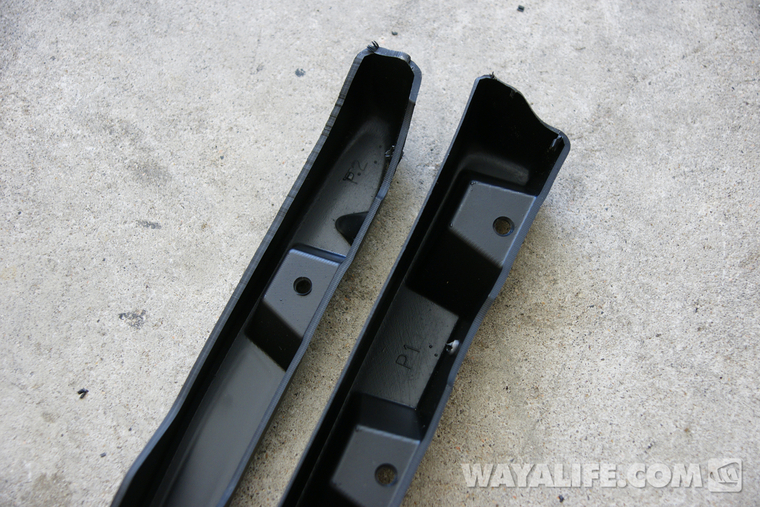
5. Starting on the passenger side of your Jeep, find the plastic inner structure pieces with P1 and P2 stamped into the mold.
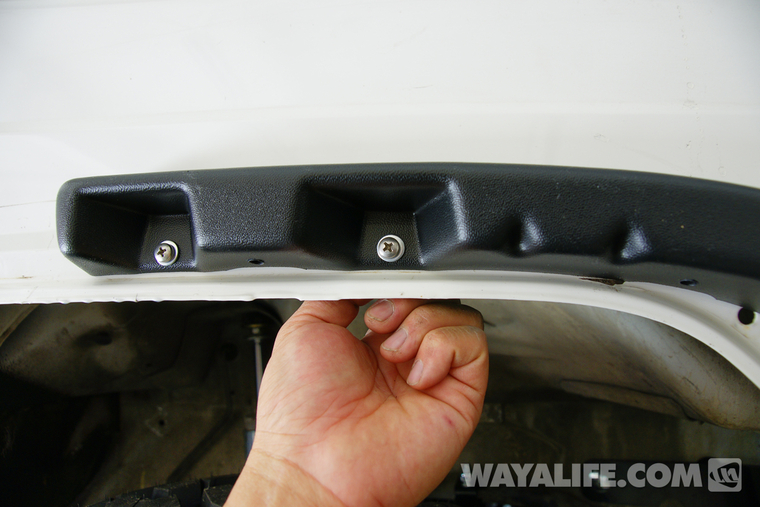
6. Place the P1 piece up against the fender so that the 2 rear holes line up with the existing mounting holes on your Jeep. Use 2 of the washers, M5-.8 machine screws and flange nuts provided to loosely secure the P1 piece on to these 2 holes.
7. Position the P1 piece so that it lines up with the mark you made on the body panel back in Step 4. Then, use the P1 as a template to mark the position of the front hole with a grease pencil.
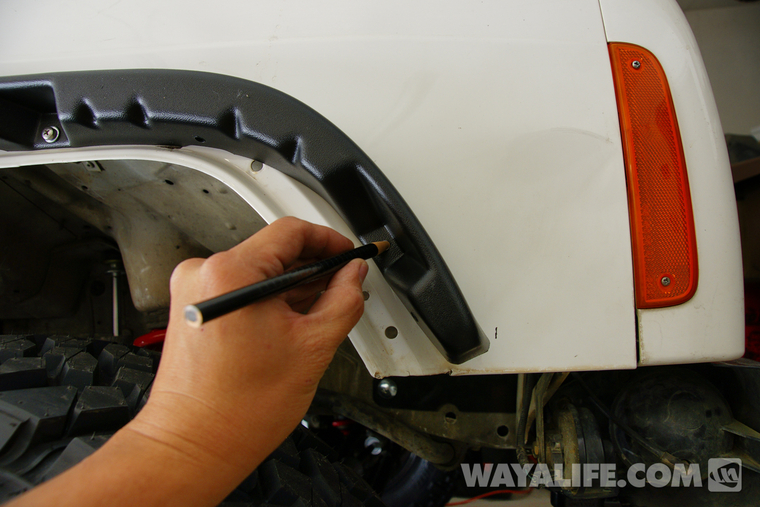
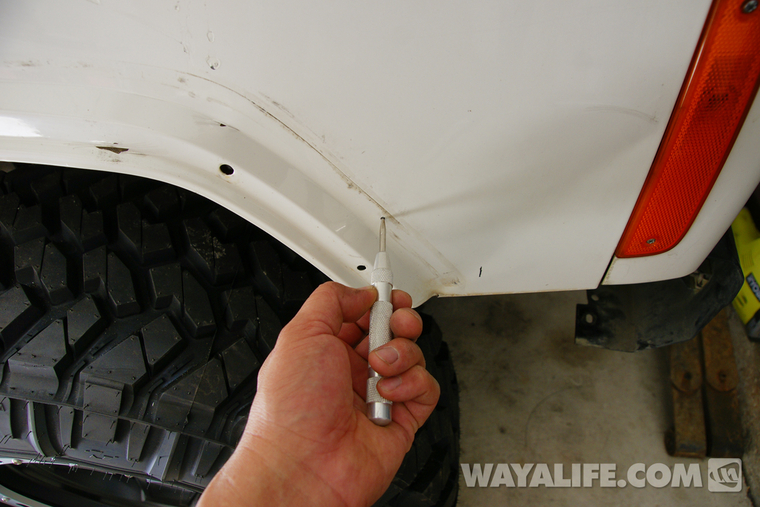
8. Remove the P1 piece and then center punch the mark you just made.
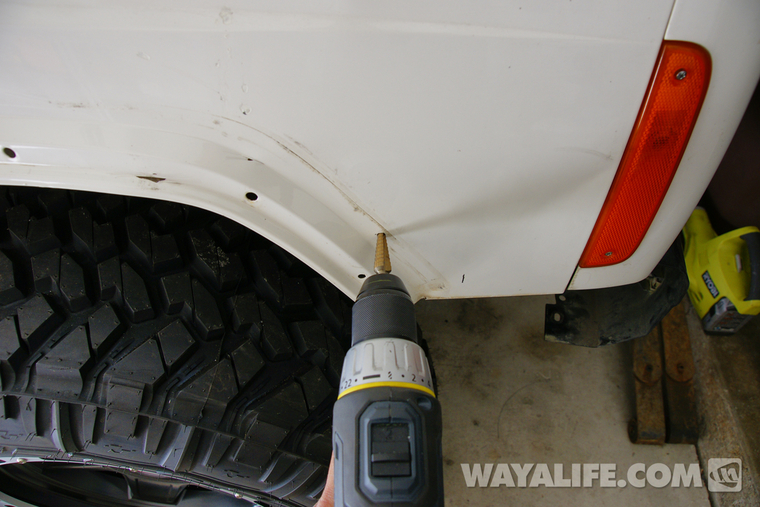
9. Use a unibit or 1/4" bit to drill a hole at the point you just marked.
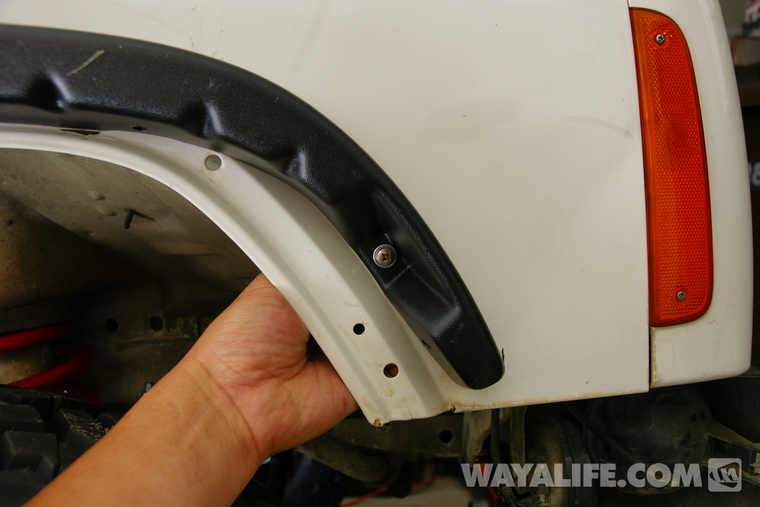
10. Reinstall the P1 piece and secure it in place using the washers, M5-.8 machine screws and flange nuts provided. Leave the bolts and nuts only hand tight for now.
11. Measure 4-1/2" from the door edge seam, along your Jeep's style line and then make a mark with a grease pencil.
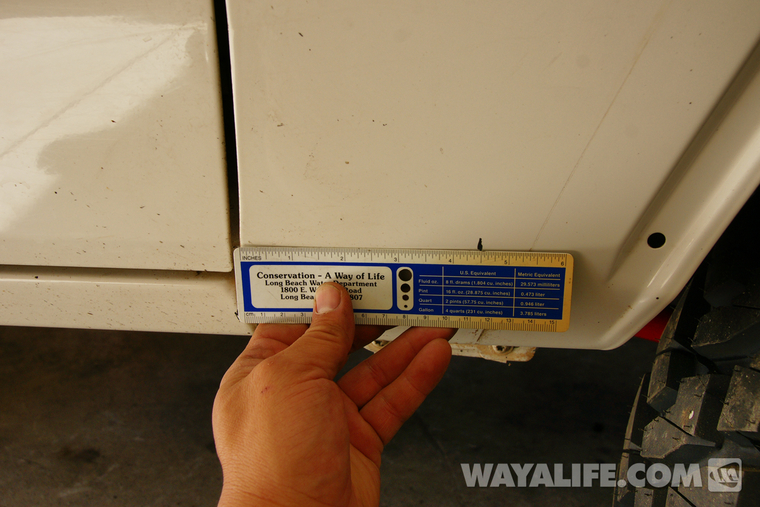
12. Measure 6-1/8" from the door edge seam, along the lower of the 2 parallel style line and then make a mark with a grease pencil.
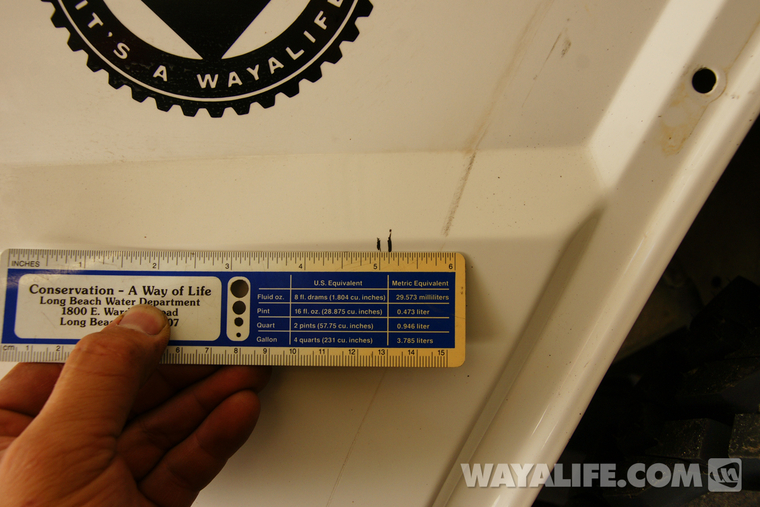
13. Place the P2 piece up against the fender so that the forward most hole on it line up with the existing mounting hole on your Jeep. Use a washer, M5-.8 machine screw and flange nut to loosely secure it in place. Then, position the piece so that it lines up with the 2 marks you made on the body panel back in Steps 11 & 12. Using the P2 as a template, mark the position of the rear holes with a grease pencil.
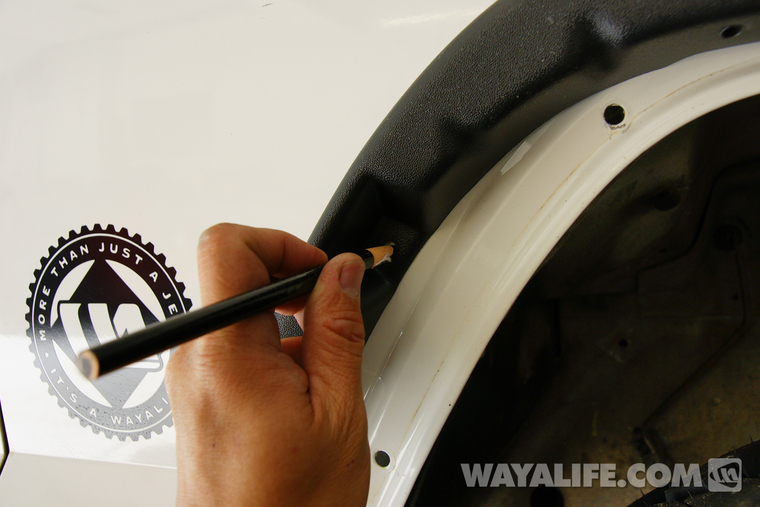
14. Remove the P2 piece, center punch the marks you just made and then drill them out to 1/4" holes.
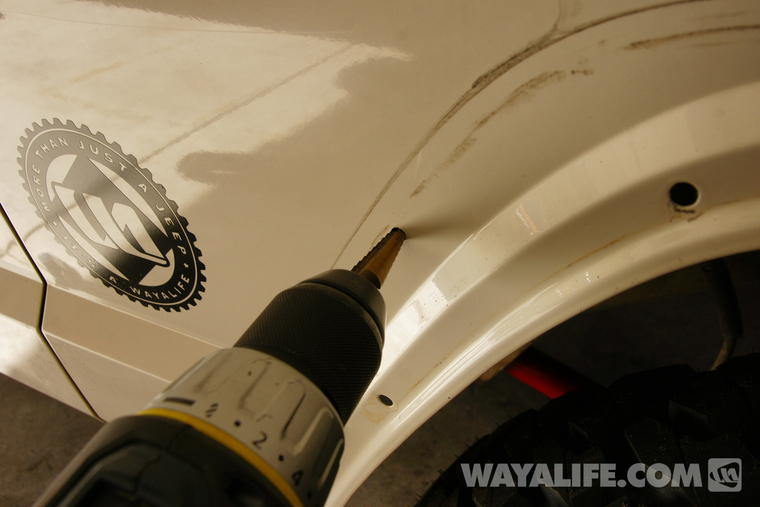
15. Reinstall the P2 piece and secure it in place using the washers, M5-.8 machine screws and flange nuts provided. Leave the bolts and nuts only hand tight for now.
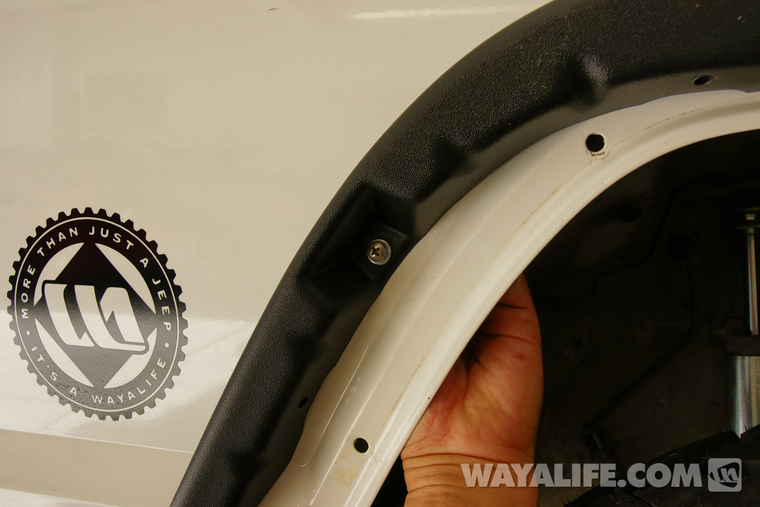
16. Using the installed P1 and P2 pieces as a template, trace the inner profile of them with a grease pencil as shown.
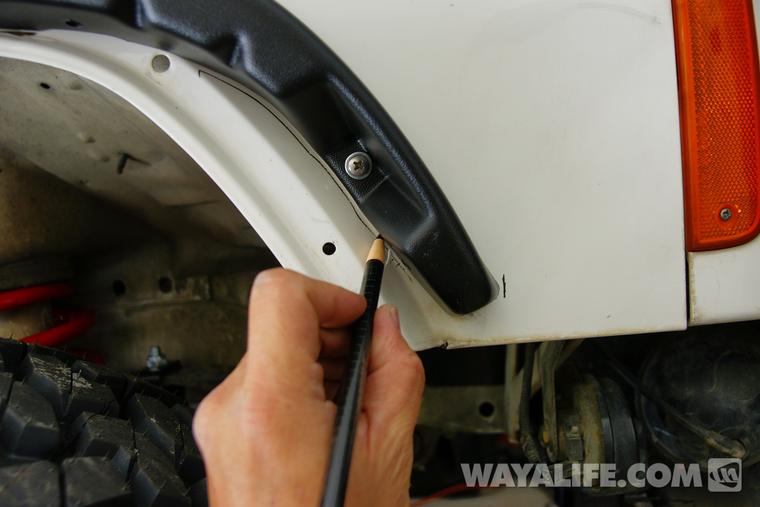
17. Continue the profile line down to the bottom in a parallel line to the fender well.
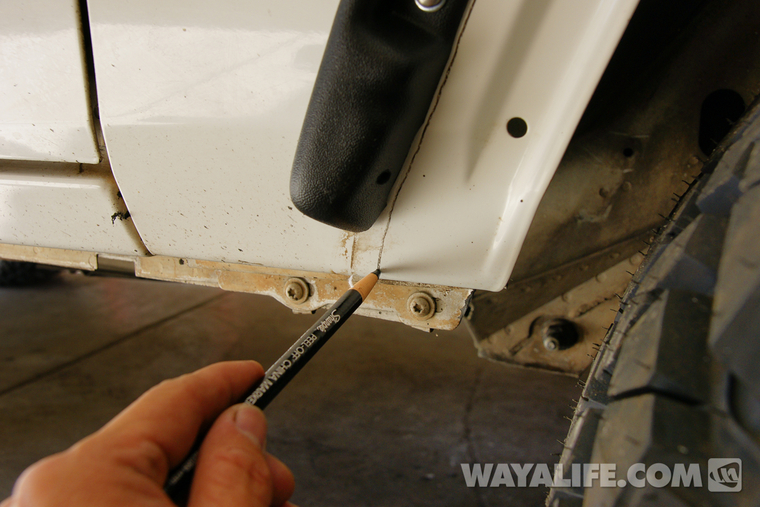
18. Remove P1 and P2 yet again and then draw parallel lines 1-1/2" apart and perpendicular to the profile line you drew along the rear half of your wheel well as shown.
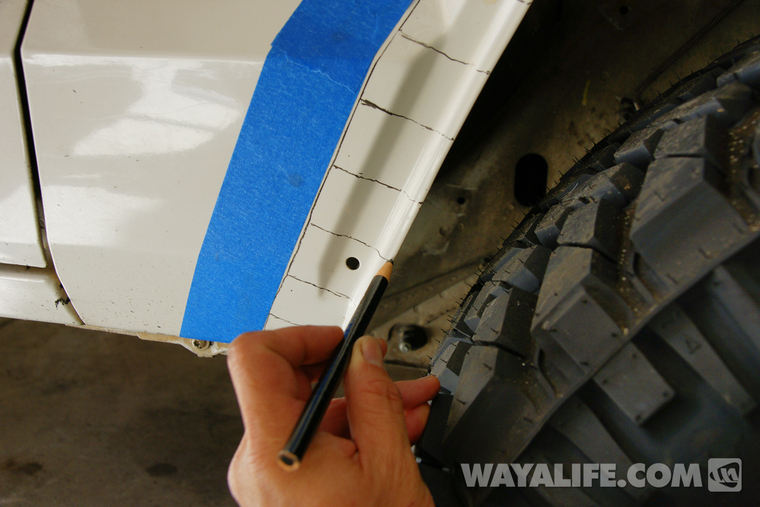
19. Being that I will be using a jigsaw to trim the fender, I took some time to trace the outer edge of the profile line with some blue painters tape. This will help prevent the jigsaw from damaging the paint as it passes over the body while cutting the metal.
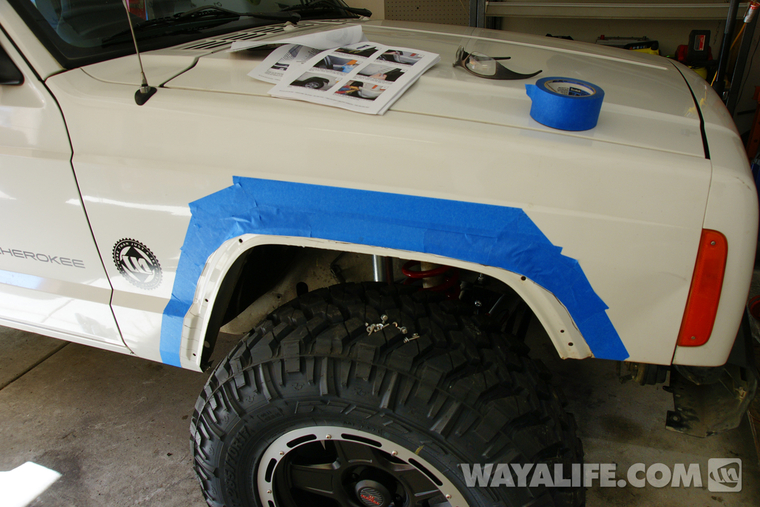
20. Using a jigsaw with a metal cutting blade or a cut off wheel, begin trimming the body along the profile line.
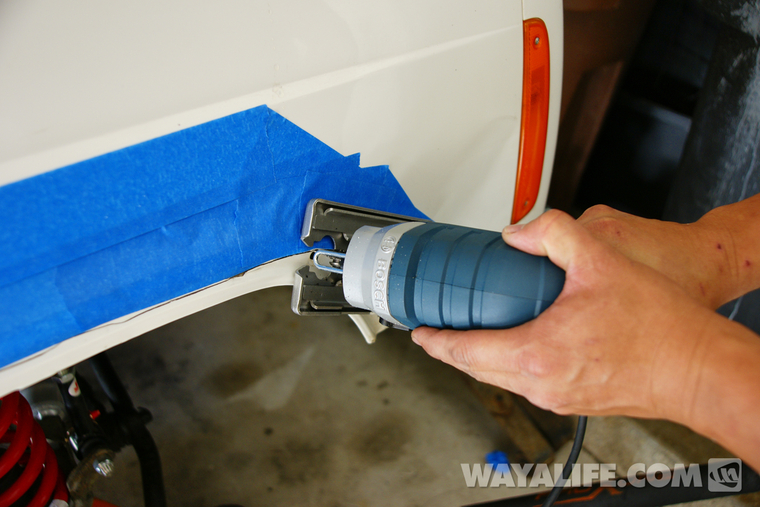
21. Using a jigsaw with a metal cutting blade or a cut off wheel, begin cutting the body along the parallel lines you made on Step #18. Be careful to NOT cut past the profile line.
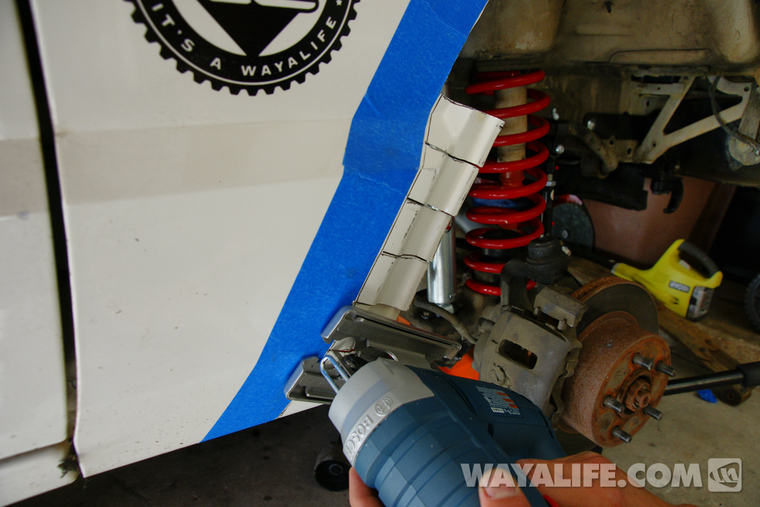
22. Use a pair of pliers to fold back the 1-1/2" tabs.
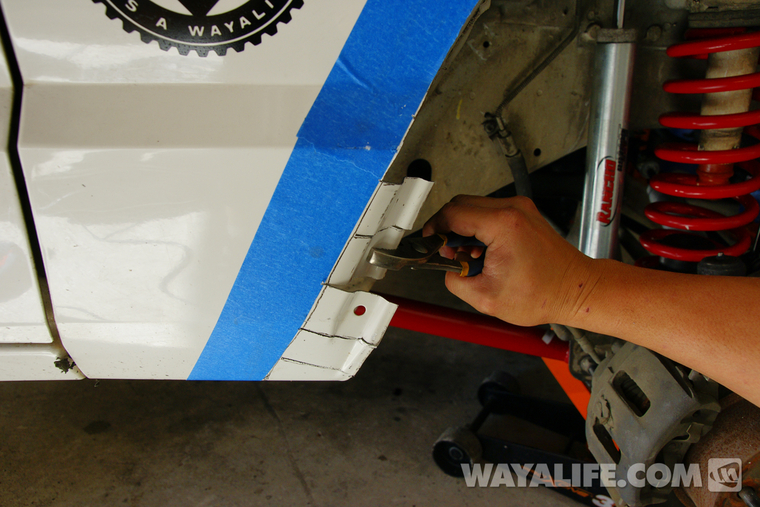
23. Use a hammer to pound the 1-1/2" tabs flat as shown.
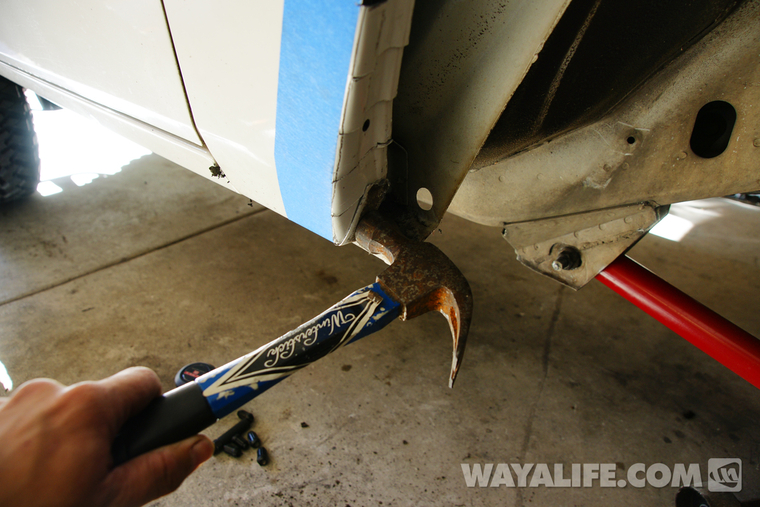
24. Use a sawzall to cut off the remaining metal along the pinch seam.
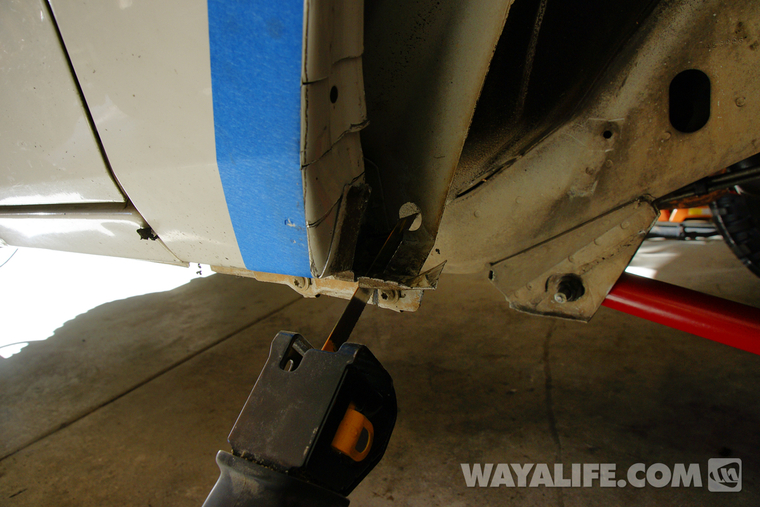
25. Use a sawzall or angle grinder to cut a series of notches along the inner pinch seam as shown.
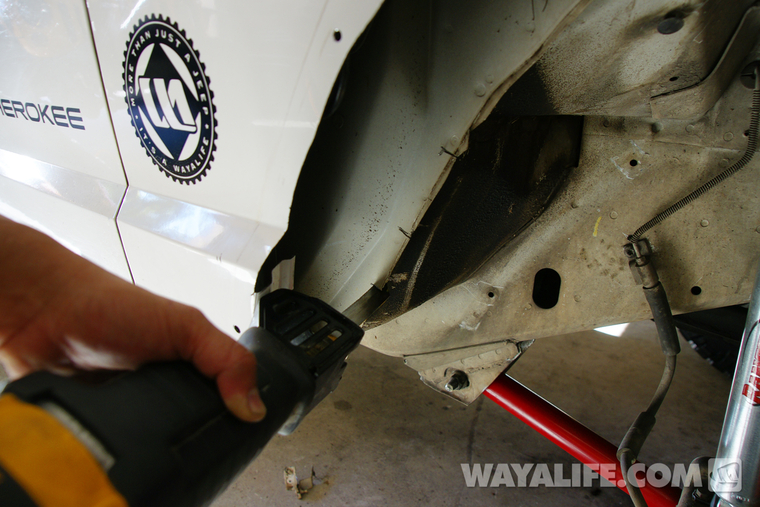
26. Use a 3 lb. Hammer to pound the inner pinch seam flat as shown.
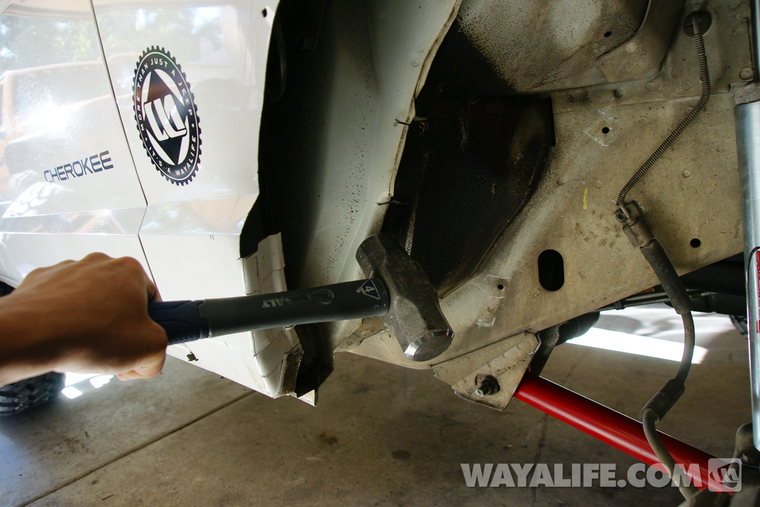
27. Install the provided speed clips over the 6 predrilled holes located along the edge of the P1 and P2 pieces.
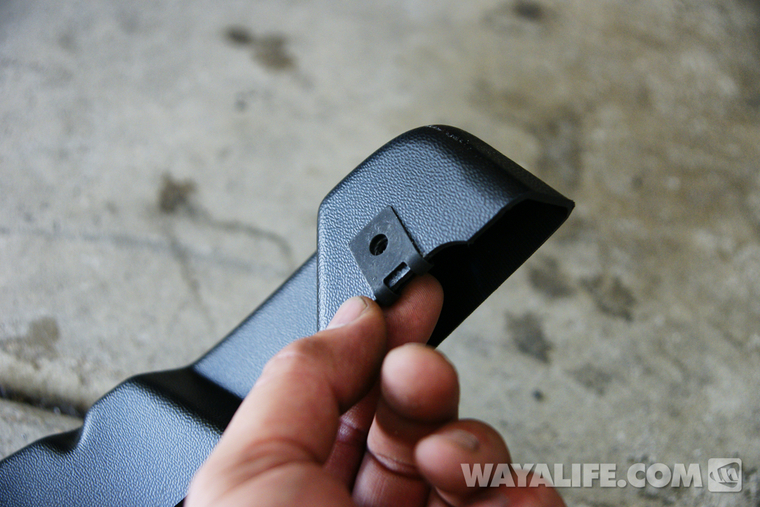
28. Reinstall the P1 and P2 piece onto the body of your Jeep and secure them in place using the washers, M5-.8 machine screws and flange nuts provided. Fully tighten the bolts and nuts using a 5/16" socket and wrench. Use a #2 Phillips bit for the M5-.8 screws.
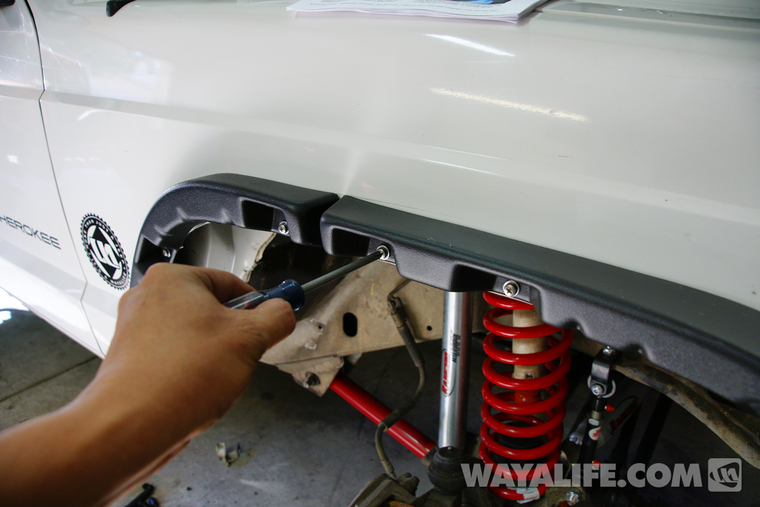
29. Take your new Bushwacker passenger side front fender and install the c-channel side of the edge trim along the upper edge. Leave the red tap on the other side in place.
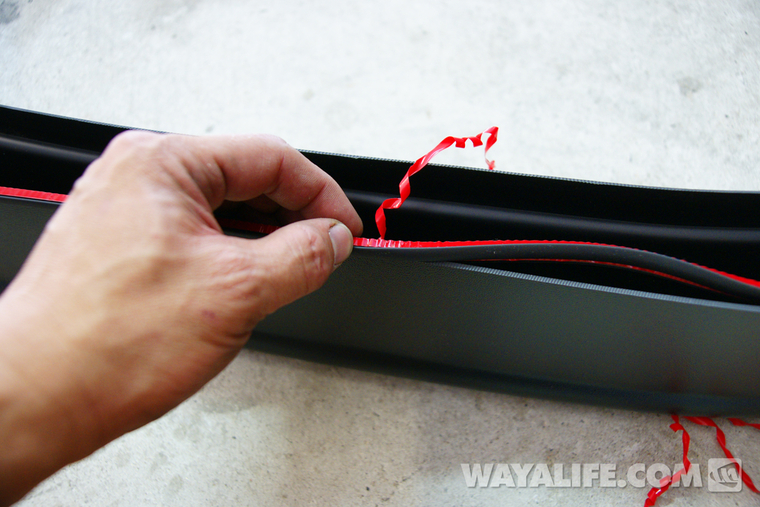
30. Thoroughly clean the surface of your Jeep's body panel where the fender will be mounted with some rubbing alcohol. Then, peel back 1"-2" of the red tap on the edge trim so that you will have something to grab onto and then install the Bushwacker flat fender onto the P1 and P2 inner structure pieces. Use a scratch awl to help align the holes on the bottom of the fenders with the speed clips on the inner structure pieces.
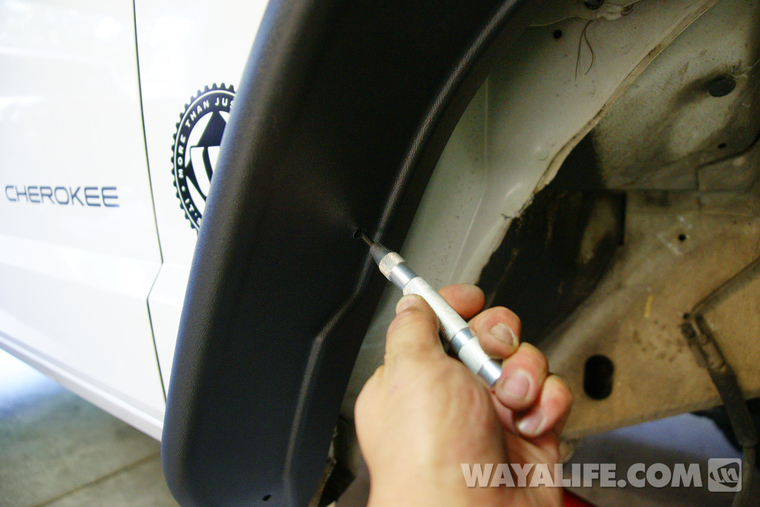
31. Pushing firmly against the side of the fender, secure the bottom of it in place by installing #8 pan head screws into each of the 6 holes.
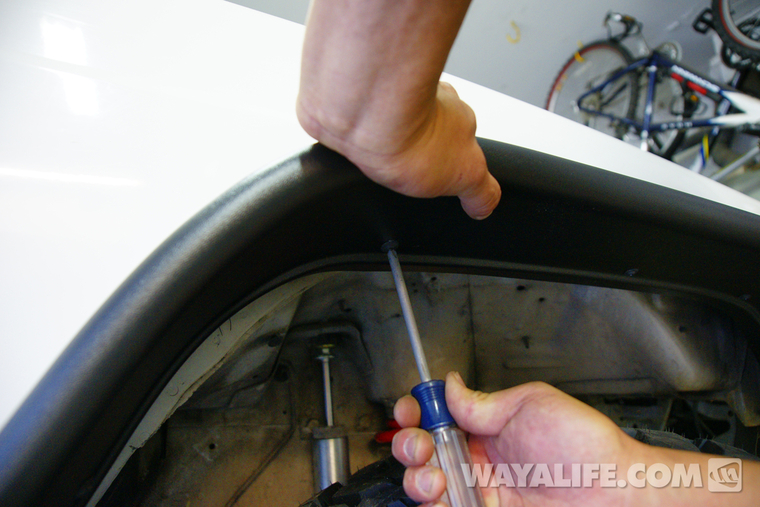
32. Push lightly down on the fender while peeling the red tape out as shown.
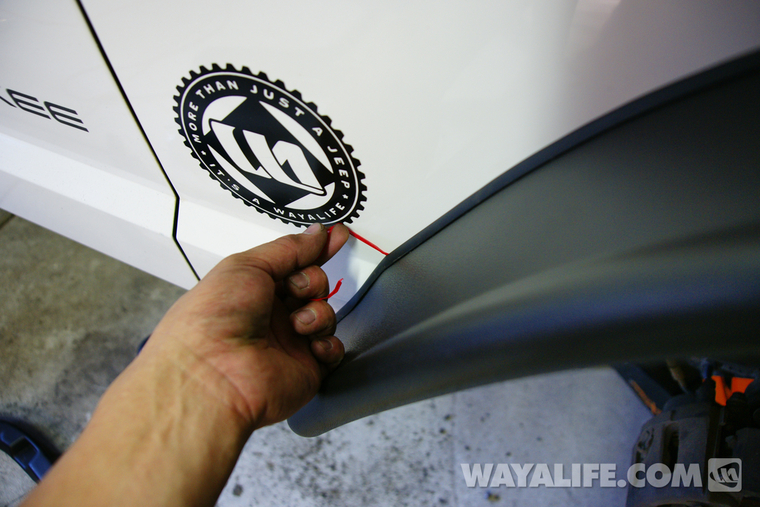
33. Insert the edge trim tool provided with the kit between the lip of the edge trim and the fender and firmly slide it along the entire length of it while pushing the fender toward the body of your Jeep.
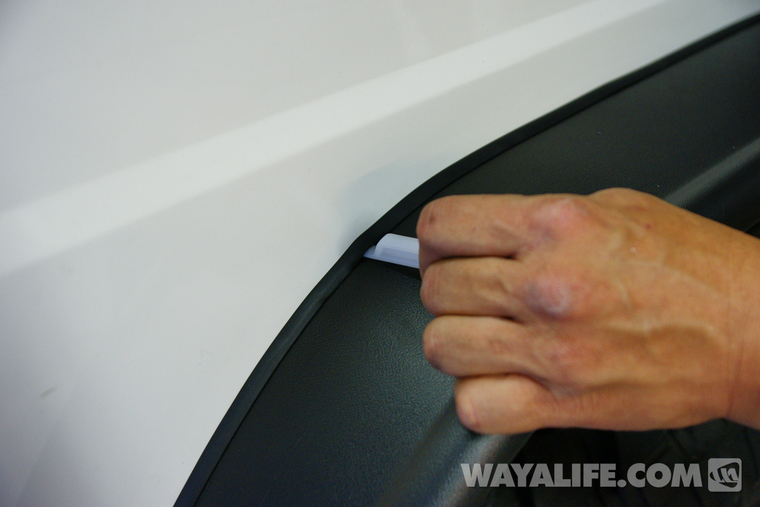
34. Moving to the rear of the Jeep, trace the style line along the wheel well with a grease pencil or some blue painters tape. Again, being that I'm using a jig saw to make my cuts, the blue painters tape will help prevent any damage to the paint while trimming. Make sure that all the factory mounting holes will NOT get cut. The large hole that dips down into the fender well will be cut in half.
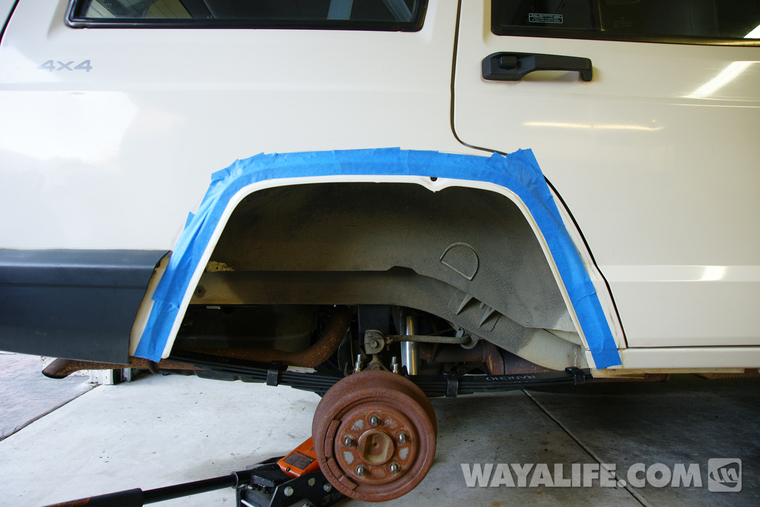
35. Use a jigsaw or cutoff wheel to trim the fender well.
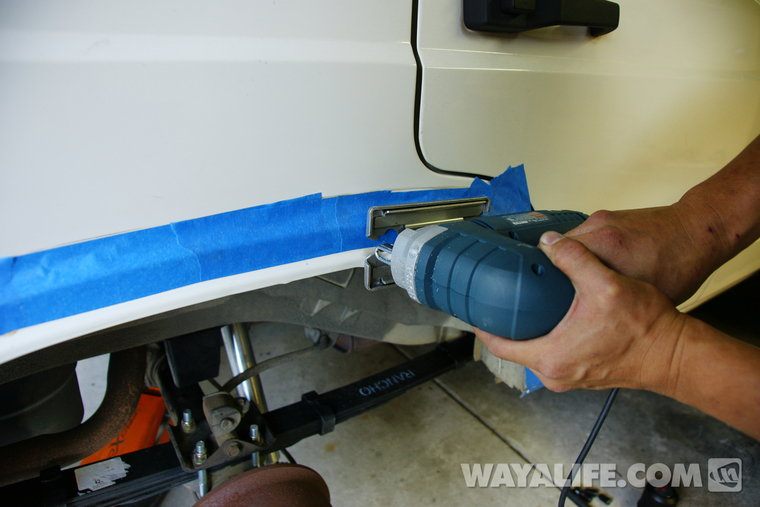
36. Using a grease pencil, draw a couple of lines 3/8" away from the door seam.
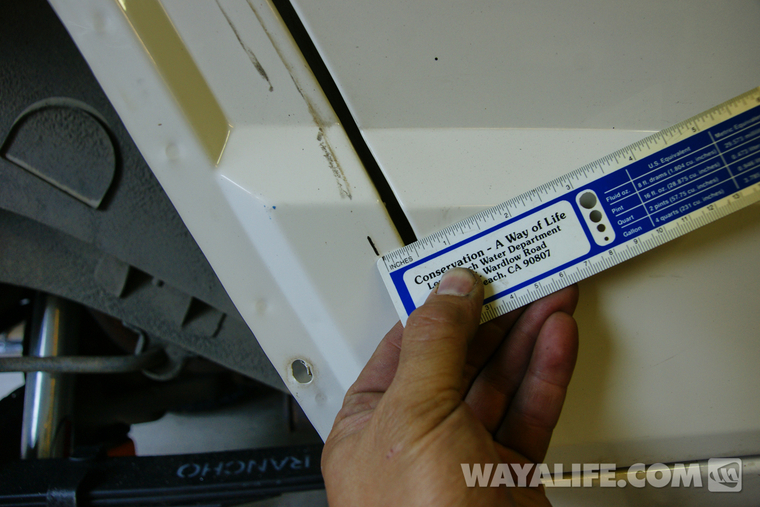
37. Find the plastic inner structure pieces with P3 and P4 stamped into the mold.
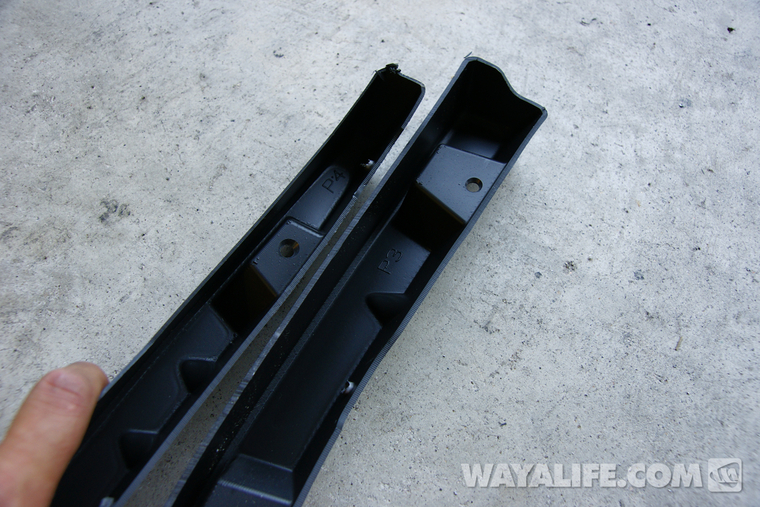
38. Place the P3 piece up against the front of fender so that the 2 holes line up with the existing mounting holes on your Jeep. Use 2 of the washers, M5-.8 machine screws and flange nuts provided to loosely secure the P3 piece on to these 2 holes.
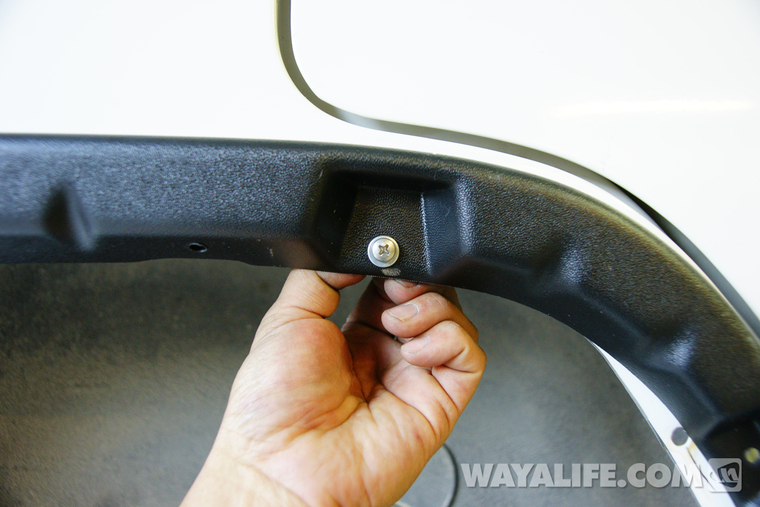
39. Position the P3 piece so that it lines up with the marks you made on the body panel back in Step #36. Then, use the P3 as a template to mark the position of the front lower hole with a grease pencil. Use a scratch awl to mark the upper hole.
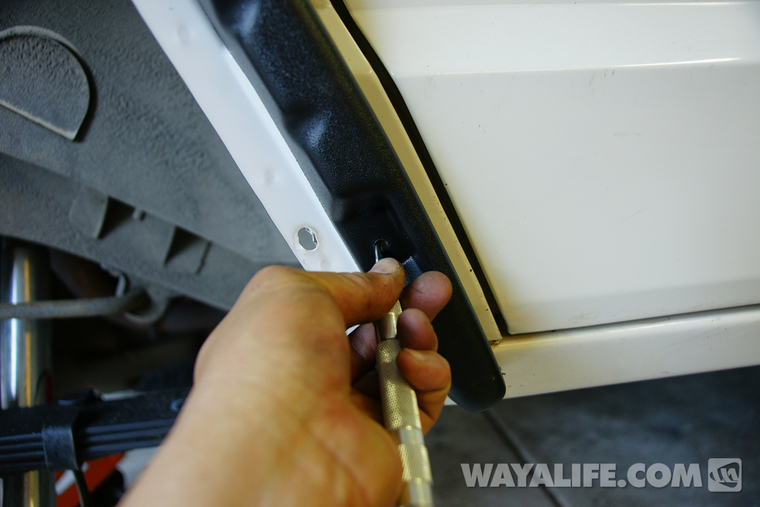
40. Place the P4 piece up against the rear of the fender so that the top hole lines up with the existing mounting hole on your Jeep. Use a washer, M5-.8 machine screw and flange nut provided to loosely secure the P4 piece onto the hole.
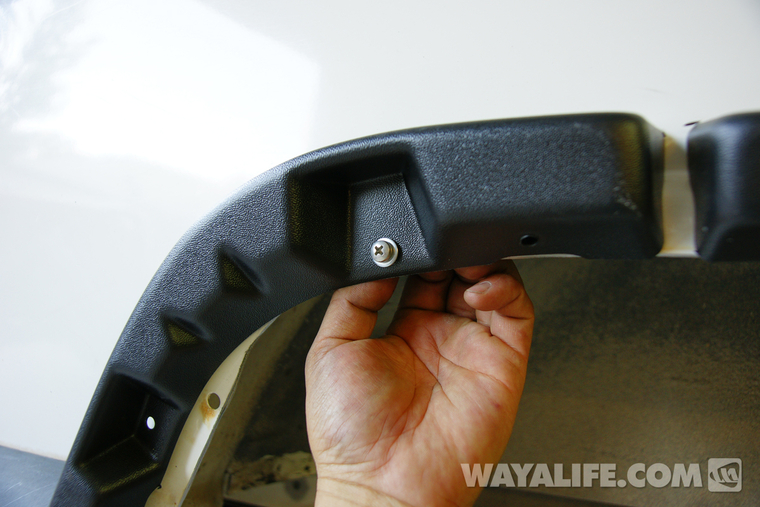
41. The Bushwacker instructions provided steps to show where marks should be made to help position the rear P4 piece. Because I was unable to remove my rear bumper end cap at the time of installation, I just made an educated guess as to where the P4 piece needed to be in regards to the style lines on the Jeep. Once in position, use a scratch awl to mark the two holes.
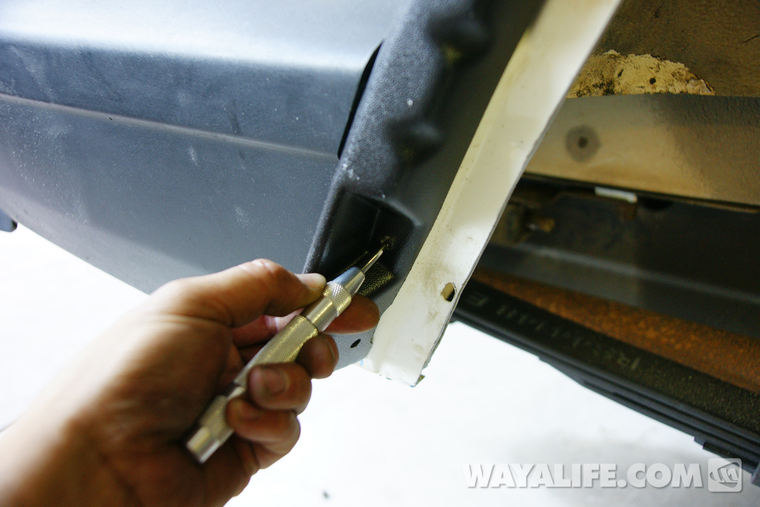
42. Holding P3 and P4 in place and using them as a template, trace the inside profile of them with a grease pencil.
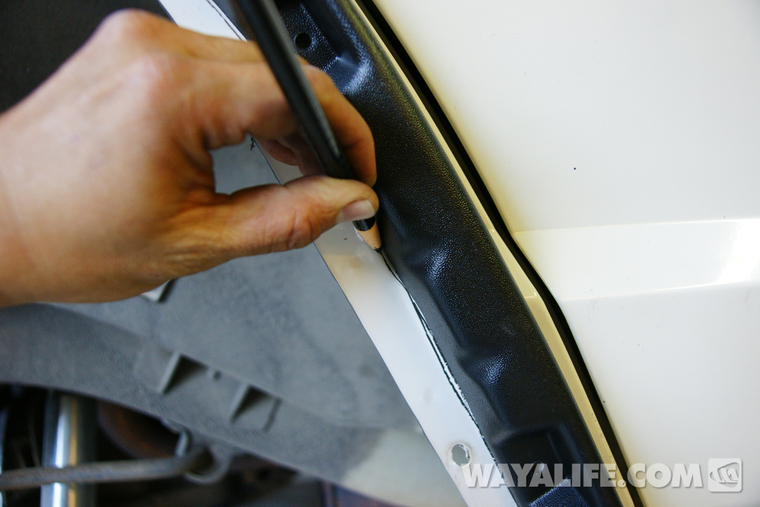
43. Remove P3 and P4 and then, drill 7/64" holes through the body on the upper 2 marked spots. Drill 1/4" holes through the lower 2 marked spots.
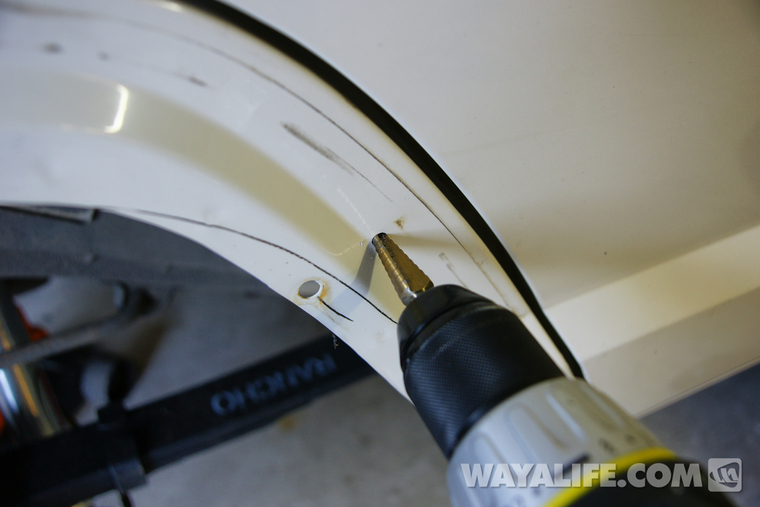
44. Starting from about 3" above the upper style line, draw 1-1/2" parallel lines extending out from the profile line you drew in Step #39 and down toward the pinch seam.
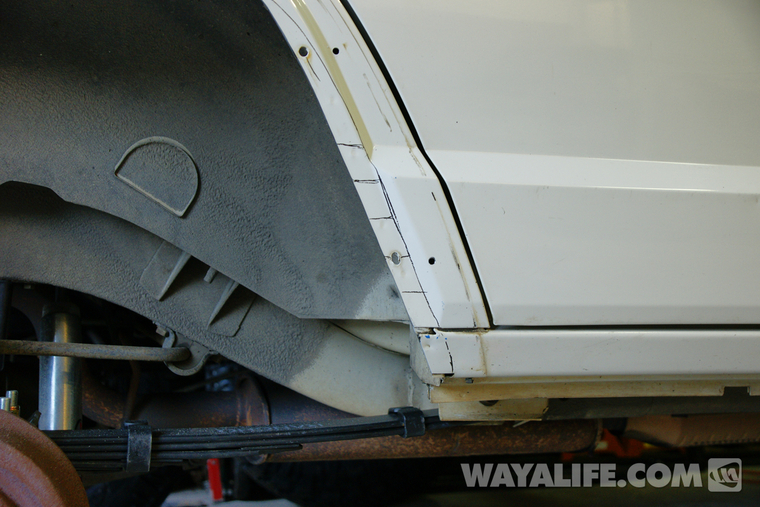
45. Again, starting from about 3" above the upper style line, draw 1-1/2" parallel lines extending out from the profile line you drew on the rear half of the wheel well and down toward the pinch seam.
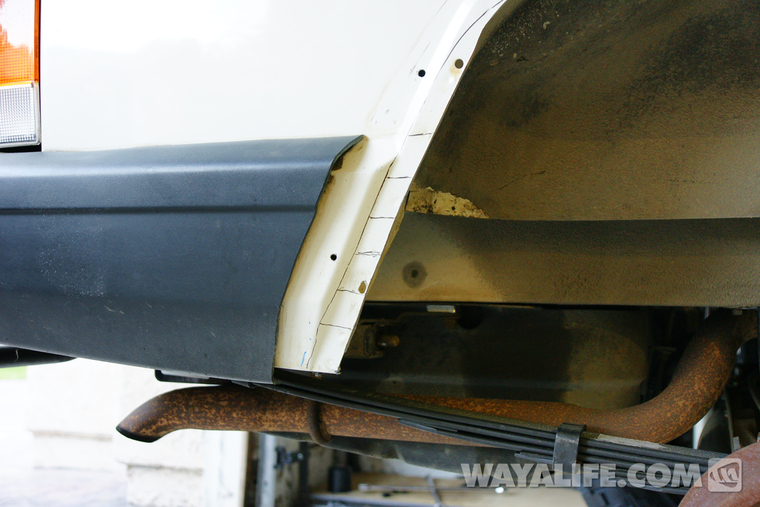
46. Using a sawzall with a metal cutting blade or cutoff wheel, trim the rear fender well along the profile line you drew down to the first parallel line you drew in Steps #44 and #45
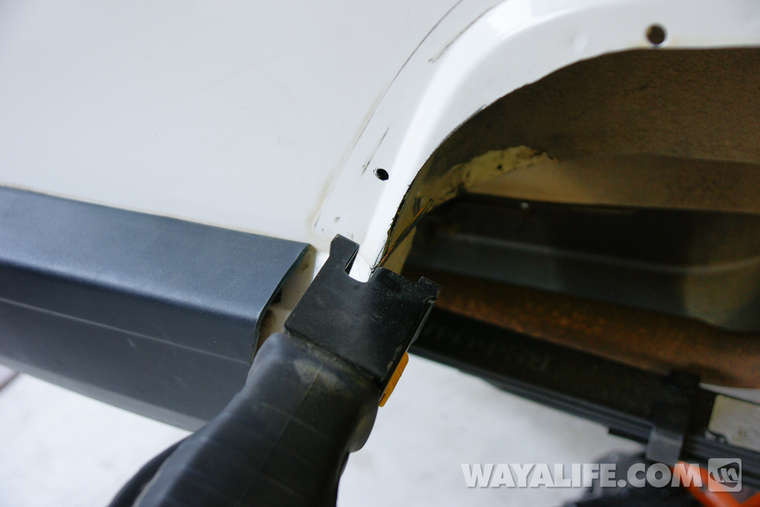
47. Using a jigsaw with a metal cutting blade or a cut off wheel, begin cutting the body along the parallel lines you made being careful to NOT cut past the profile line.
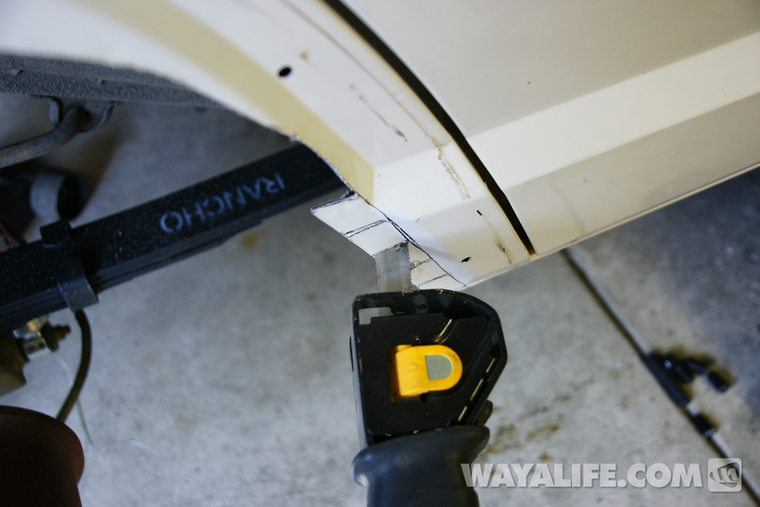
48. Use a pair of pliers to bend back the parallel tabs.
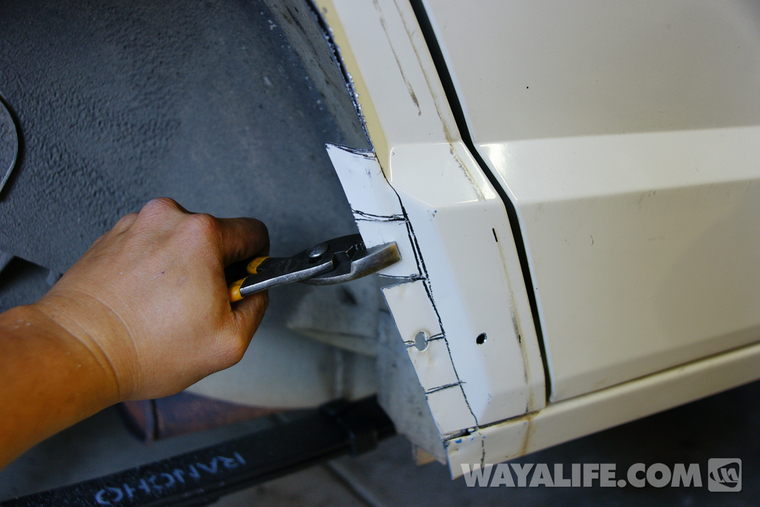
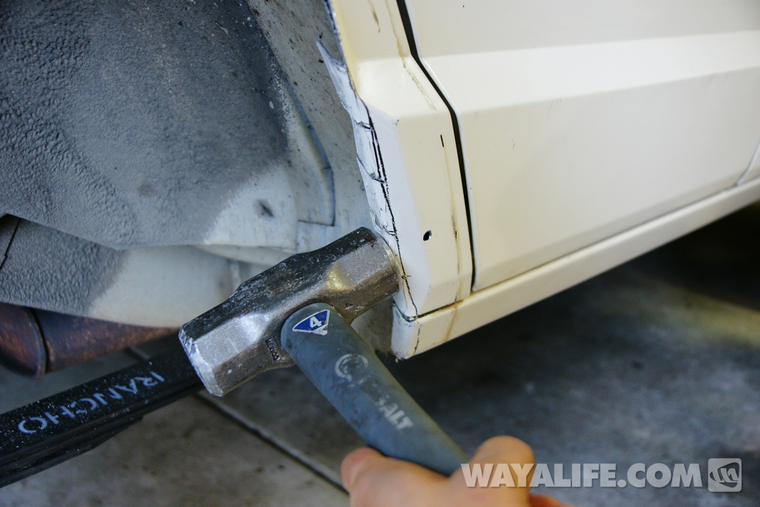
49. Use a hammer to pound the 1-1/2" tabs flat as shown.
50. Reinstall P3 and P4 using the hardware provided and proceed to install the Bushwacker flat fenders in the same manner as you did up front. Then, repeat all the steps on the driver side of your Jeep.
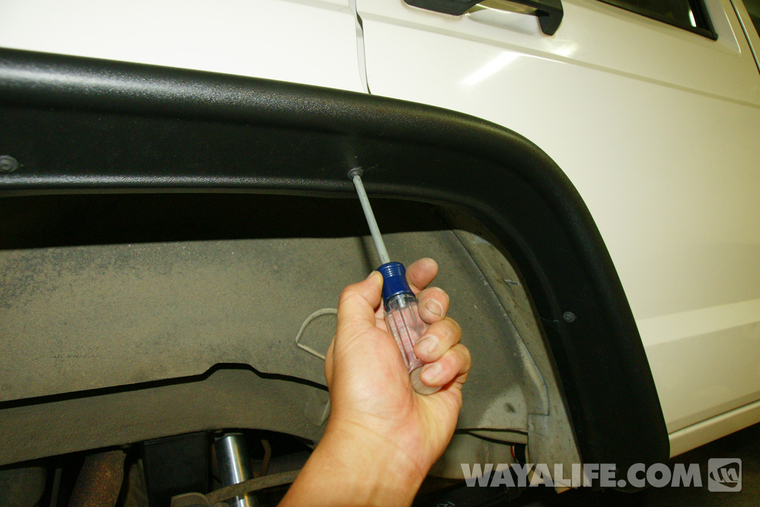
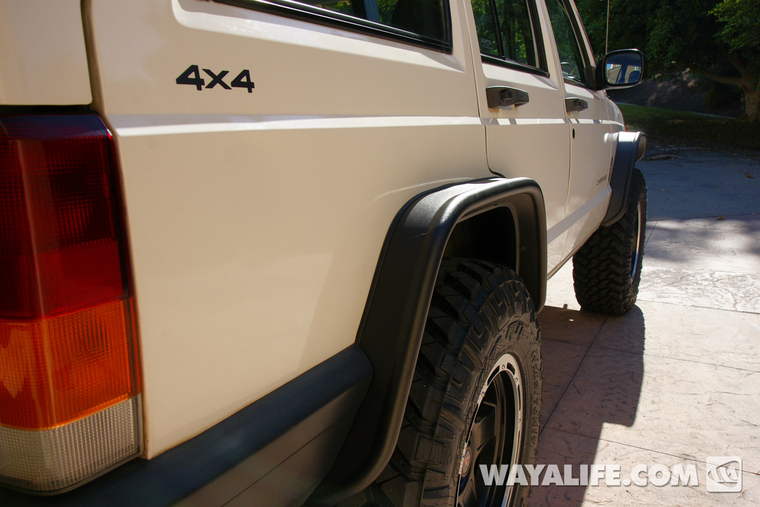
Here are some shots of what everything should look like when all is said and done.
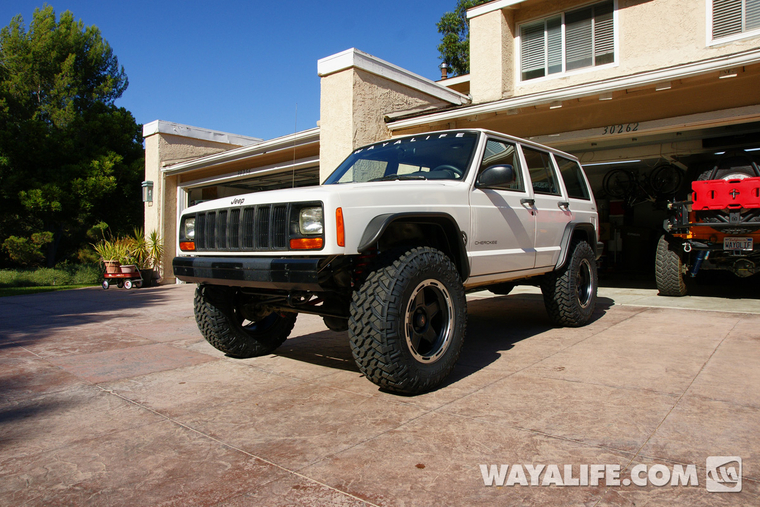
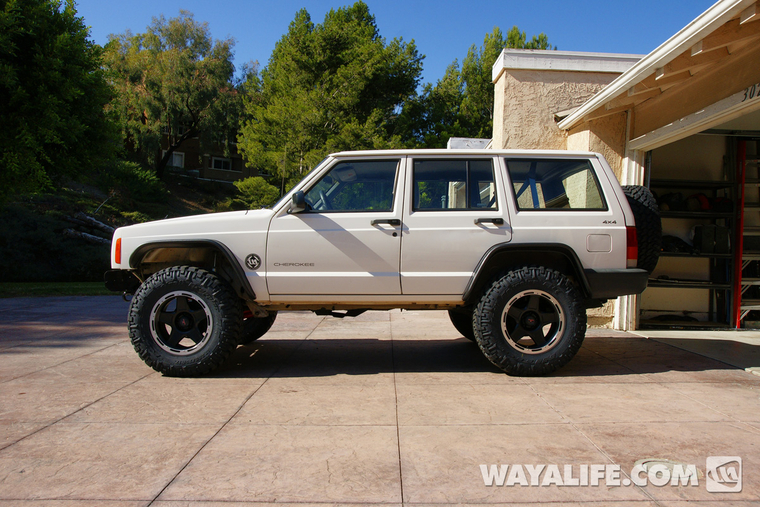
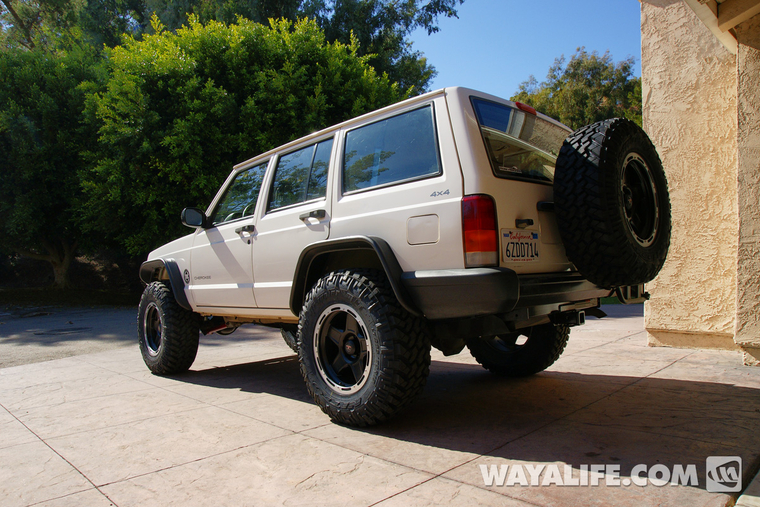
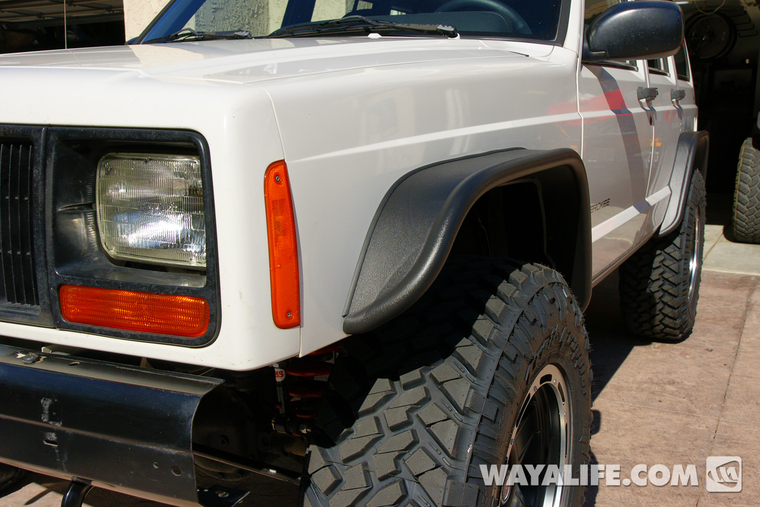
Close up shot...
Having installed a set of Bushwacker Flat Fenders on our old 2009 Jeep JK Wrangler in the past, I knew they would look factory when finished, would be light weight, would offer a lot more clearance under the wheel well and would also be durable. Once I realized just how much I would need to trim to get them installed, I knew these would be perfect for our needs. The below is an installation write-up on how to install these flat fenders on a 1997-01 XJ and I point that out because there are a few things you will have to do differently on an earlier model XJ. Also, I should point out that this write-up should be used as a compliment to the instructions provided by Bushwacker.
What you will need
• Utility Knife
• #2 Phillips Drive Bit
• Electric Drill
• 1/4” & 7/64” Drill Bits
• #2 Phillips Screwdriver
• Socket Wrench
• 1/4” Socket
• 7mm, 8mm & 10mm Sockets
• Scratch Awl
• Angle Grinder
• Soft Wiping Cloth/Shop Towels
• Pry bar/Claw Hammer
• Safety Glasses
• Grease Pencil/Marker
• Partner/Helper
• Putty Knife/Molding Remover
Here's a shot of everything you will get with your new Bushwacker Jeep XJ Flat Fenders.
Instructions
1. The plastic factory fender flares are attached to metal brackets that are bolted to the body (photo only shown with the bracket). Using a 10mm wrench, remove the 7 nuts securing the bracket and pull the entire fender off the body of your Jeep.
2. Remove the fender liners from wheel wells using a pry tool or flat head screw driver. There are a total of 7 tabs that will need to be pulled in order to remove the liner.
3. Clean the body panels around the wheel well with rubbing alcohol and a clean rag.
4. Measure 3-3/4” from the forward edge of the body panel back toward the fender well and then draw a small vertical line with a grease pencil.
5. Starting on the passenger side of your Jeep, find the plastic inner structure pieces with P1 and P2 stamped into the mold.
6. Place the P1 piece up against the fender so that the 2 rear holes line up with the existing mounting holes on your Jeep. Use 2 of the washers, M5-.8 machine screws and flange nuts provided to loosely secure the P1 piece on to these 2 holes.
7. Position the P1 piece so that it lines up with the mark you made on the body panel back in Step 4. Then, use the P1 as a template to mark the position of the front hole with a grease pencil.
8. Remove the P1 piece and then center punch the mark you just made.
9. Use a unibit or 1/4" bit to drill a hole at the point you just marked.
10. Reinstall the P1 piece and secure it in place using the washers, M5-.8 machine screws and flange nuts provided. Leave the bolts and nuts only hand tight for now.
11. Measure 4-1/2" from the door edge seam, along your Jeep's style line and then make a mark with a grease pencil.
12. Measure 6-1/8" from the door edge seam, along the lower of the 2 parallel style line and then make a mark with a grease pencil.
13. Place the P2 piece up against the fender so that the forward most hole on it line up with the existing mounting hole on your Jeep. Use a washer, M5-.8 machine screw and flange nut to loosely secure it in place. Then, position the piece so that it lines up with the 2 marks you made on the body panel back in Steps 11 & 12. Using the P2 as a template, mark the position of the rear holes with a grease pencil.
14. Remove the P2 piece, center punch the marks you just made and then drill them out to 1/4" holes.
15. Reinstall the P2 piece and secure it in place using the washers, M5-.8 machine screws and flange nuts provided. Leave the bolts and nuts only hand tight for now.
16. Using the installed P1 and P2 pieces as a template, trace the inner profile of them with a grease pencil as shown.
17. Continue the profile line down to the bottom in a parallel line to the fender well.
18. Remove P1 and P2 yet again and then draw parallel lines 1-1/2" apart and perpendicular to the profile line you drew along the rear half of your wheel well as shown.
19. Being that I will be using a jigsaw to trim the fender, I took some time to trace the outer edge of the profile line with some blue painters tape. This will help prevent the jigsaw from damaging the paint as it passes over the body while cutting the metal.
20. Using a jigsaw with a metal cutting blade or a cut off wheel, begin trimming the body along the profile line.
21. Using a jigsaw with a metal cutting blade or a cut off wheel, begin cutting the body along the parallel lines you made on Step #18. Be careful to NOT cut past the profile line.
22. Use a pair of pliers to fold back the 1-1/2" tabs.
23. Use a hammer to pound the 1-1/2" tabs flat as shown.
24. Use a sawzall to cut off the remaining metal along the pinch seam.
25. Use a sawzall or angle grinder to cut a series of notches along the inner pinch seam as shown.
26. Use a 3 lb. Hammer to pound the inner pinch seam flat as shown.
27. Install the provided speed clips over the 6 predrilled holes located along the edge of the P1 and P2 pieces.
28. Reinstall the P1 and P2 piece onto the body of your Jeep and secure them in place using the washers, M5-.8 machine screws and flange nuts provided. Fully tighten the bolts and nuts using a 5/16" socket and wrench. Use a #2 Phillips bit for the M5-.8 screws.
29. Take your new Bushwacker passenger side front fender and install the c-channel side of the edge trim along the upper edge. Leave the red tap on the other side in place.
30. Thoroughly clean the surface of your Jeep's body panel where the fender will be mounted with some rubbing alcohol. Then, peel back 1"-2" of the red tap on the edge trim so that you will have something to grab onto and then install the Bushwacker flat fender onto the P1 and P2 inner structure pieces. Use a scratch awl to help align the holes on the bottom of the fenders with the speed clips on the inner structure pieces.
31. Pushing firmly against the side of the fender, secure the bottom of it in place by installing #8 pan head screws into each of the 6 holes.
32. Push lightly down on the fender while peeling the red tape out as shown.
33. Insert the edge trim tool provided with the kit between the lip of the edge trim and the fender and firmly slide it along the entire length of it while pushing the fender toward the body of your Jeep.
34. Moving to the rear of the Jeep, trace the style line along the wheel well with a grease pencil or some blue painters tape. Again, being that I'm using a jig saw to make my cuts, the blue painters tape will help prevent any damage to the paint while trimming. Make sure that all the factory mounting holes will NOT get cut. The large hole that dips down into the fender well will be cut in half.
35. Use a jigsaw or cutoff wheel to trim the fender well.
36. Using a grease pencil, draw a couple of lines 3/8" away from the door seam.
37. Find the plastic inner structure pieces with P3 and P4 stamped into the mold.
38. Place the P3 piece up against the front of fender so that the 2 holes line up with the existing mounting holes on your Jeep. Use 2 of the washers, M5-.8 machine screws and flange nuts provided to loosely secure the P3 piece on to these 2 holes.
39. Position the P3 piece so that it lines up with the marks you made on the body panel back in Step #36. Then, use the P3 as a template to mark the position of the front lower hole with a grease pencil. Use a scratch awl to mark the upper hole.
40. Place the P4 piece up against the rear of the fender so that the top hole lines up with the existing mounting hole on your Jeep. Use a washer, M5-.8 machine screw and flange nut provided to loosely secure the P4 piece onto the hole.
41. The Bushwacker instructions provided steps to show where marks should be made to help position the rear P4 piece. Because I was unable to remove my rear bumper end cap at the time of installation, I just made an educated guess as to where the P4 piece needed to be in regards to the style lines on the Jeep. Once in position, use a scratch awl to mark the two holes.
42. Holding P3 and P4 in place and using them as a template, trace the inside profile of them with a grease pencil.
43. Remove P3 and P4 and then, drill 7/64" holes through the body on the upper 2 marked spots. Drill 1/4" holes through the lower 2 marked spots.
44. Starting from about 3" above the upper style line, draw 1-1/2" parallel lines extending out from the profile line you drew in Step #39 and down toward the pinch seam.
45. Again, starting from about 3" above the upper style line, draw 1-1/2" parallel lines extending out from the profile line you drew on the rear half of the wheel well and down toward the pinch seam.
46. Using a sawzall with a metal cutting blade or cutoff wheel, trim the rear fender well along the profile line you drew down to the first parallel line you drew in Steps #44 and #45
47. Using a jigsaw with a metal cutting blade or a cut off wheel, begin cutting the body along the parallel lines you made being careful to NOT cut past the profile line.
48. Use a pair of pliers to bend back the parallel tabs.
49. Use a hammer to pound the 1-1/2" tabs flat as shown.
50. Reinstall P3 and P4 using the hardware provided and proceed to install the Bushwacker flat fenders in the same manner as you did up front. Then, repeat all the steps on the driver side of your Jeep.
Here are some shots of what everything should look like when all is said and done.
Close up shot...
