scull20
New member
Disclaimer: I am not a professional mechanic. I am a guy with tools and a jeep, and I am willing to try to fix things myself with the intent of learning something new, and saving some money. I will be the first to acknowledge that a little bit of knowledge and know-how can be dangerous. If you find any of the techniques, methods or instructions dictated below to be incorrect, laughable, dangerous, etc. then please speak up in a constructive and informative fashion such that others would be advised to not make the same mistake(s) I made.
So you think you need to replace the thermostat housing on your Pentastar 3.6L V6 Engine (Jeep JK Model Years 2012+)
Symptoms (There may be more here, but this is what I ended up noticing/not noticing):
1. Gurgling/water flowing sound from behind the passenger dash (i.e. heater core) that got worse over time.
2. Low Coolant level within the reservoir bottle (below the min line, but still barely visible in the bottom of the bottle) Note: Yours may be totally empty.
3. I DID NOT smell any coolant prior to this (leading me to believe this was probably a slow leak, occurring over an extended period of time). Note: Smelling coolant is something that would typically be a symptom of a coolant leak
4. I DID NOT see a puddle of coolant on the ground where I normally park in my driveway, or any significant staining elsewhere (see above...slow leak). Again…puddling/staining like this is something indicative of a coolant leak (duh).
5. I DID NOT have any loss of heat blowing prior to discovering the problem (meaning the coolant had not gotten low enough for the heat to be effected, but I suspect it was very close to that point) …though loss of heat is also indicative of a coolant leak.
6. After some searching/digging around under the hood, I found dried up coolant residue on the thermostat housing.
Note: In my searches online, I noted that others with JK's with the 3.6 V6 were complaining of the "water-flowing" issue shortly after getting their Jeeps (low mileage). They took them back to the dealer to be "burped" and/or the noise eventually resolved itself. My jeep has just over 36,000 miles on it, and the water-flowing noise has gotten progressively worse. This led me to believe that this was not a problem that was going to go away, and probably beyond the coolant system needing be burped.
GO THROUGH THIS THREAD FIRST BEFORE PROCEEDING ANY FURTHER: http://wayalife.com/showthread.php?...eep-JK-Wrangler-Coolants-and-Save-Your-Engine!
Note: It seems like coolant prices may have dropped since that post was written..however, the information in it is critical. Take note of everything there, bookmark the page, tattoo it on your arm, etc.
The rest of this thread will be written for a 2014 model year JK (ensure that your part numbers match your model year, they may be different from what I am using...case in point: coolant!)
Parts (Purchased from the Parts Counter at my local dealership):
1. Thermostat Housing (Mopar Part#: 5184651AH, Price I Paid: $32.85)
2. 50/50 Premix Coolant (Mopar Part#: 68163849AA, Price I Paid: $19.45 Each)....Note: I bought 2 gallons of coolant, and only ended up using a bit less than 1 gallon. The total coolant capacity is 10.5 quarts (2.625 US Gallons)…keep this in mind depending on how low you are on coolant.
Tools:
1. Socket Wrench
2. 10 mm socket
3. Pliers
4. in-lb. Torque Wrench
5. T30 torx socket with short extension
6. Drain pan
7. Small bucket or empty 1-gallon jug
8. Flathead screw driver
9. Funnel
10. Clean shop rags
11. Plastic scraped (if need be)
12. Flashlight (if need be)
Procedure:
Step 1:
Make sure you are parked on level ground. Open your hood and remove the engine cover. Also...your engine should be cold when doing the initial housing replacement.
Step 2:
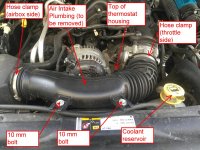
Using your socket wrench and 10mm socket, remove the two bolts holding down the air intake plumbing between the air box and the throttle. Then using your flathead screwdriver, loosen the hose-clamps at the airbox and the throttle. Also pop out the thin hose from the clips that is held in near where the 10mm bolts come out. This small hose stays in place, but just needs to be removed from the clips.
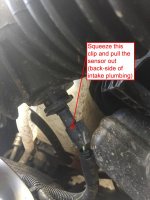
Step 3: Disconnect the sensor on the back-side of intake plumbing.
Step 4: Remove the intake piece and set it aside (you should now have better/more access to the thermostat housing)
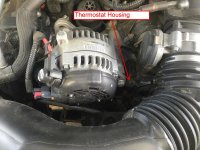
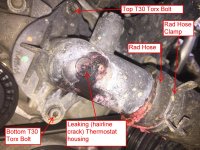
Step 5: Place a small bucket/jug below the thermostat housing, and a drain pan on the ground below that to catch any coolant that may leak out in the following steps. Make sure that the jug can be placed in and removed in a vertical orientation. If you need to fish it in there, it may end up spilling the drained coolant on the way out.
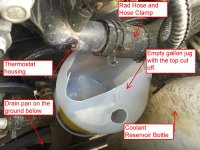
Step 6: Using your pliers, squeeze and slide the hose clamp on the radiator hose going to the thermostat housing over to the right. After the clamp is off slid out of the way, twist and pull the radiator hose off the housing (it may need some coaxing). Note: At this point, coolant will probably start to flow out of the hose and drain into the bucket you put down below it. Also, remove the radiator cap to help the coolant to drain. Radiator cap is not pictured, but its on the left side of the radiator just above the grill as the hood is open.
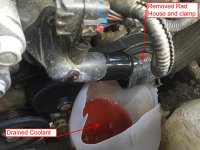
Step 7: Using your T30 Torx Socket, with socket wrench and short extension loosen the top and bottom bolts holding the thermostat housing to the engine block. Note: More coolant will leak out from behind the thermostat, out of the engine block. It will probably be difficult to get this coolant into the bucket below, which is why I had another drain pan on the ground. A couple of shop rags will help sop up the extra coolant that you can't catch.
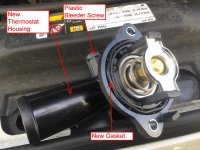
Step 8: Remove the old thermostat housing and take a look to see if the gasket came with it. In my case the old gasket was left behind. Make sure you peel this off as the new thermostat housing has a new gasket already pressed into it. Make sure you scrape away any excess residue or piece of the gasket left behind. Start with a plastic scraper (old credit card?) so you don't mar the mating surface (which may end up causing more leaks).
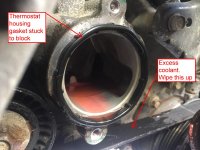
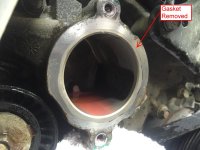
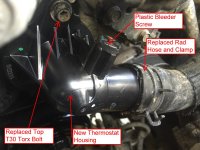
Step 9: Install the new thermostat housing in the same orientation as the one you just removed. Replace the top and bottom T30 Torx bolts. I believe these should be torqued to 105 in-lbs. If you don’t have a torque wrench, then you should be safe with getting the bolts snug tight, then about a 1/4 turn after that. The key here is to NOT over-tighten them. You can loosen the bleeder screw on the top of the new thermostat housing a bit at this point as well.
Step 10: Replace the radiator hose and hose clamp onto the new thermostat housing. Make sure you push the hose up to the stopper on the thermostat housing and then replace the hose clamp so that it is beyond the "knurled" end of the housing. Once this is complete, add coolant into the radiator until it starts to bleed out of the bleeder screw you just loosened. Then tighten down the bleeder screw (hand tight, I used a pair of pliers because access was pretty tight, but again do not over-tighten.) You can now remove the bucket from earlier that should have drained coolant in it.
Step 11: Continue to top off your radiator with coolant. You’ll want to fill until the bottom of the filler neck has coolant in it, but not all the way to the very top of the neck, because the radiator cap takes up some space in there and will just result in wasted coolant being pushed out of the fillet neck. Don’t forget to replace the cap....twist it until it stops.
Step 12: Top off your coolant reservoir bottle to the max line. Your coolant bottle is best viewed from the drivers side looking down. Use a flashlight to help see the MAX and MIN lines if need be.
Step 12A: If you want to replace your air filter inside the airbox, do so now.
Step 13: Replace your air intake plumbing that you removed in step 2. Don’t forget to reconnect the sensor wire at the backside, and reclip the small hose in at the bolting locations. Use the two 10mm bolts and hand tighten them down. Then hand tighten the hose clamps at the airbox and throttle side with the flathead screwdriver. Be careful not to over-tighten anything.
Step 14: Continue to leave your hood open. Go into your jeep and turn the heat to the hottest setting. Make sure the A/C is NOT on. Start the engine, get out of the jeep and check for any leaks that may be occurring from a loose hose, bleeder screw, etc. Let the engine run for a few minutes until the electric cooling fan kicks in (you'll hear it turn on). Keep an eye on the temp gauge in the cabin (or on the EVIC if equipped)…if it starts to creep above the halfway mark (about 225-230 def F) at any point turn off the engine (you may have an additional problem that has not be covered here). Once the fan kicks in, you can turn the engine off and let it cool. After its cool, check the reservoir bottle and radiator and add coolant as required back up to max (DO NOT open the radiator unless the engine is cool). Start the engine again (heat still on)…close the hood and give it a quick drive around the block/down the street for a minute or two until you get the temp gauge to the center (195-210 def F). At this point your heat should start to blow warm/hot again. Again, keep an eye on the temp gauge during this process. Then let the engine cool and check your coolant levels again. You may need to repeat this process a few more times depending on your situation (may take a few hours depending on the ambient temperature outside). Keep checking for leaks during this process and over the next few days. Eventually you’ll get to the point where you won’t need to add coolant to the reservoir bottle or radiator anymore.
Once you coolant levels are totally topped of, go grab yourself a beer (or three) and relax...the job is complete.
Hope this helps someone else out there!
-Ryan
So you think you need to replace the thermostat housing on your Pentastar 3.6L V6 Engine (Jeep JK Model Years 2012+)
Symptoms (There may be more here, but this is what I ended up noticing/not noticing):
1. Gurgling/water flowing sound from behind the passenger dash (i.e. heater core) that got worse over time.
2. Low Coolant level within the reservoir bottle (below the min line, but still barely visible in the bottom of the bottle) Note: Yours may be totally empty.
3. I DID NOT smell any coolant prior to this (leading me to believe this was probably a slow leak, occurring over an extended period of time). Note: Smelling coolant is something that would typically be a symptom of a coolant leak
4. I DID NOT see a puddle of coolant on the ground where I normally park in my driveway, or any significant staining elsewhere (see above...slow leak). Again…puddling/staining like this is something indicative of a coolant leak (duh).
5. I DID NOT have any loss of heat blowing prior to discovering the problem (meaning the coolant had not gotten low enough for the heat to be effected, but I suspect it was very close to that point) …though loss of heat is also indicative of a coolant leak.
6. After some searching/digging around under the hood, I found dried up coolant residue on the thermostat housing.
Note: In my searches online, I noted that others with JK's with the 3.6 V6 were complaining of the "water-flowing" issue shortly after getting their Jeeps (low mileage). They took them back to the dealer to be "burped" and/or the noise eventually resolved itself. My jeep has just over 36,000 miles on it, and the water-flowing noise has gotten progressively worse. This led me to believe that this was not a problem that was going to go away, and probably beyond the coolant system needing be burped.
GO THROUGH THIS THREAD FIRST BEFORE PROCEEDING ANY FURTHER: http://wayalife.com/showthread.php?...eep-JK-Wrangler-Coolants-and-Save-Your-Engine!
Note: It seems like coolant prices may have dropped since that post was written..however, the information in it is critical. Take note of everything there, bookmark the page, tattoo it on your arm, etc.
The rest of this thread will be written for a 2014 model year JK (ensure that your part numbers match your model year, they may be different from what I am using...case in point: coolant!)
Parts (Purchased from the Parts Counter at my local dealership):
1. Thermostat Housing (Mopar Part#: 5184651AH, Price I Paid: $32.85)
2. 50/50 Premix Coolant (Mopar Part#: 68163849AA, Price I Paid: $19.45 Each)....Note: I bought 2 gallons of coolant, and only ended up using a bit less than 1 gallon. The total coolant capacity is 10.5 quarts (2.625 US Gallons)…keep this in mind depending on how low you are on coolant.
Tools:
1. Socket Wrench
2. 10 mm socket
3. Pliers
4. in-lb. Torque Wrench
5. T30 torx socket with short extension
6. Drain pan
7. Small bucket or empty 1-gallon jug
8. Flathead screw driver
9. Funnel
10. Clean shop rags
11. Plastic scraped (if need be)
12. Flashlight (if need be)
Procedure:
Step 1:
Make sure you are parked on level ground. Open your hood and remove the engine cover. Also...your engine should be cold when doing the initial housing replacement.
Step 2:
Using your socket wrench and 10mm socket, remove the two bolts holding down the air intake plumbing between the air box and the throttle. Then using your flathead screwdriver, loosen the hose-clamps at the airbox and the throttle. Also pop out the thin hose from the clips that is held in near where the 10mm bolts come out. This small hose stays in place, but just needs to be removed from the clips.

Step 3: Disconnect the sensor on the back-side of intake plumbing.

Step 4: Remove the intake piece and set it aside (you should now have better/more access to the thermostat housing)


Step 5: Place a small bucket/jug below the thermostat housing, and a drain pan on the ground below that to catch any coolant that may leak out in the following steps. Make sure that the jug can be placed in and removed in a vertical orientation. If you need to fish it in there, it may end up spilling the drained coolant on the way out.

Step 6: Using your pliers, squeeze and slide the hose clamp on the radiator hose going to the thermostat housing over to the right. After the clamp is off slid out of the way, twist and pull the radiator hose off the housing (it may need some coaxing). Note: At this point, coolant will probably start to flow out of the hose and drain into the bucket you put down below it. Also, remove the radiator cap to help the coolant to drain. Radiator cap is not pictured, but its on the left side of the radiator just above the grill as the hood is open.

Step 7: Using your T30 Torx Socket, with socket wrench and short extension loosen the top and bottom bolts holding the thermostat housing to the engine block. Note: More coolant will leak out from behind the thermostat, out of the engine block. It will probably be difficult to get this coolant into the bucket below, which is why I had another drain pan on the ground. A couple of shop rags will help sop up the extra coolant that you can't catch.
Step 8: Remove the old thermostat housing and take a look to see if the gasket came with it. In my case the old gasket was left behind. Make sure you peel this off as the new thermostat housing has a new gasket already pressed into it. Make sure you scrape away any excess residue or piece of the gasket left behind. Start with a plastic scraper (old credit card?) so you don't mar the mating surface (which may end up causing more leaks).


Step 9: Install the new thermostat housing in the same orientation as the one you just removed. Replace the top and bottom T30 Torx bolts. I believe these should be torqued to 105 in-lbs. If you don’t have a torque wrench, then you should be safe with getting the bolts snug tight, then about a 1/4 turn after that. The key here is to NOT over-tighten them. You can loosen the bleeder screw on the top of the new thermostat housing a bit at this point as well.
Step 10: Replace the radiator hose and hose clamp onto the new thermostat housing. Make sure you push the hose up to the stopper on the thermostat housing and then replace the hose clamp so that it is beyond the "knurled" end of the housing. Once this is complete, add coolant into the radiator until it starts to bleed out of the bleeder screw you just loosened. Then tighten down the bleeder screw (hand tight, I used a pair of pliers because access was pretty tight, but again do not over-tighten.) You can now remove the bucket from earlier that should have drained coolant in it.


Step 11: Continue to top off your radiator with coolant. You’ll want to fill until the bottom of the filler neck has coolant in it, but not all the way to the very top of the neck, because the radiator cap takes up some space in there and will just result in wasted coolant being pushed out of the fillet neck. Don’t forget to replace the cap....twist it until it stops.
Step 12: Top off your coolant reservoir bottle to the max line. Your coolant bottle is best viewed from the drivers side looking down. Use a flashlight to help see the MAX and MIN lines if need be.
Step 12A: If you want to replace your air filter inside the airbox, do so now.
Step 13: Replace your air intake plumbing that you removed in step 2. Don’t forget to reconnect the sensor wire at the backside, and reclip the small hose in at the bolting locations. Use the two 10mm bolts and hand tighten them down. Then hand tighten the hose clamps at the airbox and throttle side with the flathead screwdriver. Be careful not to over-tighten anything.
Step 14: Continue to leave your hood open. Go into your jeep and turn the heat to the hottest setting. Make sure the A/C is NOT on. Start the engine, get out of the jeep and check for any leaks that may be occurring from a loose hose, bleeder screw, etc. Let the engine run for a few minutes until the electric cooling fan kicks in (you'll hear it turn on). Keep an eye on the temp gauge in the cabin (or on the EVIC if equipped)…if it starts to creep above the halfway mark (about 225-230 def F) at any point turn off the engine (you may have an additional problem that has not be covered here). Once the fan kicks in, you can turn the engine off and let it cool. After its cool, check the reservoir bottle and radiator and add coolant as required back up to max (DO NOT open the radiator unless the engine is cool). Start the engine again (heat still on)…close the hood and give it a quick drive around the block/down the street for a minute or two until you get the temp gauge to the center (195-210 def F). At this point your heat should start to blow warm/hot again. Again, keep an eye on the temp gauge during this process. Then let the engine cool and check your coolant levels again. You may need to repeat this process a few more times depending on your situation (may take a few hours depending on the ambient temperature outside). Keep checking for leaks during this process and over the next few days. Eventually you’ll get to the point where you won’t need to add coolant to the reservoir bottle or radiator anymore.
Once you coolant levels are totally topped of, go grab yourself a beer (or three) and relax...the job is complete.
Hope this helps someone else out there!
-Ryan
Last edited:
