What was done to your rig this week?

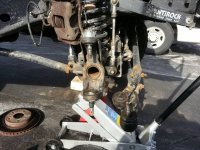
Ok not really see what you're getting at but the way I see it is.. He has the one jack holding his axle up because the shocks aren't on and the shocks hold the axle from dropping too far. If he had springs on then he could put jacks under the axle but since he doesn't he has them on the frame

I didn't see that his springs were removed, and all you said at first was shocks which wouldn't prevent you from using two stands

Sent from my whatchamacallit
 
The axle won't drop any farther then the shocks will go whether they are in or out. The only thing disconnected is the shocks and springs. The driveshaft is still in.

The jack stand under the axle is just keeping it up a little bit over night.
 
The axle won't drop any farther then the shocks will go whether they are in or out. The only thing disconnected is the shocks and springs. The driveshaft is still in.

The jack stand under the axle is just keeping it up a little bit over night.

Still looks good can't wait to see pics of the install :thumbup:

Sent from my whatchamacallit
 
The axle won't drop any farther then the shocks will go whether they are in or out. The only thing disconnected is the shocks and springs. The driveshaft is still in.

The jack stand under the axle is just keeping it up a little bit over night.

Yeah but without the shocks it's pretty much supported by the control arms and the bushing and drive shaft. But I understand what you're saying. Those dynatrac ball joints are beastly. Did you happen to get the install tools?
 
Yeah but without the shocks it's pretty much supported by the control arms and the bushing and drive shaft. But I understand what you're saying. Those dynatrac ball joints are beastly. Did you happen to get the install tools?

What tool? Ball joint press? Yes I have one.
 
Little Dip

Little ghetto, but until I pull the trigger on Evo bumpers this spring, I decided to Plasti Dip the silver parts of the stock bumper that were bugging the hell outta me :icon_crazy:

I also decided to record a POV video of the process in case anyone else would want to do the same, to see how easy it is to do even for a first timer like myself (Never used the stuff before).

One can is plenty to give the front and back 5 coats each. Love the outcome for what it is and love that it's durable, but non-permanent.

Here are pics of it after a week of being in the cold icy weather we've been having here in TX:
attachment.php

attachment.php


Was so happy with the stuff I used the last bit of it to dip the bare aluminum part of my ZX-6R's muffler (stuff is rated for temps above 300' F):
20140127_031045982_iOS.jpg
 
Started work on my new tire carrier, using the Poison Spyder C-piller kit as a base. All thats left is to weld it up and do some fine tuning, should be ready for paint on tuesday night. :clap2: (please note the photo’s were taken during the rough the 45degree angles are now flush... lol )

piping 1.jpgpiping 2.jpg
 
New 37s Nitto Trail Grapplers put on last night!
 

Attachments

  • new tires.jpg
    new tires.jpg
    95.5 KB · Views: 340
  • new tires1.jpg
    new tires1.jpg
    94.2 KB · Views: 338
Rebuilt my right side Dynatrac ball joints today. Drives great now. Pictured is the upper disassembled. Really is a fantastic design, and was easy to repair both joints.
 

Attachments

  • 1391280545559.jpg
    1391280545559.jpg
    93 KB · Views: 304
  • 1391280553915.jpg
    1391280553915.jpg
    91.6 KB · Views: 305
Top Bottom