Voyage of The Black Gypsy

GP NOIR

Hooked
EE9AF06F-6C70-4CB2-84D8-7E5B70D598BD-X4.jpg


I recently bought a black 2012 2 door Wrangler Rubicon with the 6 speed manual transmission with 122k on the clock. It came from Canada. Everything works and it looks to have been well taken care. It came with LT285/70R 17 Hankook mud terrains. It checked all the boxes- At the top of the list was the Rubicon 4.10 gears, 4: t case, lockers, heater/air conditioning and cruise control worked and heated seats. She looked clean, well taken care of and factory stock.

I fell in love on the first test drive. I’ve heard a lot of guys say while reviewing intakes and exhaust systems, the 3.6 V6 will never sound like a V8. Of course not! The 3.6 V6 has its own unique throaty growl and I love it.

We christened her The Black Gypsy.

A week ago, measured the suspension and to my surprise, found it was 3.75 inches over stock. That could explain the bad driveshaft u joint. Factory control arms were reinstalled with drop brackets. On the one hand, the brackets use up ground clearance. On the other, the control arms are still parallel to the ground for a smoother ride. The factory control were re-used in the rear as well.
E65F7B06-0CC7-43FD-9B84-7CC4D9245AAD-S.jpg


The front axle is centered in the chassis. No relocation bracket was used with the track bar. I’m guessing a longer track bar was installed, but it looks OEM. Is there an after market track bar that looks OEM?

The drag link hasn’t been flipped. I will be doing that when I can. There's no rush, she hasn’t exhibited any bad habits going down the freeway.
A73D443F-5DA4-4B9A-932C-135E09AD61EE-X4.jpg


There have been a few issues. The check engine light came on. Once for a bad thermostat and again for a bad gascap. I was shocked to learn that the thermostat, housing (made of plastic, no less!) and gasket all had to be replaced as a single assembly and cost $70! However, it paid for itself on installation. I’ve never had a thermostat installation go easier or more trouble free.

The gascap was an easy fix. I read the code with the Blue Driver app & dongle and after following the prompts, found myself on Amazon showing a selection of JK gascaps. Another click or two had the gascap on my doorstep the following day.

There have been a few other minor repairs and mods. LED headlights, JL hood latches, new tire pressure sensors, replacing the K&N intake, tightening a few hose clamps, replacing missing body buttons and so on.
950AFC79-06D6-4024-B2F2-C42D9962A45D-S.jpg


I have plans for the usual mods. Better bumpers, upgrade the factory rear driveshaft, install a winch… and I’ll have questions. I’ve driven and modified Cherokees for years, but this is my first Wrangler and my first SWB Jeep. There are things about the JK that I don’t know what don’t know and I suspect that as I go along, I’m gonna get an education.

This journey has just begun
A241B02D-B9E9-43D3-99C0-630D7E9D6D39-S.jpg
 

GP NOIR

Hooked
Congrats on the new jeep and welcome to Wayalife.

Two things: Create a build page in the member builds section and add stock grill to your buy list. 😝
Believe me, that grill is on the list of things I want to replace. But it's low on that list because Parts That GO take priority over Parts That Show.

Isn't this the Member's Build section? Or is a build page something else?
 

GP NOIR

Hooked
Thanks to all for the warm welcome!

Before buying the Jeep, I looked at the ball joints, u joints and what I was later to learn were called the Rzeppa joints. It didn't take long to determine the u joint of the front driveshaft was worn beyond allowable limits. Another problem was the aftermarket exhaust wasn't installed correctly and made the whole Jeep buzz! The dealer agreed to take care of both problems. I let him take care of the exhaust and he offered to pay me what repairing the driveshaft would cost so I could deal with the driveshaft myself.

Ain't she a beauty?
6C5F4A99-B4AB-456F-8DA9-54567C507296-S.jpg


The OEM driveshaft in the junk pile

5E00C8F1-E3DD-4A5A-95CD-CC819CCEAB58-X4.jpg

The money paid for an Adams 1350 driveshaft I installed myself. My first mod! It's runs very smooth on the freeway.

Someone had yanked out the factory exhaust from the cat back and installed a Magna Flow muffler/resonator then a tail pipe that dumped out before the rear axle. On top of that, the hangers didn't line up well and the exhaust barely hung in place. The dealer got the hangers lined up and installed well enough and ran the tail pipe all the way out the back like I asked. The exhaust has enough burble to be entertaining without being too loud, all the way up to redline.

What's next? Stay tuned to find out!
 

GP NOIR

Hooked
Be Still My Fluttering Hood

I'm all for honoring traditions, but watching the hood flutter as I'm driving does the freeway is more than just a bit disconcerting, especially after reading reports of JK hoods popping open while traveling lonely desert highways. I like the look of the JL latches and ordered a pair. Soon as they hit my doorstep, I began the install.

Three bolts for the upper half. One bolt and two locator pins for the lower. Shouldn't t take more than fifteen or twenty minutes. Except He-Who-Shall-Not-Be-Named always gets a vote. First, the bolts in the lower half are in an awkward location behind wires, hoses and catch tanks. Second, the alignment holes in the sheetmetal don't match the pins on the latch Time to break out the Dremel for the first modification involving cutting sheetmetal!

(I don't know why the photos are posting at different sizes. They were then with the same camera on the same settings. Must an Apple thing.)
06B1394E-30C0-402B-934A-A0BE1589C178-X4.jpg


The install took longer than anticipated, so I didn't get but a couple photos. It was getting dark, it was cold and if I didn't hurry up and finish, I was gonna be late for work! I did manage to snap a quick shot after the latches were installed.

BF698CBC-0957-43D9-AC31-9EB47F481953-X4.jpg


No more hood flutter! Now to drive Gypsy until the next needed repair or mod makes itself known...
 

GP NOIR

Hooked
That Looks Pretty Shifty To Me

When you watch the videos on YouTube showing how to install the B&M shift tower, you'll notice they all have one thing in common- None show how to instal the dust seal that goes between the transmission and the floor boards. They'll tell you to start the seal from the top, then raw underneath to work it into place. But they never show how it's done.

The Black Gypsy exhibited a bad habit so common to Wranglers equipped with the NSG370 6 speed manual transmission. She would randomly pop out of first gear during take off. I thought my tranny was going bad. After a bit of searching the internet, I found out this was a common problem due to the shifter assembly and that installing the B&M shift tower would solve the problem. I watched a few more videos, looked for write-ups online and decided to order the B&M shift tower for a bit over $600. Not cheap, but it promised more precise shifting, shorter throw and to cure the problem with popping out of first.

INSTALL-
With the exception of a couple of frozen bolts on the gas tank skid plate, the install was straight forward.
-Remove the T case skid plate.
-Remove the four forward bolts holding the gas tank in place. Loosen the two rear bolts enough the lower the front of the gas tank about four inches. You need just enough space to remove the t case cross member bolts and droop the back of the drive train.
-Remove the four cross member bolts holding the cross member to the chassis and lower the the tail of the t case. You don't need to remove the cross member from the t case
-Put the transmission and t case in neutral. Pop off both shift knobs. Raise the parking brake as high as it can go. You're supposed to be able to wiggle the knobs back and forth and pull hard. The case shift knob came off after a bit of a tussle, but the the internal lock of the tranny knob broke. It now won't lock back in place.
-Pull the center console out by grasping the top part of the cup holders and pull up. It unsnaps easy enough. You'll need to twist and turn a little to get it out of the way
-Remove the inner shifter boot. There's a thin piece of sheetmetal that acts like a nut. Spin it off carefully as the edges are sharp. Then lift the tab the nut was holding in place and unsnap the inner boot and remove it
-Remove the shift lever with a 45 Torx. Mine slide right off
-Remove the dust seal before removing the shift tower. The dust seal is probably old and crumbly and you don't want to drop any FOD down inside the tranny. After removing the dust seal, vacuum up the mess it made. Mine was in pieces
-Remove the four bolts holding the shift tower to the tranny. Use a 30 Torx. (Note: There is plenty of room for the Torx when removing the OEM shift tower, but you'll need a real skinny one to install the B&M.) You may need to carefully pry the shift tower loose as the factory seals it in place with what appears to be RTV
-Clean up the mating surface of the tranny & B&M shift tower with some solvent and clean rag. Put a little assembly lube on the B&M shift tower to hold the supplied gasket in place
-Carefully work the shifter in place making sure the gasket didn't shift
-Stat the four bolts and tighten them down. They need to be good and snug but don't over tighten. You could apply a little blue Locktite. Blue, not red. You might have to get those bolts off again someday
-Start carefully working the dust seal in front the top. You'll need to crawl under the Jeep, reach up around the transmission and work it into place. Go back and forth as needed. When the new dust seal tears in two, toss it on the ground and stomp it until you feel better. I noted the smaller the pieces I stomped it into, the better I felt
-LIft the tranny with a floor jack and install the cross member bolts. You may have to pry the cross member back into place. Double check torque of all bolts
-Lift the gas tank back into place. MAKE SURE ALL BOLTS ARE WELL STARTED BEFORE TORQUING TO PREVENT CROSS THREADING. Once bolts are all started, torque bolts. Double check the torque of all bolts
-Install shifter lever on shift tower
-Install inner boot with retainer nut
-Install center console
-Install both shift knobs
-Take for a test drive

BEFORE STARTING-
-Read the installation instructions provided by B&M
-Order a new dust shield and trim according to B&M instructions
-Check the condition of the inner boot before beginning. Mine was torn and needs to be replaced (Part on order. Should be in tomorrow)
-Hit the bolts of the skid plates & cross member with your favorite penetrating oil a couple of days in advance. Have a propane torch on hand for removal

AFTERMATH-
Shift pattern is significantly shorter. It's more positive and has a definite mechanical feel. However, it's stiffer, notchy and not as smooth. It's going to take some getting used to. I can hear (and feel) it click click it moves from one gear to the other. If you get sloppy, you'll miss the gate. Please note this is with the original OEM shift lever. The OEM shift lever has a very soft isolator which contributes to the vague feeling of the original shift tower. B&M sells a replacement shift lever without the isolator. It offers a bit of adjustment to position the lever and the end is threaded to fit many after market shift knobs. However, the lever itself is over $200 and to save a couple of bucks, I opted to re-use the OEM shifter which is sloppier than I realized and may be having a negative impact on the performance of the shift tower.

More on that in my next post....
 

GP NOIR

Hooked
Still Looks Shifty To Me

Further investigation revealed the primary problem with the tranny popping out of gear is the inner shift boot and sheetmetal interfering with the travel of the OEM shift lever. I saw evidence of this when I pulled out the inner boot. I could see where the boot was squashed between the lever and the sheetmetal.

The OEM shift lever uses a soft rubber isolator to reduce felt vibration. It creates an over travel when shifting. You have to take up the slack in the isolator before the shifter can move the ship forks in the tranny. Shifting feels vague, like the shifter is attached to rubber bands. I suspect this vagueness is why the B&M shift tower feels balky.

B&M offers an improved shift lever. It has a threaded end so a variety of shift knobs can be used and has a bit of adjustment so you can reposition it for your comfort. Most importantly is is has almost no slack. Trouble is it cost around $220. I didn't get the B&M shift lever when I ordered the B&M shift tower because I figured I'd just re-use the OEM lever. I was not aware of the problem with the soft isolator. I found out later the better precision of the B&M shift lever much improves shifting with the OEM shift tower and eliminates the problem with the transmission popping out of gear.

I am glad I got the B&M shift tower. It is an improvement over the OEM shift tower. But, I wish I'd gotten the B&M shift lever at the same time. If I had to do it over, I'd get the B&M shift lever first. I ordered one yesterday and am waiting for it to come. I'll let you know if it improves shifting with the B&M shift tower.

3EC8ED49-255B-4A61-A919-2E6773BB70F2-X4.jpg


PS- To anyone looking to improve shifting for their JK manual transmission, I'm reserving judgement of the B&M lever and tower until I have the lever installed and test it on the trail.

Does anyone have experience with the B&M shift lever & tower?
 
Last edited:

GP NOIR

Hooked
Shifty, But Not Shiftless

Received the B&M shift lever yesterday. I immediately installed it and took Gypsy for a test drive. Get this shift lever. Do not live with the POS factory shift lever longer than you have to.

With the OEM shift lever and its sloppy isolator, hitting the shift gates is always guesswork. Not so with the B&M shift lever. Shifting with the B&M lever is more precise. Shift gates stop being moving targets and are easier to hit. The lever itself is shorter and the knob smaller. It has some adjustments to allow you to position the knob where you want it. I simply installed it as it was and it falls comfortably to my hand.

The B&M shift tower has a tighter, precise shift pattern. Compared to the factory shift tower, it's stiffer and feels notchy. I'm hoping with time, it'll smooth out. I really like the mechanical feel to it, like the Old School transmissions I learned to drive on so many years ago. Shift gates are exactly where they're supposed to be. Unlike the Old School trannies, shift throw is real short.

The B&M shift lever is enough of an improvement by itself, you can get away with just using the factory shift tower. It eliminates the sloppy over travel and shake the OEM shifter has that's responsible for the transmission popping out of gear. It's a definite improvement.

The B&M shift tower is an improvement, but a subjective rather than an objective one. If you want a shorter throw and a more mechanical feel and don't mind a stiffer shifter, get it. Still, you have to ask yourself if you want it $600 worth. I like the shorter throw and the mechanical feel. To be honest however, if I'd bought the shift lever first, I would have saved the $600 for something else. Now that I have it, I won't send it back for a refund.
 

GP NOIR

Hooked
Getting The Shaft

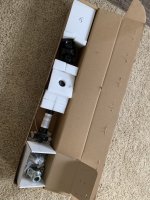
On the rear factory driveshaft, there's a lip around the Rzeppa joint and because of the lift, the shaft going into the Rzeppa sometimes hits the lip during articulation. The lip had a couple of outward dents. An order was placed for an Adams 1350 driveshaft. It came sooner than expected and when I opened the box, it was a sight to behold.

DS001.jpg

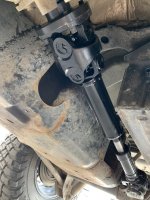
Because of corrosion, the rear driveshaft required a bit of persuasion to remove. The head of one flange bolt had to be cut and the driveshaft hammered on to get it out of the pinion flange. Once the driveshaft was out, the backlash was checked at the pinion. It was too tight and the torque required to turn the pinion a bit high. When the new flange was installed, I made sure the crush sleeve was crushed just a little bit. Break away torque and backlash fell within specs. The Jeep has over 120,000 miles on it. I don't see why the pinion was tight.

Installed! I don't remember the driveshafts of my youth being so heavy!
DS002.jpg

After a good day of wrenching, there's a tendency for the butt dyno to tell us "Wow! The Jeep now runs better!" The Jeep does feel smoother. However, my butt dyno also told me the Jeep was faster after installing new headlights...
 

GP NOIR

Hooked
Fix The Jeep And Drive It Until The Next Thing Breaks

I crawled under my Jeep to look things over after the day trip to Five Mile Pass last Sunday and found the front axle u-joints have play in them. Well, poop! Ordered u-joints, wheel bearings and a few tools from AutoZone. Got 20% off my first purchase for signing up for their rewards program. Everything should be here shortly.

Other problems I ned to troubleshoot are a gas cap light, check engine light and ABS light. In dealing with the gas cap light, I've tightened hose clamps, cleaned gas stains, replaced the gas cap and the vent valve. I'm gonna check the hoses again for dry rot and check the hose clamps. I have a feeling at some point, I'm just gonna have to bite that $200 bullet and replace the evaporator canister. Any suggestions what else to try?

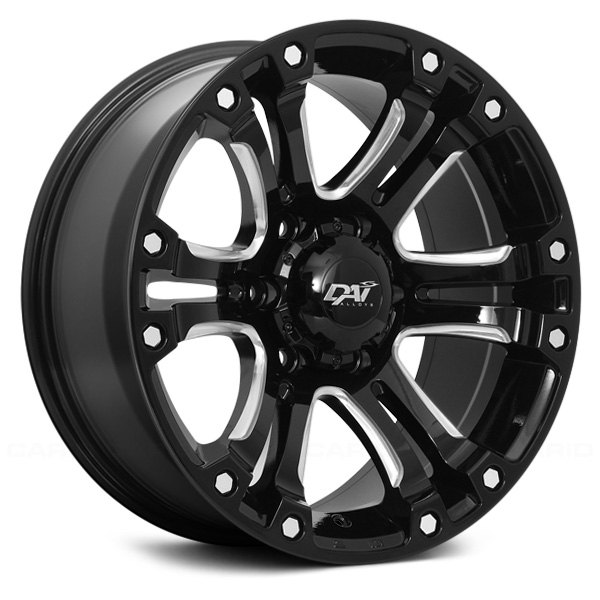
I know this is a long shot, but I need one DAI Crusher 17x9 5 on 5 (5 on 127mm) rim with 5 inch backspace. The rims are Canadian. I need one for a spare.

dai-alloys-crusher-gloss-black-milled-accents_1.jpg
 

GP NOIR

Hooked
Well, POOP!

If you're gonna fix the Jeep and drive until it breaks, you gotta fix it first. I've got a crazy, sometimes unpredictable work schedule because the flight schedules vary from day to day and some planes come in early, some late, some get cancelled and somethimes flight are added without warning. So, I gotta shoehorn time to fix the Jeep in there when I can and work at a mad pace so I'm not late for work. That's what happened Tuesday. Parts didn't come in until the afternoon and the single flight I had didn't come in until 10 pm. That gave me a few hours, so I dove right in.

I am an actual shade tree mechanic when working on the Jeep. I have no garage, but I do have a flat spot on the grass under a shady tree. Long story short, between frozen bolts, a lost c clip for the u joints and the inability to figure out how to disconnect the ABS speed sensor, it was dark before I got the left side done. Didn't even get started on the right side. I needed to get to work, so I bundled up the new sensor harness (which, after installing the wheel bearing, I found was too short) and the old sensor harness and took off for work. The traction control and ABS was all sorts of confused, but I got to work OK.

Getting home was another story. The instrument panel light up like Tim Allen's house at Christmas and one brake locked up solid. The plane was late, so there I was at 0100 hrs trying to figure out how to hook up the old sensor in hopes to get home. It took a bit of finagling, but I got it done and the Jeep behaved enough to drive home.

After reading the codes, I suspect the tone ring in the new wheel bearing doesn't match the factory tone ring on the right side. This raises the question- Do I go ahead and install the new bearing on the right side? Or go back to the old bearing? The old bearings are in good shape, but I thought as I'm pulling the bearings to get to the u joints, I'd install new wheel bearings.

I have been getting an ABS light after my last wheeling trip. I think my next step is going to be reinstalling the old wheel bearings, returning the new bearings and taking another reading of the codes. Currently, I'm driving my Jeep with the the J6 & J7 fuses pulled to deactivate the ABS & traction control.

Anyone got suggestions?

PS- Can anyone tell me how to disconnect the sensor from the chassis side?
 

Spazbyt

Hooked
Should be a simple plug. Some ABS sensors come with wires that are shorter then OEM but will work if you rout them a different way then OEM. Where did you get the wheel bearing? What brand? When you say the dash lit up. What exactly? Just the ABS and traction control or other lights too? With 120K miles I would do bearings and sensors from a reputable company all at the same time.
 

GP NOIR

Hooked
Should be a simple plug.
You'd think so. It has a red tab that must be either pushed in or pulled out to remove. (It's not a sideways tab.) But I cannot figure out which. I don't want to pull too hard and break wires or the connector. I don't know if I have to squeeze something or what. I've tried finding a YouTube vid showing how it's done, but so far, it's eluded my Search-fu

Some ABS sensors come with wires that are shorter then OEM but will work if you rout them a different way then OEM.
I might be able to make it work. But I have to get the old sensor disconnected first

Where did you get the wheel bearing? What brand?
I got the wheel bearings from Auto Zone. They're made by Duralast

When you say the dash lit up. What exactly? Just the ABS and traction control or other lights too? With 120K miles I would do bearings and sensors from a reputable company all at the same time.
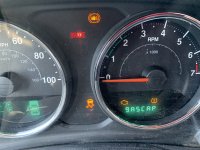
The ABS, BRAKE & BUTT WIGGLE lights lit up

WARNINGLIGHTS.jpg

The CHECK ENGINE light, LOW TIRE and GASCAP are unrelated to the brake issue.

CHECK ENGINE is for the GASCAP. Code reader says there's a minor leak. I think I need to get a new evap canister.
LOW TIRE is because the tire pressure threshold needs to be reprogrammed. It's also possible the tire store installed the wrong sensor units. I don't want to get into that yet because I haven't given the store a chance to address the problem.
 

GP NOIR

Hooked
PS- My concern with the shorter wires on the sensor assembly is the suspension is 3.75 inches taller than stock
 

GP NOIR

Hooked
Right!

Last Tuesday, Ireplaced the wheel bearing and u joint on the left side. Today, I had enough time from the last flight of the afternoon and the evening flight to tackle the right side. I planned my work flow better and the job went smoother. Like the left side, the u joint bearings were dry and rusty. The R/H wheel bearing had play in it. Since getting the work done, steering is more precise, the slight wobble in the steering wheel is gone and the vibrations are gone. When I get a chance, I'll pop the fuses back in and see what error codes the brake system gives me.
 

GP NOIR

Hooked
Gimme A Brake!

Mystery solved. Removing the fender flare and the wheel assembly gave me better access to the speed sensor connector so I could figure out how to disconnect it. The new sensor was installed and all my brake codes went away.
 

GP NOIR

Hooked
Shiftier Still

While an improvement over stock, the B&M shifter assembly was stiff and balky when it was first installed. Now, after a couple thousand mikes, it's gotten noticeably better. Still a bit stiff now and again, but much improved. I've been wondering about the condition of the clutch. A worn clutch can make a shifting balky.

Well, I wonder no more. Last weekend while on a trail run, the throwout bearing started squealing. Jeep has 127k showing on the clock. Time for a new clutch assembly. I'm gonna give the Centerforce Dual Friction Clutch kit a try.
 
Top Bottom