Sunnyside's Gladiator build begins...

WJCO

Meme King
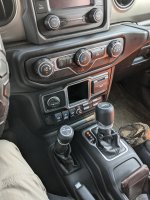
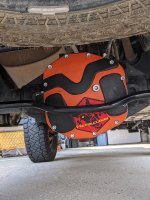
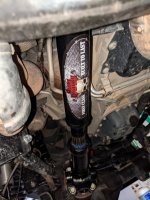
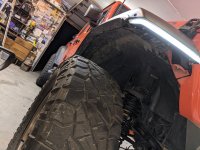
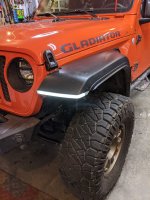
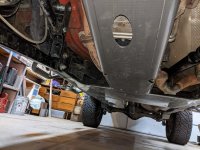
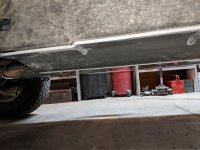
So if you have not guessed... I like some old school looks...even in a modern JT truck. When I bought the air lockers and compressor... and the redarch brake controller... I had a plan to take the dash apart and make the switches look like they fit. I didn't have to buy anything... I just had to work at it. The ARB harness is proven and robust... the switches last forever. I then looked and noticed the aftermarket came up with a switch group that fits right in the hole next to the Aux switch panel - but in reading the small print they install a lot of things.... like rev limiters, 4wd low only... Not that I often want to use a locker at speed or anything like that... I just hate the reliance on the chip inside the aftermarket panel telling me what I can and can't do. So- back to old school and cheap. I used my drill and jig saw... and made a panel and wired it all up...and it has a tinge of old school...but looks like it belongs! I cleaned it up after the photos...it was dirty in the truck... but all of them fit, they all work and all the lines are leak free! Just have to have the axle side done now! I also had to change up my air chuck at the top... since now the compressor can't just dump air until I attach a hose... I fixed that part too!
That came out pretty good. Nice work.
 

sunnysideup

Active Member
Here is a pic in a clean jeep of the ARB switches. All electronics are now wired and all switches mounted in jeep! The gears, axles, truss, and lockers are being put in this week!
 

Attachments

  • PXL_20210718_221744063.jpg
    PXL_20210718_221744063.jpg
    212.8 KB · Views: 37

sunnysideup

Active Member
I got the rear axle set up with the 488's 35 spline and ARB! The front is proving to take me on a detour..... I bought the RCV kit for a Max Tow front with the EAD retained. The tech ended up spending 4 hours on the phone with them...because sadly the center shaft is about 3/16 inch too long. So on the front I have RCV on the drivers side.... and stock on passenger side until I get a new middle shaft. RCV told me that they thought they had all JT front ends covered- all three trim levels. But they have found up to 10 differences from the factory on shaft lengths and its driving them nuts. It may even be that you will need to take your front axle apart and measure to get the right kit! I wondered if mine was just an oddball...but there are several others that have had the same issue. 8 to 10 weeks for the right shaft to come in.... so we just put the stock shafts back in and it works fine on the passenger side. All the parts fit except that middle shaft... so heads up if you go this route that you might have a headache....

I have a tazer... so got the gearing swapped in the computer and I am now breaking in the ring and pinion...

or I was... Got covid tested and I have it again (my wife and I both!) So... just sitting at home now... and not feeling good enough to install any parts.... We were in a group of 9 that tested positive- 3 fully vaccinated, 3 of us had already had it... 3 had never had it and were not vaccinated... and we all got 9 it. So far for me... I seem to be recovering much quicker than last time, same type junk as last time, but its lighter this go around. My wife is having a tougher fight this time... but today we both seem to be getting better... we are "free to leave the home" on Friday... so if I feel up to it... I might take the truck on a 200 miles gravel road trip to break in the front gears... with the fad- they don't turn in 2wd- so I am thinking I need to do something to get them spinning.
 

sunnysideup

Active Member
Well.... getting over covid is about done. So I will start on some parts this weekend again!

I wanted to move the air inlet for my ARB up where it is less likely to ingest water... and also put it in a location where it will normally be bringing in air from a cooler source. So I just added a "t" fitting on top of the compressor... ran about 1 foot of hose and put it up under the cowl on drivers side. This should help cool the compressor as well as protect it from water. PXL_20210731_033007324.jpg
 

sunnysideup

Active Member
A few more additions to the build today once I got off from work! Rock Hard front LCA skids... And the ARB cover I might not of taken a pic of before...

PXL_20210807_002356038.jpg PXL_20210807_002401945.jpg
 

sunnysideup

Active Member
I also took the location of the stock breather on the rear diff.... and moved it up into the rear fender. To do this- I removed the breather and hose clamped it on to the extended line. Ran the line up into the fender and came down through the hole in the body that you can see the location of in the second picture...it is up inside the body. then I took the extended line and plugged it into the old breather position on the body. This raises the breather from the bottom of the body to half way up inside the fender near the bed rail. The front one and Transmission already mount high in the engine compartment.... this just put the rear up to a similar height!
PXL_20210807_002545828.jpg PXL_20210807_002534623.jpg
 

sunnysideup

Active Member
A couple more things... Put Amsoil in transfer case ( a tradition for my jeeps!) - and the rear diff gears have been broke in now- so it has new gear lube and a new heavy duty diff cover (I got very inexpensive in November...) I just figured I would wait to put it on until gears got all switched out and such. Then I made a bracket to hold my traction boards to the inside roof of the camper shell I made. Still have room for the home made roof mounted Molle panel too... just got to get that cut. All I have left coming... new front driveshaft, a fender trim kit, and I have to get my skids mounted. I need to go put some miles on the front end under load still to break in those gears.... then RCV has a part coming so the front can all go back together with their parts. I started ordering parts in April/May.... so this has taken a long summer to get it all finished! PXL_20210807_235118223.jpg
 

Attachments

  • PXL_20210807_235132198.jpg
    PXL_20210807_235132198.jpg
    217.1 KB · Views: 12
  • PXL_20210807_235025335.jpg
    PXL_20210807_235025335.jpg
    182.9 KB · Views: 12

sunnysideup

Active Member
I almost forgot I ordered these 3.5 or 4 months ago!
They came in...just in time - I have some pretty hard trails coming up this week to try everything out on. These are the American Adventure lights. I kept the liners and used the harness that deletes any error codes due to the led lights. They are being used on the Max Tow fenders as opposed to the sport or rubicon... They have an overhang on the inside of the fender near the body... but I painted it black and its not that bad. I have plans on how to make it disappear. No error codes and they are great so far! Gained about 2.5 inches when sway bar is disconnected before impact with fenders. PXL_20210831_032347874.jpg
 

Attachments

  • PXL_20210831_032356269.jpg
    PXL_20210831_032356269.jpg
    201 KB · Views: 11
  • PXL_20210831_032414591.jpg
    PXL_20210831_032414591.jpg
    199.2 KB · Views: 11

Jsouder53

Hooked
I almost forgot I ordered these 3.5 or 4 months ago!
They came in...just in time - I have some pretty hard trails coming up this week to try everything out on. These are the American Adventure lights. I kept the liners and used the harness that deletes any error codes due to the led lights. They are being used on the Max Tow fenders as opposed to the sport or rubicon... They have an overhang on the inside of the fender near the body... but I painted it black and its not that bad. I have plans on how to make it disappear. No error codes and they are great so far! Gained about 2.5 inches when sway bar is disconnected before impact with fenders. View attachment 366636
Those look good!
 

sunnysideup

Active Member
Got around to the skid plates... big job! Instructions are not very accurate for the Gladiator yet... different front mounts, different rear... some tabs in different positions... a nasty metal strap over the front of the tank that is not on the JL. Good news is... the parts all fit after you figure out where they go! I measured the skids from the ground and they do give you 7/8 to 1/2inch GC increase all over the underside compared to stock . For 10lbs more weight... and the piece of mind. I treated mine with a slippery paint... to help in the snow and minor scrapes. About 6 hours install...using the floor of the garage with no help. Here is the finished product from Artec...
 

Attachments

  • PXL_20210901_055747960.jpg
    PXL_20210901_055747960.jpg
    197.9 KB · Views: 27
  • PXL_20210901_055917857.jpg
    PXL_20210901_055917857.jpg
    163.8 KB · Views: 27

sunnysideup

Active Member
Putting it to the test.... first shakedown!
Things discovered:
1. I have just enough fender clearance to full flex!
2. Topper doubles as a shelter when needed!
3. Arb single compressor can fill four 37 inch tires from 13psi to 34psi without overheating.
4. Ridge grapplers are good tires!
5. Manual sway bar disconnects work , but you do get dirty doing it- only want to reconnect on flat ground.
PXL_20210903_234443106.jpg
 

Attachments

  • PXL_20210903_234544319.jpg
    PXL_20210903_234544319.jpg
    194.8 KB · Views: 5

sunnysideup

Active Member
I ran 5 trails in 3 days! lots of pics... the ride is great, lockers work great, my wife and I camped in it 3 nights... with a tarp over the back, I have plans to make a tent attachment this winter now. (Never built a tent before?) Anyway... here are a couple more pics!
PXL_20210902_200443455.jpg
 

Attachments

  • PXL_20210903_201736978.jpg
    PXL_20210903_201736978.jpg
    304.7 KB · Views: 17
  • PXL_20210902_235739281.jpg
    PXL_20210902_235739281.jpg
    319.2 KB · Views: 20
  • PXL_20210902_223546242.jpg
    PXL_20210902_223546242.jpg
    314.5 KB · Views: 20

sunnysideup

Active Member
I don't know how I skipped over this but how do you like the stealth light bar? I was looking at getting that same one but was concerned on how bright it is and glare from the hood...
I think the light is pretty amazing.... they reset the lights into the housing and it has a lip to match the slope of the window on the bottom... this seems to aim the lights out away from the hood. It also seems the lights on the side of the bar are aimed out to the sides a bit more than the center, as you get some good lighting out to the sides of the road and past with it. Be careful to install it tight... and some have even placed some thin weather striping across the bottom before bolting it up to be sure there is no light gap coming down on the dash. It puts out plenty of light! I do wonder if it is illegal in some states since it is not covered? No one has stopped me yet...but I live in the west.... I'll check to see if I have some pics in the cab of the light output and placement...
 

Bullwinckle

Hooked
I think the light is pretty amazing.... they reset the lights into the housing and it has a lip to match the slope of the window on the bottom... this seems to aim the lights out away from the hood. It also seems the lights on the side of the bar are aimed out to the sides a bit more than the center, as you get some good lighting out to the sides of the road and past with it. Be careful to install it tight... and some have even placed some thin weather striping across the bottom before bolting it up to be sure there is no light gap coming down on the dash. It puts out plenty of light! I do wonder if it is illegal in some states since it is not covered? No one has stopped me yet...but I live in the west.... I'll check to see if I have some pics in the cab of the light output and placement...
Ok that’s good to hear! I’m thinking I may definitely go with this lighting system. I also like the fact it has the white/amber combo. I don’t think too many cops would bother with it being that it’s inside…
 
Top Bottom