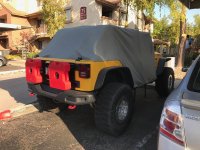
Maggie the Yellow JKU

AZ Explorer

Caught the Bug
A little update

As expected, the dry fit of the Poison Spyder cage was a royal pain in the ass. The entire complex was blitzkrieged with F-bombs. It'll be worth it in the end but boy, did it suck. It looked fantastic once done and I got it to snug up to the dash nicely no thanks the garbage instructions which put the holes too low on the door jambs. I should have ignored their measurements and marked off the holes the right way. Instead I had to wallow them out a bit which I hated but since the side brackets go to the floor it's still super strong, and the washers hide the holes anyhow. The problem is I know they're not perfect and that'll bug me for a while. I dropped the parts off at powdercoat today. I love my powdercoat guy! He has done all the parts on my Jeep and does great work. He's doing the whole cage, blasting and paint in 60% black (like the rest of my stuff) for $125.00. He will be taking a week and a half to get to it because he's really booked and is going to do mine with a bunch of other small parts getting done in black but for his quality and prices, I'll wait. The good news is, now that I have the daily driver, I'm in no big rush to get it done. So I'll get pics up when I'm done with it.

In other news, UPS has sent me a message the my Rotopax mounts will be here tomorrow. Still waiting on the tailgate armor but was told by the manufacturer last Friday that it was supposed to ship Monday. Hopefully I will see that by the end of the week. Meanwhile, I'll just sit and look at the pax and latches sitting in the corner.
 

wayoflife

Administrator
Staff member
As expected, the dry fit of the Poison Spyder cage was a royal pain in the ass. The entire complex was blitzkrieged with F-bombs. It'll be worth it in the end but boy, did it suck. It looked fantastic once done and I got it to snug up to the dash nicely no thanks the garbage instructions which put the holes too low on the door jambs. I should have ignored their measurements and marked off the holes the right way. Instead I had to wallow them out a bit which I hated but since the side brackets go to the floor it's still super strong, and the washers hide the holes anyhow. The problem is I know they're not perfect and that'll bug me for a while. I dropped the parts off at powdercoat today. I love my powdercoat guy! He has done all the parts on my Jeep and does great work. He's doing the whole cage, blasting and paint in 60% black (like the rest of my stuff) for $125.00. He will be taking a week and a half to get to it because he's really booked and is going to do mine with a bunch of other small parts getting done in black but for his quality and prices, I'll wait. The good news is, now that I have the daily driver, I'm in no big rush to get it done. So I'll get pics up when I'm done with it.

In other news, UPS has sent me a message the my Rotopax mounts will be here tomorrow. Still waiting on the tailgate armor but was told by the manufacturer last Friday that it was supposed to ship Monday. Hopefully I will see that by the end of the week. Meanwhile, I'll just sit and look at the pax and latches sitting in the corner.

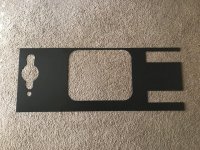
About what I've heard with Poison Spyder's cage. Hopefully it doesn't get all beat up going back in after the parts are powder coated.
 

Texas_Jester

New member
Whole jeep looks awesome, but I must say, I love these Mastercraft seats. Nice ride and thanks for sharing this build thread.

First off the Mastercraft seats are great. Super comfy and really hold you in when cornering. I know the common way to do the rear is to run buckets all around but in keeping with the old school style, I wanted a bench. It is only my wife and I so rarely is anyone back there. I did sit back there and it is surprisingly comfortable as well. Head and shoulders easily clear the spare tire. When we travel, we can stuff quite a bit around the spare tire and load the rear passenger area with everything else. I really like the tire inside keeping the weight over the axle and not hitting anything outside on trails. We have slightly more space than a fully loaded 2 door so we are happy. Oh yeah, the console cover is not something I like the looks of so much, but we have both burned our elbows a few times in the Phoenix heat in the dead of summer. Necessary evil, I suppose.

View attachment 248984 View attachment 248985

I also did the Rock Hard pillar braces. Easy install to add passenger protection when they are back there. It also gave me a great place to mount the quick release fire extinguishers. The pins are on the outside but I can swap them from side to side to put the pins on the inside for when the top is on.

View attachment 248986
 

AZ Explorer

Caught the Bug
Whole jeep looks awesome, but I must say, I love these Mastercraft seats. Nice ride and thanks for sharing this build thread.

Glad you enjoy it. I love the Mastercraft seats too, very comfortable. Although I think I might be the only person who is running the bench in the back.
 

AZ Explorer

Caught the Bug
Tailgate armor

Well, third times the charm. Finally got the right armor. Would've got it right from the start if my shop used the Warrior part numbers instead of the in house ones (which were wrong, LOL). Anyhow, the part was packaged well enough and shrink wrapped on the ends. Powdercoat is really good and without dings or scratches. The only thing I don't like about it is there are no pre-drilled holes for mounting. The instructions say to line everything up and use at least 8 of the included pop rivets. 4 along the top and bottom spaced evenly. So I have to figure out where the best place to drill is and through the nice new armor as well. :mad: Not really a big deal but would have been nice if it came like the side armor and had the same mounting hardware as EVO and Poison Spyder. Hopefully it won't look too bad on the inside of the tailgate since it appears at first glance that the rivets will be visible because drilling is at the edges, at least along the bottom. Maybe I'll run a chalk line and go a little higher there. Still, overall I think it will be a good add on. An accurately cut piece of 12 gauge armor already powdercoated is a decent deal for $130.00, to me anyhow. I will be installing it probably Sunday morning early before the heat kicks in. Would do it tomorrow but I ended up having to work last minute.

unnamed.jpg
 

AZ Explorer

Caught the Bug
Warrior armor installed

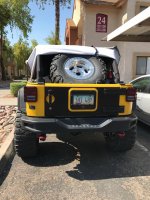
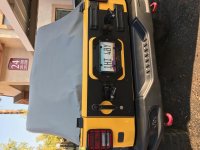
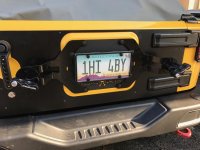
Got this thing put on and it was pretty easy to figure out where to drill. There is a slight curve to the tailgate and the piece is really flat. The rivets don't seem to pull in as tight as I would like so there are a couple of really small gaps that I don't like. They do not jump out at you but the fit isn't perfect. It is something I can fix, but I'll do it probably next year when I'm in a house. The fix will be to drill out the rivets work a slight curve into the part, and then replace the rivets with nutserts. Other than that, I like it. Although I don't know how much of it I will see once I get my rotopax mounts back from powdercoat and put on. It covers the couple of small dings I have been getting for some unknown reason, and also covers the small holes that were left from doing the license plate relocation to the tailgate instead of using the plastic plugs. I only had to trim one of the hinge covers with my dremel and those fit really well.

unnamed.jpg
 

VeruGE*144

Caught the Bug
It looks really good, I like it.
How is that poison spyder cage coming along. How long did it take you to get it fitted? I am considering this one myself I really like the design.


Sent from my iPhone using WAYALIFE mobile app
 

AZ Explorer

Caught the Bug
It looks really good, I like it.
How is that poison spyder cage coming along. How long did it take you to get it fitted? I am considering this one myself I really like the design.


Sent from my iPhone using WAYALIFE mobile app

Cage should be done early this week installed next weekend. Fitting took about 6 1/2 hours The biggest thing is making sure the side pieces are placed properly, as far to the rear of the Jeep as you can get the spacers and up higher than the directions say so the floor spacers are in. Otherwise the sides do not fit against the dash edge properly. Then you have to tap the threads to clean them or the bolts get stuck. I had one break and had to drill it out. I do really like the looks and function once it's in, but it's extra work to get it right. Will post up the pics once it's in.
 

AZ Explorer

Caught the Bug
Can't wait to see the cage all done. Just curious, why did you go with the Poison Spyder cage?

The main reason is because I have been trying to keep a relatively old school look. The Poison Spyder cage tubes along the windshield, goes up and curves to replace the factory bar going toward the rear. The one piece design is more classic looking. I am one of the few people who don't care if the windshield is tied to the cage. There is talk of it flopping around in a rollover, but I think the way it's brackets are, it will stay in place. In any event, it's as safe as any CJ which was never tied in to the windshield back in the day and nobody worried about that back then. I don't feel as if this cage is any safer than say, the rock hard because the facts don't back that up. But I think it is at least as safe. I also like the way the side panels fit tighter to the curve of the dash and are bolted/screwed on. Every rock hard I have seen including their demo Jeep, always has a gap and you can see into the dash. That really bugged me. Maybe there's a way to fix that but all the pics I saw of the Spyder cage had that gap closed up tight and to me it looked more factory. If anyone is looking for a cage where ease of install is a priority, this is not for them. I won't even say it looks better than RH or EVO, just that it looks like what I wanted and met the safety requirements.
 

JKbrick

Active Member
The main reason is because I have been trying to keep a relatively old school look. The Poison Spyder cage tubes along the windshield, goes up and curves to replace the factory bar going toward the rear. The one piece design is more classic looking. I am one of the few people who don't care if the windshield is tied to the cage. There is talk of it flopping around in a rollover, but I think the way it's brackets are, it will stay in place. In any event, it's as safe as any CJ which was never tied in to the windshield back in the day and nobody worried about that back then. I don't feel as if this cage is any safer than say, the rock hard because the facts don't back that up. But I think it is at least as safe. I also like the way the side panels fit tighter to the curve of the dash and are bolted/screwed on. Every rock hard I have seen including their demo Jeep, always has a gap and you can see into the dash. That really bugged me. Maybe there's a way to fix that but all the pics I saw of the Spyder cage had that gap closed up tight and to me it looked more factory. If anyone is looking for a cage where ease of install is a priority, this is not for them. I won't even say it looks better than RH or EVO, just that it looks like what I wanted and met the safety requirements.

Does it bolt to the door jamb or is it old school as in the front tube goes to the floor and bolts down with a plate? That's how I remember roll cages


Sent from my iPad using WAYALIFE mobile app
 

AZ Explorer

Caught the Bug
Does it bolt to the door jamb or is it old school as in the front tube goes to the floor and bolts down with a plate? That's how I remember roll cages


Sent from my iPad using WAYALIFE mobile app

It actually bolts to the door jamb and to the floor, although it is tubes above the dash and flat-plate below with gussets at the floor reenforcing the L-bend there. So I'd say it's sort of old school in that respect. Really, it's the overall look that is old school in terms of the tubular part.
 
Last edited:

BananaJeep

Caught the Bug
The main reason is because I have been trying to keep a relatively old school look. The Poison Spyder cage tubes along the windshield, goes up and curves to replace the factory bar going toward the rear. The one piece design is more classic looking. I am one of the few people who don't care if the windshield is tied to the cage. There is talk of it flopping around in a rollover, but I think the way it's brackets are, it will stay in place. In any event, it's as safe as any CJ which was never tied in to the windshield back in the day and nobody worried about that back then. I don't feel as if this cage is any safer than say, the rock hard because the facts don't back that up. But I think it is at least as safe. I also like the way the side panels fit tighter to the curve of the dash and are bolted/screwed on. Every rock hard I have seen including their demo Jeep, always has a gap and you can see into the dash. That really bugged me. Maybe there's a way to fix that but all the pics I saw of the Spyder cage had that gap closed up tight and to me it looked more factory. If anyone is looking for a cage where ease of install is a priority, this is not for them. I won't even say it looks better than RH or EVO, just that it looks like what I wanted and met the safety requirements.

I have a Rockhard cage and ran it without the windshield bolted to it for a long time. I used to love flipping the windshield down offroad and it made it so much easier. I rarely do that anymore so I have since bolted it back up but yeah, I never felt it was any less safe than having it bolted up. Good luck with the install, can't wait to see it all done! :thumb:
 

AZ Explorer

Caught the Bug
Rotopax

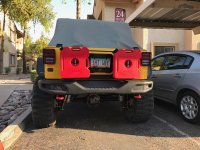
The cage is back from powder but that will have to wait until the weekend because it's too hot, like 118 degrees hot. So this weekend will consist of early mornings to get as much done as I can before it gets unbearable.
In the meantime, the Rotopax mounts are also back and these were a quick 15 minute job including grabbing the tools and putting them away afterward. The work well for my application and look good too as well as keeping the license plate visible to the PO-PO.

IMG_0243.jpg
IMG_0244.jpg
IMG_0245.jpg
IMG_0247.jpg
 

M_Savage

Caught the Bug
we are seriously building similar rigs! both currently working on installing cages. :clap2:

looks good! need picture updates!
 

AZ Explorer

Caught the Bug
Looking good! Can't wait to see the cage. I have the same roto mounts. Super easy install and pretty stealth when you don't have the actual cans mounted.

Sent from my iPhone using WAYALIFE mobile app

If it was cool enough here to install after work, the cage would get done faster. Staring at all the parts on the floor of my office is starting to get to me.

we are seriously building similar rigs! both currently working on installing cages. :clap2:

looks good! need picture updates!

Pics will be up as soon as it's in for sure. I'm always checking in on yours just because it is so similar. Always interested to see what you're up to.

roto mounts look great :thumb:

Thank you very much!!
 
Top Bottom