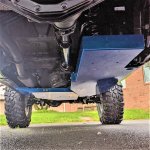
I know that Hauk Offroad has gone out of business and this will be a long shot. I have gotten a Hauk Offroad skid plate set for my Jeep Gladiator. However it does not have any of the hardware and I cannot find any instructions. I would love to hear from someone that has this setup so I can get some insight on what else I may be missing. Not sure if I have all the brackets and braces. Any help or insight is appreciated.
You are using an out of date browser. It may not display this or other websites correctly.
You should upgrade or use an alternative browser.
You should upgrade or use an alternative browser.
Hauk Offroad Skid Plates-Instructions Needed
- Thread starter CLOberto
- Start date
Unfortunatley I have been unable to find one that matches a Gladiator JT or a Jeep JLU. Only a JK and not much help.IIRC they have a youtube installation video.
kevman65
Hooked
Hauk Offroad Skidplates: Yikes...
I'm just gonna stick this in here for now as a quick review. Maybe I'll come back and add more pictures later. However, if you're considering getting the Hauk Offroad skid plate system for your Gladiator be prepared... It's not easy to install in your drive way. If you look at the pics from...
thanks for thi
Thanks for this. I have read this post as well as several others. None have a complete listing of all the parts and hardware required. I suspect I will just have to start fitting things and figure out what works and what doesn't.Hauk Offroad Skidplates: Yikes...
I'm just gonna stick this in here for now as a quick review. Maybe I'll come back and add more pictures later. However, if you're considering getting the Hauk Offroad skid plate system for your Gladiator be prepared... It's not easy to install in your drive way. If you look at the pics from...www.wayalife.com
kevman65
Hooked
Send the OP in that thread a DM.thanks for thi
Thanks for this. I have read this post as well as several others. None have a complete listing of all the parts and hardware required. I suspect I will just have to start fitting things and figure out what works and what doesn't.
sent a DM to OP.Try this
kevman65
Hooked
There are a couple of other install video's out there. The two that came up are places not favored here. Just do a search for "Hauk Offroad skid plates for JT installation video".
I looked at these before they closed, did some research on reviews and scratched them off the list.
If you get a copy of the instructions, get hardware at least 1/4" longer than they list, you may want to run the next drill bit bigger than the hole through all of the holes.
I looked at these before they closed, did some research on reviews and scratched them off the list.
If you get a copy of the instructions, get hardware at least 1/4" longer than they list, you may want to run the next drill bit bigger than the hole through all of the holes.


ScoobyCarolanNC
Active Member
Ok. It looks like you have almost everything except the bolts. Does one half of the gas tank skid have one of this black plates bolted across it? I didn’t see it in the pictures?
ScoobyCarolanNC
Active Member
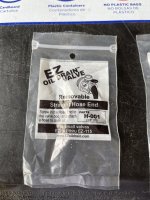
The other major part you will need these. One is an oil drain valve and a hose end adapter for it. Then get about a foot and a half of gas hose. Without these you won’t be able to easily change your oil. Also, to put these on you’ll need to do an oil change so be ready for that.
Attachments

ScoobyCarolanNC
Active Member
Here's the incorrect instructions I was provided. That triangle drain plug cover is clutch, but its just a plate with the holes countersunk so you can put flathead bolts into it and get them to bolt into the main plate. The instructions have the hardware list, but these are for the gen 1 plates, not what you and I have. I have fucking PTSD from just thinking about what I went through by myself to get this up. However, its indestructible and I'm super happy with it after hanging my truck up on the rocks at Uwharrie. Here's some tips and some of the major areas it differs:
- The 2 piece gas tank plates. Bolt these together on the ground well, very well. Then follow the instructions and once your brackets are installed use a jack with a board to press the skid up to the gas tank. You will likely have to raise and lower it a few times and adjust the brackets to get it to line up. The tolerances are extremely tight. Don't be scared to drill out if you need an extra 1/32nd of an inch. Hit it with some spray paint to prevent rust.
- Speaking of which, dont do this with a lot of gas in the tank. You are removing and then replacing some of the bolts that mount it.
- The front plate's wings (step 25). The motor mounts don't look at all like the picture and yours look like mine. Go under there BEFORE you start doing anything with the wings, a flashlight, and some spare nuts. Look up and you'll need to find the existing bolts in there and figure out what size they are. DO NOT REMOVE THE EXISTING NUTS. The wings should fit over them and you use the excess bolt to put a nut on. I think I put a washer in between the exisitng bolt and wing. You'll understand what I mean when you see it. Basically this whole area is bullshit and you'll have to engineer it yourself. Just do it before you start.
- One of the black brackets will bolt to the center of the midplate and requires you to use self-tapping screws to mount ti to the tub. This wont fit either and you'll need to come up with a spacer or re-bend it, or redrill it. Again, some bullshit you'll have to re-engineer on your back. I did this step last since the whole system needs to move a bit during install.
- If you have a lift and installed spacers under the driveshaft carrier bearing then dealing with the gas tank bracket over there might be tough. I had to grind a little extra clearance off the spacers because they touched the bracket. So get ready to redo that whole thing.
- My life was a ton easier by getting 1.25"x3/4" bots instead of the supplied ones. Sometimes 1" is all that will fit in tight spots, but that extra quarter inch will bve a life saver other times. Also get stover nuts, lock washers and blue loctite for everything.
- You'll need regular & ratcheting wrenches as well as sockets and extensions. Also one of those magentic extendo wands for when you drop bolts in the plate and cant reach them.
- Keep al the hardware barely hand-tight until the end. You will need some play in the whole thing as you move from one section to the next. It sucks to have to go back through and loosen some of this stuff to get 1/32 towards the end.
bobfriesenhahn
Hooked
Since the bolts are such a pain, maybe the solution is to use a welder to weld everything in place. Then bring a battery-powered angle grinder on the trail in case you need to make any repairs.
Really appreciate all the help on this project.Here's the incorrect instructions I was provided. That triangle drain plug cover is clutch, but its just a plate with the holes countersunk so you can put flathead bolts into it and get them to bolt into the main plate. The instructions have the hardware list, but these are for the gen 1 plates, not what you and I have. I have fucking PTSD from just thinking about what I went through by myself to get this up. However, its indestructible and I'm super happy with it after hanging my truck up on the rocks at Uwharrie. Here's some tips and some of the major areas it differs:
I forget how long it took me, something north of 12 hours. I was constantly putting it up, finding issues, lowering peices, fixing issues, then putting pieces back on. I did have a couple of things loosen up after the first couple of hundred miles that required some adjustments and more loctite. Even with stovers and loctite the bolts from the front wings to the front plate come a little loose once a year (engine vibrations) and I have to go crank them down as routing maintenance. But like I said, it was worth it. I overcame all the bullshit and now all 4 wheels could come off my truck on the highway and I'd be ok.
- The 2 piece gas tank plates. Bolt these together on the ground well, very well. Then follow the instructions and once your brackets are installed use a jack with a board to press the skid up to the gas tank. You will likely have to raise and lower it a few times and adjust the brackets to get it to line up. The tolerances are extremely tight. Don't be scared to drill out if you need an extra 1/32nd of an inch. Hit it with some spray paint to prevent rust.
- Speaking of which, dont do this with a lot of gas in the tank. You are removing and then replacing some of the bolts that mount it.
- The front plate's wings (step 25). The motor mounts don't look at all like the picture and yours look like mine. Go under there BEFORE you start doing anything with the wings, a flashlight, and some spare nuts. Look up and you'll need to find the existing bolts in there and figure out what size they are. DO NOT REMOVE THE EXISTING NUTS. The wings should fit over them and you use the excess bolt to put a nut on. I think I put a washer in between the exisitng bolt and wing. You'll understand what I mean when you see it. Basically this whole area is bullshit and you'll have to engineer it yourself. Just do it before you start.
- One of the black brackets will bolt to the center of the midplate and requires you to use self-tapping screws to mount ti to the tub. This wont fit either and you'll need to come up with a spacer or re-bend it, or redrill it. Again, some bullshit you'll have to re-engineer on your back. I did this step last since the whole system needs to move a bit during install.
- If you have a lift and installed spacers under the driveshaft carrier bearing then dealing with the gas tank bracket over there might be tough. I had to grind a little extra clearance off the spacers because they touched the bracket. So get ready to redo that whole thing.
- My life was a ton easier by getting 1.25"x3/4" bots instead of the supplied ones. Sometimes 1" is all that will fit in tight spots, but that extra quarter inch will bve a life saver other times. Also get stover nuts, lock washers and blue loctite for everything.
- You'll need regular & ratcheting wrenches as well as sockets and extensions. Also one of those magentic extendo wands for when you drop bolts in the plate and cant reach them.
- Keep al the hardware barely hand-tight until the end. You will need some play in the whole thing as you move from one section to the next. It sucks to have to go back through and loosen some of this stuff to get 1/32 towards the end.
Might be a bit of overkill, but considering what is ahead of me might be an option.Since the bolts are such a pain, maybe the solution is to use a welder to weld everything in place. Then bring a battery-powered angle grinder on the trail in case you need to make any repairs.
Disciple Off Road
Hooked
Assuming this was a joke.....Since the bolts are such a pain, maybe the solution is to use a welder to weld everything in place. Then bring a battery-powered angle grinder on the trail in case you need to make any repairs.
Hope you get it all figured out since you already spent the money but man, what a pain in the butt for something that already comes on the Jeep.I know that Hauk Offroad has gone out of business and this will be a long shot. I have gotten a Hauk Offroad skid plate set for my Jeep Gladiator. However it does not have any of the hardware and I cannot find any instructions. I would love to hear from someone that has this setup so I can get some insight on what else I may be missing. Not sure if I have all the brackets and braces. Any help or insight is appreciated.
Thankfully didn't spend too much. Really need the extra protection since I do wheel a little harder than I probably should.Assuming this was a joke.....
Hope you get it all figured out since you already spent the money but man, what a pain in the butt for something that already comes on the Jeep.
ScoobyCarolanNC
Active Member
You’d be fucked if you welded this on. Honestly it is a huge pain in the ass, but it is bulletproof. I did some dumbshit that caused an upper oil pan leak. Got the dealer to warranty 2 repairs, but after that I decided to ensure I’d never go through that again. When I bought the kit it was $1200, came powder coated to match granite crystal, and I waited 2 months for it. I almost shipped it back to them, but that would have been wicked expensive. I’m a rookie wheeler and east coast trails are tight and without a lot of options. Besides, we’ve all been through crazy upgrade projects that don’t go as planned. It builds character & pride!
My only regret about it? It covers the mid section of the frame rails making it impossible to install evo rocksliders without cutting it.
My only regret about it? It covers the mid section of the frame rails making it impossible to install evo rocksliders without cutting it.
Last edited: