Evo mfg long arm bolt on kit help

Tree Frog

Member
Once I had mine close to where they needed to be I used some oil (synthetic motor oil) and put a few drops down through the slit in the top of the long arm where the lock down bolt goes through. Then I put the Jeep down on the tires and adjusted the pinion angles as needed. Even though I was close it still took quite a few turns to get the angles right.

The length of the arms should not affect the ride height of the Jeep as stated earlier.
 

DWiggles

Caught the Bug
Im going to try and tackle this as well in the near future, havent bit the bullet yet on the parts, however I am planning out how long the install is going to take and what else is needed.

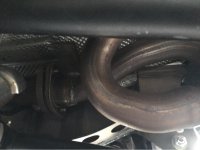
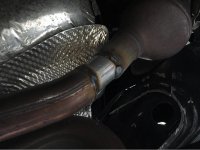
Tree Frog, it looks like you were able to keep the exhaust loop? EDIT: did you have to do anything with it? spacer or anything?

My plan is to install/bleed the brakes and remove front DS prior to starting, then barrow the shop at work (NON Automotive, so this will be on jackstands) over a weekend and cut the fronts with a plasma, grind clean, mark up, drill minimal to bolt in the front brackets, grind clean, Bolt up front brackets, burn them in, weld on the axle C's while installing the rear springs/track bar bracket, paint everything, install the front arms, put the jeep down, set caster and head home. MAXIMUM allowance for IN the shop time will be from Friday 6pm, until Monday morning 7am. Do you think this is feasible? I have NEVER installed a lift on any jeep before.

I will barrow the shop again a following weekend to basically do the same thing with the rear arms... Do you think the timeline is feasible? Or should I try to find another solution? (Sawzall in my garage, drill/install ALL bolts, then just use the shop to weld it up after the fact)
 
Last edited:

Tree Frog

Member
Re. the exhaust loop; it took a while for me to get my head around how to do it that's for sure.
What I did was to cut out the loop and the connector piece (I know that's not the right name for it but I cant remember right now what it's called) Throw away the connector piece as you wont be reusing it.
Cut the loop ends as close to 90 degrees right angle across the pipe as possible and cut the down pipe and remaining exhaust pipe also at a 90 degree angle.
I did add in a spacer piece from a 12" section of 2 1/2 inch exhaust tail pipe piece I bought for about 7 bucks at Autozone. I used the center of a paper towel roll as a template.
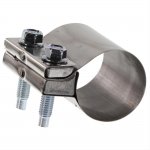
Get those band clamp things that the good muffle shops use. They are about 3-4 inches wide stainless band and have 2 bolts that go through them and clamp like crazy on the pipe.
sum-693250_xl.jpg
This way you can take it apart later. I did weld on the spacer piece up on a bench once I had my angles all right. Then just clamped the 2 ends. No joke it did take a while to get it right.

Really wanted the ends tight where they met so there was less chance of the band clamp getting burnt through. 2000 miles on it now and it is still good to go.
I have no idea how someone would weld this thing back in. maybe with a small TIG torch and the cut down tungsten cap but even that would be tight as heck to do. Would love to watch on of the experts do it.

As far as doing the front of the long arm kit in one weekend, I feel its pretty ambitious to attempt that. There are other threads where I posted how long it took me to do it. :cheesy:
The quote I got for the long arm kit alone was 24-26 hours and the full Double D or DTD was 40 hours. This was from an absolute pro shop that does them all the time. All the right tools, plenty of manpower and great knowledge of the project. I wanted to do it myself for the experience and as a hobby.

The front is a lot easier in my opinion. The one big hang up is the exhaust loop.

The rear is another story as you have to pull the rear part of the exhaust and the fuel tank. The exhaust is no big deal, however the fuel tank is a major PIA. Remember ratchet straps are your friend. Make sure to use up all of the fuel first. Don't try to siphon it as you cant. Once pulled there is a way to remove the screen in the filler neck but you have to have access to the filler neck right where it goes into the tank.

Let us know if you get in a bind or have any questions.

Hey Ralfman 5 hope it went well for you.
 

DWiggles

Caught the Bug
Re. the exhaust loop; it took a while for me to get my head around how to do it that's for sure.
What I did was to cut out the loop and the connector piece (I know that's not the right name for it but I cant remember right now what it's called) Throw away the connector piece as you wont be reusing it.
Cut the loop ends as close to 90 degrees right angle across the pipe as possible and cut the down pipe and remaining exhaust pipe also at a 90 degree angle.
I did add in a spacer piece from a 12" section of 2 1/2 inch exhaust tail pipe piece I bought for about 7 bucks at Autozone. I used the center of a paper towel roll as a template.
Get those band clamp things that the good muffle shops use. They are about 3-4 inches wide stainless band and have 2 bolts that go through them and clamp like crazy on the pipe.
View attachment 168039
This way you can take it apart later. I did weld on the spacer piece up on a bench once I had my angles all right. Then just clamped the 2 ends. No joke it did take a while to get it right.

Really wanted the ends tight where they met so there was less chance of the band clamp getting burnt through. 2000 miles on it now and it is still good to go.
I have no idea how someone would weld this thing back in. maybe with a small TIG torch and the cut down tungsten cap but even that would be tight as heck to do. Would love to watch on of the experts do it.

As far as doing the front of the long arm kit in one weekend, I feel its pretty ambitious to attempt that. There are other threads where I posted how long it took me to do it. :cheesy:
The quote I got for the long arm kit alone was 24-26 hours and the full Double D or DTD was 40 hours. This was from an absolute pro shop that does them all the time. All the right tools, plenty of manpower and great knowledge of the project. I wanted to do it myself for the experience and as a hobby.

The front is a lot easier in my opinion. The one big hang up is the exhaust loop.

The rear is another story as you have to pull the rear part of the exhaust and the fuel tank. The exhaust is no big deal, however the fuel tank is a major PIA. Remember ratchet straps are your friend. Make sure to use up all of the fuel first. Don't try to siphon it as you cant. Once pulled there is a way to remove the screen in the filler neck but you have to have access to the filler neck right where it goes into the tank.

Let us know if you get in a bind or have any questions.

Hey Ralfman 5 hope it went well for you.
Thanks Tree Frog! :thumb:

I'm not sure I followed you with how to keep the loop, but it sounds complicated... lol, cutting it off and then just taking it to an exhaust shop afterwords may be the way to go. some people wanna keep the loop due to "back pressure" or whatever but honeslty, I believe your biggest pressure drop will be at the cats, so I'm not really worried about this creating any issues past them. :yup:
 
Last edited:

Tree Frog

Member
Good job Piginajeep. For some reason it just did not occur to me. Probably lack of sleep HA.
No it was a real bear to get lined up just right and now that I have got it, well it would be no trouble at all to mark it good, slip the clamp down a bit and then tack it before pulling it apart to weld.

Yeah good idea. :thumb:
 

piginajeep

The Original Smartass
Good job Piginajeep. For some reason it just did not occur to me. Probably lack of sleep HA.
No it was a real bear to get lined up just right and now that I have got it, well it would be no trouble at all to mark it good, slip the clamp down a bit and then tack it before pulling it apart to weld.

Yeah good idea. :thumb:

Oh trust me, I've done worst from lack of sleep and just wrenching for hours..

Anymore I learn to say fuck it and move on to something else.
 

ralfman5

New member
I read somewhere in the forum that the rough country exhaust is not compatible with the Eco long arm..I just started on the front.. Doing the passenger side.. Much easier then the rear. Only problem I have is drilling the 1/2 holes on the frame, my drill is too long. But I'm going to weld the bracket so I hope that is enough. I also can someone here tell me the orientation of the upper arms? Does the bend go towards or away from the frame?? Thanks
 

Tree Frog

Member
The direction the bend goes is confusing.
Best way to describe it is that follows the contour of the frame.
So the bend will be inboard.
It will only work one way, put it on the wrong way and it will hit the frame.

Glad to see you back at it.
 

ralfman5

New member
Tree Frog: the driver side.. U mean if I hit a pot hole it will make contact? Meineke is only a few minutes away.
 

Tree Frog

Member
Okay I will try to make sense.

Question was "Can I just do the one side"?
What I thought you meant was that you were going to only install the longarm set on the passenger side for now. Not advised.

I am out of town and reading / writing with this phone is not my strong point.

As far as driving with the loop removed to get down to Meinike, yeah you shoul be fine.

The question about the direction to install the upper front control arms is where I was referring to the bends going inboard as if put on upside down / wrong they will hit the frame at ride height.

Sorry I don't make a lot of sense sometimes.
Just to busy for my own good.
 

ralfman5

New member
The autocorrect on my iPhone screws me up... Sorry. I meant to ask if I can install the driver side bracket with the factory loop ,without the modification?
 

Tree Frog

Member
No Sir,
Sorry but that loop will be right in the way of the bracket and the control arm.
If you go back to page 2 of this thread you will see what the loop look's like after being flipped and then reinstalled.

I recommend cutting the loop out. Getting the bracket installed, the control arm installed, and finally the driveshaft. Then start figuring out where the loop can be fit into the middle of all this.

And some wonder what took me so long....:cheesy:

Looking back on it, the install seemed a lot easier than it was. Bet after three or four I could get good at it. :naw:
 

dchew

Caught the Bug
I temporarily flipped the loop and clamped it in place with some flex exhaust tube. That held together well enough for a few weeks until I got a welder to sew it up right.

Dave
 
Top Bottom