GraniteWilly
New member
Hi all, not sure if this is helpful or not but I thought I’d share my DIY hockey puck bump stops. I’ve heard plenty about using hockey pucks, but I haven’t come across a write-up yet, so here’s what I ended up doing.
This is for 1” bump stops, super easy to add more if needed.
What you’ll need:
Tools:
Punch
Hammer
Drill
Drill press
1/4” drill bit
5/16” drill bit
3/8” drill bit
1/2” wood boring bit or similar
3/4” wood boring bit or similar
3/8” tap (same thread as 3/8” bolts below)
Front:
(2) Hockey pucks
(2) 3/8” x 1.5” all thread hex bolts
Back:
(2) Hockey pucks
(4) 1/4” x 1.25” all thread hex bolts
(4) 1/4” nylon lock nuts
(4) 1/4” washers
The rear bump stops are simple since there is no coil removal involved.
All I did was drill two holes opposite each other on the hockey pucks about as far to each side as possible without drilling past the edge (it just so happens that it’s the same width apart as the pre-drilled holes on the axle housing). I used the 1/4” bit in my drill press for this. I’m sure it’s do-able by hand drill if need be
Next, I used the press and the 1/2” boring bit to countersink the heads of the bolts.
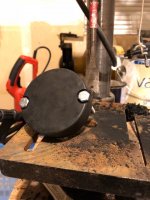
After that’s done I simply bolted them onto the rear axle housing using the 1/4” hardware (washer on the underside).
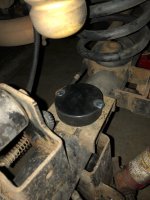
The front is a little more involved since I needed to pull the coils and drill/tap holes in the lower spring perches.
Once the springs were out, I center punched the perches and drilled using the 5/16” bit and tapped them with a 3/8” tap.
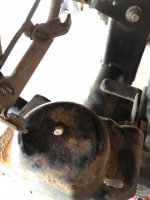
To make the stops, I center punched the pucks and drilled 3/8” holes.
Next, I countersunk the bolt heads with the 3/4” boring bit.
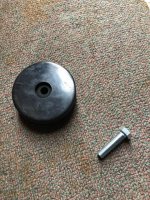
Finally, I mounted the pucks to the freshly tapped spring perch using the 3/8” bolts.
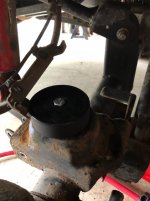
If I ever need more bump stop I’ll use the stops I’ve already made as a template and drill a couple more pucks. Then all I’d need is longer hardware and they’ll stack right up.
I hope this was helpful to someone, I’m pretty happy with the results myself. The best part is that pucks are about $1.50 on Amazon.
This is for 1” bump stops, super easy to add more if needed.
What you’ll need:
Tools:
Punch
Hammer
Drill
Drill press
1/4” drill bit
5/16” drill bit
3/8” drill bit
1/2” wood boring bit or similar
3/4” wood boring bit or similar
3/8” tap (same thread as 3/8” bolts below)
Front:
(2) Hockey pucks
(2) 3/8” x 1.5” all thread hex bolts
Back:
(2) Hockey pucks
(4) 1/4” x 1.25” all thread hex bolts
(4) 1/4” nylon lock nuts
(4) 1/4” washers
The rear bump stops are simple since there is no coil removal involved.
All I did was drill two holes opposite each other on the hockey pucks about as far to each side as possible without drilling past the edge (it just so happens that it’s the same width apart as the pre-drilled holes on the axle housing). I used the 1/4” bit in my drill press for this. I’m sure it’s do-able by hand drill if need be
Next, I used the press and the 1/2” boring bit to countersink the heads of the bolts.


After that’s done I simply bolted them onto the rear axle housing using the 1/4” hardware (washer on the underside).


The front is a little more involved since I needed to pull the coils and drill/tap holes in the lower spring perches.
Once the springs were out, I center punched the perches and drilled using the 5/16” bit and tapped them with a 3/8” tap.


To make the stops, I center punched the pucks and drilled 3/8” holes.
Next, I countersunk the bolt heads with the 3/4” boring bit.


Finally, I mounted the pucks to the freshly tapped spring perch using the 3/8” bolts.


If I ever need more bump stop I’ll use the stops I’ve already made as a template and drill a couple more pucks. Then all I’d need is longer hardware and they’ll stack right up.
I hope this was helpful to someone, I’m pretty happy with the results myself. The best part is that pucks are about $1.50 on Amazon.
Last edited:
