Rubicon310
New member
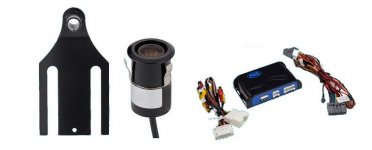
This is a write up for anyone interested in installing the PAC BCI-CH21 module with the Raxiom camera and bracket for 2007-2016 Jeep Wranglers with the 430n stereo. I'm sure it will work with other stereos but I don't have experience with them. I can only answer questions for the 430n touch screen stereo.

I'll start this thread off by saying
1. I'm in no way affiliated with Pac Audio.
2. Out of respect to the forum owners, i will not list the website where this kit was purchased from.
3. The instructions that came with the kit are horrible, hard to follow and even after calling them directly, I was still confused.
This module works great if you plan on installing a backup camera and don't want to spend the 50-150 dollars at the dealer for a flash. It will also allow you to unlock the navigation while driving.
I will list the steps in order to make it easier to follow. Any questions you may have, please post here and I will be more than happy to help answer them.
Part 1
1. Remove the spare tire.
2. Mount the metal bracket on the studs and insert the camera into the bracket.
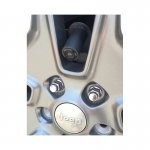
3. Remove the oval rubber grommet on the gate located to the right side of the tire. Make a 1 inch slit along the top and insert the camera wire through.
••NOTE: Several people have used the same rubber grommet as the one for the third brake light, I found it easier to use the one on the right.
4. Remove the horizontal long plastic wire cover that is located inside of the tailgate.
5. Use a wire style clothes hanger and feed it through the outside hole on the gate that the oval rubber grommet was on and out through the inside of the gate towards the hinges.
••NOTE: I put a small bend at the end of the clothes hanger and cut it 1/3 the length. This was extremely easy to do.
6. Electrical tape the camera wire to the opposite end of the clothes hanger and SLOWLY pull the rest of the hanger through the holes, brining the camera wire into the gate.
Part 2
7. Connect the extension to the camera wires and run along the passenger side.
••NOTE: Plastic panels do not need to be removed. Lift carpet slightly as you bring the wire towards the front and tuck wire under carpet and between panels. Reinstall the plastic gate panel from step 4
8. Bring wire up passenger kick panel, behind glove box and into stereo area. NOTE: removing glove box will make it easier to get the wire into the stereo area.
Part 3
9. Remove plastic panel below steering wheel, remove 4 screws and pull dash panel. If you google how to remove stereo on JK, you will find many great videos on how to do this.
10. With the stereo out, unplug the factory harness ONLY.
11. Plug the gray BCI-CH21 harness where the factory radio harness was.
12. Plug the white BCI-CH21 AUX harness into other unused port in the head unit.
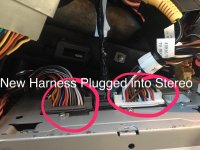
13. Plug the factory radio harness into the gray BCI-CH21 harness.
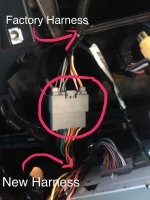
14. Disconnect the yellow RCA in the white BCI-CH21 Aux harness and connect the yellow male rca from the camera wire into the female plug.
15. Connect the red power wire from the camera to the red power wire on the gray BCI-CH21 harness. Find a good ground for the black wire from the camera and ground it.
••NOTE: I grounded mine to a screw on the metal plate located behind the stereo.
16. Lower the dip switches on the BCI-CH21 box for channel 1 and 2 NOTE: channel 1 unlocks the camera and channel 2 unlocks the navigation use while vehicle is in motion. The other two dip switches should be left in the up position.
17. Plug the white 20-pin plug and the 3 pin plug from the BCI-CH21 harness into the back of the BCI-CH21 box.
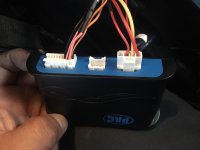
18. I put the module in the pocket right behind the window switch. Plenty of room in there to access the box if needed in the future.
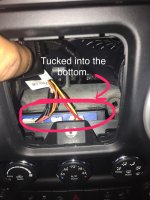
19. Test and reinstall stereo and dash.
The backup camera should turn on when the vehicle is put into reverse. If towing a trailer and you would like to view the camera, hold the left side "preset" button on the steering control for 3 seconds.
To unlock the navigation while driving, hold down the right side "source" button for 3 seconds then again for another 2 seconds.
Hope this helps. Post here with questions.
Sent from my iPhone using WAYALIFE mobile app


I'll start this thread off by saying
1. I'm in no way affiliated with Pac Audio.
2. Out of respect to the forum owners, i will not list the website where this kit was purchased from.
3. The instructions that came with the kit are horrible, hard to follow and even after calling them directly, I was still confused.
This module works great if you plan on installing a backup camera and don't want to spend the 50-150 dollars at the dealer for a flash. It will also allow you to unlock the navigation while driving.
I will list the steps in order to make it easier to follow. Any questions you may have, please post here and I will be more than happy to help answer them.
Part 1
1. Remove the spare tire.
2. Mount the metal bracket on the studs and insert the camera into the bracket.

3. Remove the oval rubber grommet on the gate located to the right side of the tire. Make a 1 inch slit along the top and insert the camera wire through.
••NOTE: Several people have used the same rubber grommet as the one for the third brake light, I found it easier to use the one on the right.
4. Remove the horizontal long plastic wire cover that is located inside of the tailgate.
5. Use a wire style clothes hanger and feed it through the outside hole on the gate that the oval rubber grommet was on and out through the inside of the gate towards the hinges.
••NOTE: I put a small bend at the end of the clothes hanger and cut it 1/3 the length. This was extremely easy to do.
6. Electrical tape the camera wire to the opposite end of the clothes hanger and SLOWLY pull the rest of the hanger through the holes, brining the camera wire into the gate.
Part 2
7. Connect the extension to the camera wires and run along the passenger side.
••NOTE: Plastic panels do not need to be removed. Lift carpet slightly as you bring the wire towards the front and tuck wire under carpet and between panels. Reinstall the plastic gate panel from step 4
8. Bring wire up passenger kick panel, behind glove box and into stereo area. NOTE: removing glove box will make it easier to get the wire into the stereo area.
Part 3
9. Remove plastic panel below steering wheel, remove 4 screws and pull dash panel. If you google how to remove stereo on JK, you will find many great videos on how to do this.
10. With the stereo out, unplug the factory harness ONLY.
11. Plug the gray BCI-CH21 harness where the factory radio harness was.
12. Plug the white BCI-CH21 AUX harness into other unused port in the head unit.

13. Plug the factory radio harness into the gray BCI-CH21 harness.

14. Disconnect the yellow RCA in the white BCI-CH21 Aux harness and connect the yellow male rca from the camera wire into the female plug.
15. Connect the red power wire from the camera to the red power wire on the gray BCI-CH21 harness. Find a good ground for the black wire from the camera and ground it.
••NOTE: I grounded mine to a screw on the metal plate located behind the stereo.
16. Lower the dip switches on the BCI-CH21 box for channel 1 and 2 NOTE: channel 1 unlocks the camera and channel 2 unlocks the navigation use while vehicle is in motion. The other two dip switches should be left in the up position.
17. Plug the white 20-pin plug and the 3 pin plug from the BCI-CH21 harness into the back of the BCI-CH21 box.

18. I put the module in the pocket right behind the window switch. Plenty of room in there to access the box if needed in the future.

19. Test and reinstall stereo and dash.
The backup camera should turn on when the vehicle is put into reverse. If towing a trailer and you would like to view the camera, hold the left side "preset" button on the steering control for 3 seconds.
To unlock the navigation while driving, hold down the right side "source" button for 3 seconds then again for another 2 seconds.
Hope this helps. Post here with questions.
Sent from my iPhone using WAYALIFE mobile app
Last edited:

