scull20
New member
Let me preface this with the following:
1. I have never done auto-body work before.
2 I have never done auto-body work before.
3. I've never done body work before.
4. The techniques displayed in this write-up are a combination of a handful of YouTube videos and some coaching a week beforehand by a friend of mine who is well versed in body work.
5. If you see something here that makes you cringe, please suggest a better method.
Tools used:
1. Stud welder kit, with slide hammer (Harbor Freight, HF)
2. Body Hammers (HF)
3. 1 Qt. of Bondo brand body filler (HF)
4. 2 small packs of body filler spreaders (HF)
5. Mixing board (get a handful of disposable ones from a body supply store)
5. Palm Sander (I had one already, pick your favorite)
6. Angle Grinder (HF)
7. 80 Grit Flap Disc (HF)
8. Pack of 100 Grit Sanding Sheets (Home Depot, HD)
9. Pack of 200 Grit Sanding Sheets (HD)
10. Pack of 400 Grit Sanding Sheets (HD)
11. Pack of 600 Grit Sanding Sheets (HD)
12. 2 Sheets of 1000 Grit, Wet/Dry sanding Sheets (Body shop supply)
13. Automotive Primer, Rattle Can (HF)
14. Single stage rattle can of your body paint color, in my cause Bright White: PW7 (Auto body supply will mix this for you...about $30, make sure to specify single stage as it has the base coat and clear coat mixed together.)
15. End-nippers (HF)
16. Nitrile gloves (HF)
17. Painters Tape/Newspaper for masking.
18. Sanding block
19. Rubbing compound
Step 1: Get a dent (this was an oops on my part while going up a hill and over a rock...slid off the rock and back into it, pushing/scratching this panel pretty well.)
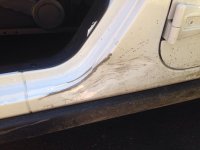
Step 2: Grind the dent. Take the angle grind with the 80 grit flap disc and grind the dented area plus the surrounding area down to bare metal.
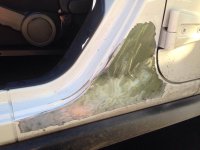
Step 3: Pull the dent. I would suggest taking to YouTube and looking up techniques on pulling a dent using a stud welder. The gist of it is, you will spot weld studs onto the dented area and use the slide hammer to bang out the dent from the outside. Start from the shallowest area and work your way to the deepest area. I used almost 200 studs to pull this dent. You will end up removing the studs and putting new ones on "a little to the left/right etc." to work the dent out using the slide hammer. Grind the heads of the studs down if they don't come off using the end nipper. This is a fairly arduous process. Again, I highly suggest watching some videos on YouTube on how to use a stud welder and slide hammer to pull a dent. One thing to note, the slide hammer in the kit from HF is garbage and ended up slipping off the studs towards the end of the day...I ended up returning the whole kit, but it at least worked for my purposes for a little while.
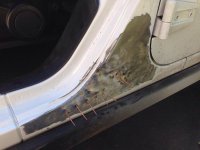
Step 4: Bang the dent. Use the body hammers to lower the high spots that your may have created with the studs. This is something I had a difficult time getting a grasp of. I'm not positive how to use each of the body hammers correctly, so I ended to picking the one I liked and going nuts, heh. Again, I would suggest catching a few YouTube videos on this subject if you wish.
Step 5: Bondo. This was an interesting step for me. WEAR GLOVES...WEAR GLOVES...WEAR GLOVES, this is nasty stuff to get on your hands/skin! Take out your mixing board and glop a sparing amount of Bondo on it. Squirt an appropriate amount of hardener into your glop of Bondo. Less is more with the hardener...you've got a few minutes to work with it before it goes from toothpaste consistency to solid. If you use too much hardener it will turn solid is a matter of about 30 seconds of mixing (ask me how I know). As far as mixing goes, use on the spreaders and mix it all together trying not to get air bubbles. The goal here is to use the Bondo to smooth out the surface of body of fine high and low areas. It's a similar concept to spackling drywall. This stuff has one hell of an odor and needs to be applied in an extremely well ventilated area (I was outside on a breezy day and still ended up with a headache). Keep your coats on the thin side and let it sit for 10-20 min between coats. I sanded between coats with 100 grit sandpaper and the palm sander. I did about 3 light coats. Once you get the surface where you want it, smooth using the palm sander with 200 grit sandpaper, then 400 grit. After the 400 grit you should have a pretty smooth surface to work with.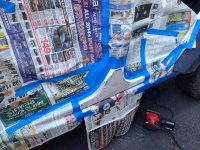
(I did some preliminary taping and masking.)
Step 6: Prime. A couple of coats of automotive primer. Light/even coats, let it dry as directed on the can between coats. I taped at the edges of this panel to hide paint lines the best I could. If you get some running don't worry as you should be able to get it out once it dries. Once the primer is fully dry, scuff it lightly with 600 grit sandpaper. I did this with a sanding block by hand and NOT with the palm sander, which would have most likely been too aggressive. At this point it'll be pretty apparent whether you have achieved a smooth dent free finish. If you screwed up a little like me, you can sand with a more aggressive grit and add more Bondo then reprime.
View attachment 102795
(The sun screwed this picture up)
Step 7: Paint! Take your single stage rattle can and have at it! As I mentioned previously, light even coats work best. I did 3 coats before I was satisfied. One thing to note, I chose a single stage method of painting. Single stage rattle cans have the base coat and clear coat mixed together. You can do them separately if you'd like, and with a paint gun for that matter. For my purposes, the single stage rattle can was the best way to go.
Step 8: Buff/Polish. Get a small tube of rubbing compound and rub it in the area that you painted (after it's fully dry of course). If you choose to do this by hand you'll want a more aggressive compound...if you have a buffing wheel (I didn't) then something less aggressive would be better.
Here is my finished product. It's not perfect by any means...but it was a hell of a lot cheaper than a body shop to fix and I learned a lot in the process. I should note that I'll probably end up getting evo skins to put over this area, but I won't have a big void back there anymore.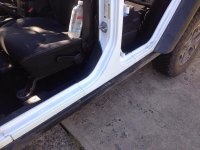
Please feel free to add your comments or suggestions on how this can be done differently/better/more efficiently/etc.
I hope that someone else will find this useful. If you have any questions for me I'd be happy to help!
-Ryan
EDIT: I'll fix that broken pic and my typos tomorrow when I'm not on my phone.
1. I have never done auto-body work before.
2 I have never done auto-body work before.
3. I've never done body work before.
4. The techniques displayed in this write-up are a combination of a handful of YouTube videos and some coaching a week beforehand by a friend of mine who is well versed in body work.
5. If you see something here that makes you cringe, please suggest a better method.
Tools used:
1. Stud welder kit, with slide hammer (Harbor Freight, HF)
2. Body Hammers (HF)
3. 1 Qt. of Bondo brand body filler (HF)
4. 2 small packs of body filler spreaders (HF)
5. Mixing board (get a handful of disposable ones from a body supply store)
5. Palm Sander (I had one already, pick your favorite)
6. Angle Grinder (HF)
7. 80 Grit Flap Disc (HF)
8. Pack of 100 Grit Sanding Sheets (Home Depot, HD)
9. Pack of 200 Grit Sanding Sheets (HD)
10. Pack of 400 Grit Sanding Sheets (HD)
11. Pack of 600 Grit Sanding Sheets (HD)
12. 2 Sheets of 1000 Grit, Wet/Dry sanding Sheets (Body shop supply)
13. Automotive Primer, Rattle Can (HF)
14. Single stage rattle can of your body paint color, in my cause Bright White: PW7 (Auto body supply will mix this for you...about $30, make sure to specify single stage as it has the base coat and clear coat mixed together.)
15. End-nippers (HF)
16. Nitrile gloves (HF)
17. Painters Tape/Newspaper for masking.
18. Sanding block
19. Rubbing compound
Step 1: Get a dent (this was an oops on my part while going up a hill and over a rock...slid off the rock and back into it, pushing/scratching this panel pretty well.)

Step 2: Grind the dent. Take the angle grind with the 80 grit flap disc and grind the dented area plus the surrounding area down to bare metal.

Step 3: Pull the dent. I would suggest taking to YouTube and looking up techniques on pulling a dent using a stud welder. The gist of it is, you will spot weld studs onto the dented area and use the slide hammer to bang out the dent from the outside. Start from the shallowest area and work your way to the deepest area. I used almost 200 studs to pull this dent. You will end up removing the studs and putting new ones on "a little to the left/right etc." to work the dent out using the slide hammer. Grind the heads of the studs down if they don't come off using the end nipper. This is a fairly arduous process. Again, I highly suggest watching some videos on YouTube on how to use a stud welder and slide hammer to pull a dent. One thing to note, the slide hammer in the kit from HF is garbage and ended up slipping off the studs towards the end of the day...I ended up returning the whole kit, but it at least worked for my purposes for a little while.

Step 4: Bang the dent. Use the body hammers to lower the high spots that your may have created with the studs. This is something I had a difficult time getting a grasp of. I'm not positive how to use each of the body hammers correctly, so I ended to picking the one I liked and going nuts, heh. Again, I would suggest catching a few YouTube videos on this subject if you wish.
Step 5: Bondo. This was an interesting step for me. WEAR GLOVES...WEAR GLOVES...WEAR GLOVES, this is nasty stuff to get on your hands/skin! Take out your mixing board and glop a sparing amount of Bondo on it. Squirt an appropriate amount of hardener into your glop of Bondo. Less is more with the hardener...you've got a few minutes to work with it before it goes from toothpaste consistency to solid. If you use too much hardener it will turn solid is a matter of about 30 seconds of mixing (ask me how I know). As far as mixing goes, use on the spreaders and mix it all together trying not to get air bubbles. The goal here is to use the Bondo to smooth out the surface of body of fine high and low areas. It's a similar concept to spackling drywall. This stuff has one hell of an odor and needs to be applied in an extremely well ventilated area (I was outside on a breezy day and still ended up with a headache). Keep your coats on the thin side and let it sit for 10-20 min between coats. I sanded between coats with 100 grit sandpaper and the palm sander. I did about 3 light coats. Once you get the surface where you want it, smooth using the palm sander with 200 grit sandpaper, then 400 grit. After the 400 grit you should have a pretty smooth surface to work with.

(I did some preliminary taping and masking.)
Step 6: Prime. A couple of coats of automotive primer. Light/even coats, let it dry as directed on the can between coats. I taped at the edges of this panel to hide paint lines the best I could. If you get some running don't worry as you should be able to get it out once it dries. Once the primer is fully dry, scuff it lightly with 600 grit sandpaper. I did this with a sanding block by hand and NOT with the palm sander, which would have most likely been too aggressive. At this point it'll be pretty apparent whether you have achieved a smooth dent free finish. If you screwed up a little like me, you can sand with a more aggressive grit and add more Bondo then reprime.
View attachment 102795
(The sun screwed this picture up)
Step 7: Paint! Take your single stage rattle can and have at it! As I mentioned previously, light even coats work best. I did 3 coats before I was satisfied. One thing to note, I chose a single stage method of painting. Single stage rattle cans have the base coat and clear coat mixed together. You can do them separately if you'd like, and with a paint gun for that matter. For my purposes, the single stage rattle can was the best way to go.
Step 8: Buff/Polish. Get a small tube of rubbing compound and rub it in the area that you painted (after it's fully dry of course). If you choose to do this by hand you'll want a more aggressive compound...if you have a buffing wheel (I didn't) then something less aggressive would be better.
Here is my finished product. It's not perfect by any means...but it was a hell of a lot cheaper than a body shop to fix and I learned a lot in the process. I should note that I'll probably end up getting evo skins to put over this area, but I won't have a big void back there anymore.

Please feel free to add your comments or suggestions on how this can be done differently/better/more efficiently/etc.
I hope that someone else will find this useful. If you have any questions for me I'd be happy to help!
-Ryan
EDIT: I'll fix that broken pic and my typos tomorrow when I'm not on my phone.
Last edited:
